Tuesday, December 31, 2019

Wrapping Up the Year

Hello! I'm so glad you stopped by for the last post of 2019!  I always feel a bit emotional on New Year's Eve-the ending of another year and the exciting promise of the new year.  This year was a rough one with a lot of personal struggle and the loss of my Dad.  I'm hoping 2020 will bring happier days and new opportunities.

I'm also excited to share some new creations and a peek at one of my Christmas gifts.  My husband must have told Santa I was extra good this year because I got a set of blending brushes in my stocking this year!!  I am so excited about getting to play with these, but first they needed a proper home.  I had an old baking powder can in my 'things to alter' crate, and I thought it would make a good holder for these beauties!  Of course, something this special needed not only a proper, but also an attractive home!  I thought since the brushes will one day be all inky, a grungy theme was in order.  I had a pattern paper from Paper Studio that I have been holding on to for just the right project, and this was it.  A little linen ribbon, a metal flower and I was finished!


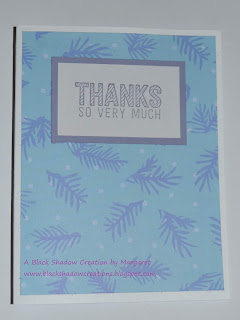
Of course, I couldn't let the rest of that paper go to waste, so I used every scrap of it to make 4 thank you cards!  They were super quick and look a little more masculine, so they were a great addition to my card stash!


I think the card is also a great way to end my year of blogging.  Being thankful for the blessings of 2019 and looking forward to even more in the new year. And to my loyal visitors, Thanks a Million!


Saturday, December 28, 2019

Thankful Holidays!

Hello! I had every intention of posting one more time before Christmas to share the last of my Christmas card designs, but then life happened. I got busy and ended up sending off my last cards without taking a picture. Sigh...  I kept thinking I would make more and could photograph the new ones, but with all of the festivities, that didn't happen!  Instead, I embraced the moment and enjoyed Christmas with my family.  I even squeezed in a lunch date with my co-workers.  We never eat at the same time at work, and this was a wonderful opportunity to get together and visit outside of work.

I actually didn't even go in my craft room until today.  I've really missed the creative process, but the time with my family has been so special.  After a quick tidy up, I was ready to make my thank you cards for my students and co-workers.  I went with a simple design this year, and I really like the wintry color combo.  The pattern paper was from a pack I bought at Wal-Mart long, long, ago.


I am now finished with all my thank yous and can relax, and enjoy the rest of my Christmas break.  Tomorrow is going to kick off my return to scrapbooking. I haven't done any of that for a few weeks!  I'm looking forward to getting a lot of pages added to albums.  Wish me luck!

Although Christmas Day has passed, I would like to wish everyone a blessed holiday season and may your new year be filled with peace, love, and happiness!  

Card Recipe:  Paper-whisper white, wisteria wonder, paper from stash, Ink-wisteria wonder, Stamp Set-Simply Wonderful

Friday, December 20, 2019

Glittery Greetings!

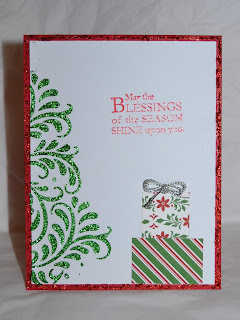
Hi! Today I'm here with something a bit new!  I've been putting a lot of effort into using my older supplies for Christmas cards, but I just had to play a little with a new stencil and new color of glitter gel I bought at our LSS.  I used a border stencil, with a tilt to create that glittery green tree. It was a bit tricky to get the placement right and not get glitter where it didn't go, but I thought it made a great tree.  What I wasn't counting on was all the white space left on the layer.  A quick change in plans led to the gifts made of DSP.  A Christmas tree should have gifts, right?!


I heat embossed the sentiment to make it stand out a bit and then ran some cherry cobbler dazzling details around the edge to frame the card in glittery goodness!  A lot more time then I usually spend on Christmas cards, but it was a lot of fun!

I will  have a few more posts with Christmas cards and then I'll be back in scrapbooking mode after the holidays.  Thanks so much for visiting today!

Card Recipe: Paper-whisper white, real red, Dashing Along DSP, Stamp Set-Star Studded Season, Ink-real red, versamark, Accessories-Gina K Autumn Wishes stencil, holiday pine glitz glitter gel, silver twine, clear embossing powder, cherry cobbler dazzling details

Wednesday, December 18, 2019

O Christmas Tree

Now that I've put that song in your head, I'm ready to share my cards for today, both feature trees, so this seemed like the perfect title!  The first has more of a wintry feel, while the second is quite traditional for Christmas.  I really like both of them!

I used the oval framelits on both because they seemed to frame the focal points perfectly.  I also dug a bit of satin ribbon out of my stash as well. (I really need to use more ribbon...there is so much in my crafty space!)


I managed to find a purpose for a lot of narrow strips of real red paper on the second card. I still have a lot of this size scrap left, but every little bit helps, right?

Well, we are neck deep in finals, but I can see Friday in near future, so there's that to look forward to!  I am so glad you came to visit and hope you have a great day!

Card Recipes: Paper-Home For Christmas DSP, Season of Cheer DSP, real red, very vanilla, soft sky, whisper white, Stamp Sets-Reason for the Season, Evergreen, Ink-mossy meadow, river rock, Accessories-oval framelits, whisper white satin ribbon

Monday, December 16, 2019

Merry Monday- More scrappy cards

Hello! I am back to share more of my holiday cards, and once again, I challenged myself to use scraps!  I am proud to share that I have finished my cards and will be posting them in the days leading up to Christmas. 

I'm also pretty excited that in one week, I won't have to get dressed for work and can enjoy my coffee in my jammies!  Christmas Break can't come soon enough!  I really love my job, but DD1 is home from college and I am enjoying every minute we have together (when she's not running off with her boyfriend and friends).  It will be nice to have a whole day to hang out and make some memories.

My cards today have a rather nontraditional color scheme, but since I love blue, I'm loving these colors together!


This one is a bit more traditional, and I actually used a whole piece of DSP to make six of this style.  I also played a bit with punches and layers on the focal sentiment.


Thanks so much for visiting and have a wonderful day!

Card Recipes: Paper-Snow Festival DSP, baja breeze, cherry cobbler, whisper white, gumball green, Stamp Sets-Joyous Celebration, Crazy for Christmas, Timeless Tidings, Ink-soft suede, gumball green, tuxedo black (memento), assorted markers, Accessories-small oval punch, 2 x 1 3/8 oval punch, decorative label punch, cherry cobbler scallop dot ribbon

Saturday, December 14, 2019

Scrapbook Saturday- Christmas Past

 Hello! I'm changing things up a bit and sharing a scrapbook page I made a few days ago when I was on my scrap using mission.  I have almost used up the whole pack of paper and I'm thinking by next Christmas, I may have most of my older Christmas paper used up.  I have several packs that only have one or two full sheets, and I'm doing my best to use up the baggies of scraps as well, so who knows!

The photo is an old one as well, taken by our church historian on Christmas Eve at the Children's Mass.  She is great about sharing photos, which I appreciate since I'm usually helping at the Children's Masses and can't take my own photos.


A dig through my Christmas accessories turned up the glittery branch cut outs that fit the background paper so well.  I also added a tree shaped tag that came from a gift many moons ago.  It was too pretty to toss and now it has a permanent home.  I also used a vellum quote that fit this page perfectly.

I have one more week of school before my two week break, and I am really looking forward to some down time to refocus on scrapbooking.  DD2 graduates in May and I have lots of pages that need to be done before then! Wish me luck!!

Thanks again for stopping by and I hope you find some time this winter season to slow down and enjoy the creative process!  Have a fabulous day!

Page Recipe: Paper-Holly Berry Bouquet DSP, bits and pieces from my stash of goodies


Friday, December 13, 2019

Flashback Friday-Christmas Stickers and Paper

Hello! I've been digging through my Christmas papers again and found some older DSP and as luck would have it, I had a partial sheet of stickers that coordinated perfectly! SCORE!!

I also went with a tri-fold card base which I haven't used in quite a while! It gave the perfect place for me to add those stickers!!


I'm slowly filling my box with cards and using up all that old paper at the same time!  I just might finish before Christmas after all!

I hope to share the last of my Christmas cards next week! Until then, thanks so much for stopping by and have a wonderful day!

Card Recipe:  Paper-Holiday Treasures DSP, old olive, very vanilla, Accessories-Samantha Walker stickers, pearls, 1 3/4 circle punch

Wednesday, December 11, 2019

Scrappy Christmas!

Hello! I am so glad you are here!  I have more Christmas cards to share today and am proud to say that I used up a lot of scraps on these!  I am so bad at keeping bits and pieces of paper and then not using them. This time I was determined to see how many cards I could make with a pile of scraps. I ended up with one of each pictured, except the Season's Greetings in the second photo- I made four of those!!  It felt great to make a little dent in the baggie of smaller pieces!


I don't really have a lot of explaining for these. I just played around with the pieces until they looked right.  

Thanks so much for visiting and have a fabulous day!!

Card Recipes: Paper-Holly Berry Bouquet DSP, real red, very vanilla, Stamp Sets-Miracle of Christmas, Curly Cute, Sidekick Sayings (all SU), Blessed Christmas (Stampabilities), Ink-chocolate chip, real red, wild wasabi, so saffron, Accessories-ovals framelits collection, chocolate chip ribbon

Monday, December 9, 2019

Merry Monday- Santa's Coming!

Well, hello there! I am so glad you stopped in and if you read the title, you know I have another Christmas card to share.  I'm in a bit of a panic because I am still not finished with my Christmas cards and Christmas will soon be here!

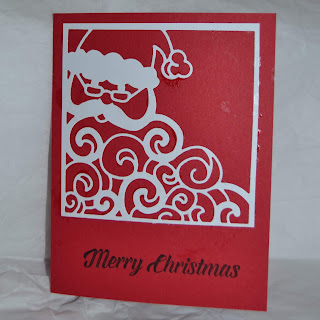
I've been carving some time out to work on them, but between work and all of the other holiday prep, it has been slow going.  Today's card helped me add a few more completed cards to my box and I love how pretty Santa's beard looks on this!  I was worried about how the thinlit would work because I couldn't find the mat that I usually use with my detailed dies, but it cut like a champ.  My real issue ended up dealing with attaching the die cut to the card base.  I used my precision glue, but it was still a bit messy.  I could use the adhesive sheets, but I hate the idea of wasting all of the pieces that are cut away... yes, I know, too frugal for my own good...


Although I wasn't crazy about the shine from the dried glue, I still think these turned out pretty well, and I love the red, black, and white combo.

I will be back Wednesday with more cards, and I'll even have a Flashback Friday for you too!  Thanks so much for visiting and have a great day!

Card Recipe: Paper-real red, whisper white, Stamp Set-Timeless Tidings, Ink-Memento Tuxedo Black, Accessories-Detailed Santa Thinlits

Saturday, December 7, 2019

Small Things with Great Love

Hello! Today I'm sharing a beautiful card made by a dear blogging friend, Heather.  She really is the sweetest person and always sends the prettiest cards!

I received this beauty for Thanksgiving and it included a very thoughtful note inside.  It really made my day, and reminded me that while we enjoy creating things, the cards we share and send with others really can make a difference. It also reminded me of a quote, "We can do no great things, but we can do small things with great love."


So today I leave you with a challenge to not only make things, but share them with others!  Thanks so much for stopping by and have a wonderful day!

Monday, November 18, 2019

Merry Monday-Frosty Christmas Greetings

Hello! I am back with some super glittery goodness for a Merry Monday! I know I have already mentioned my recent obsession interest in stencils and today I'm showing off the efforts of working with my most recent purchase.  When I saw the Winter Farmhouse stencil from Simple Stories, I had visions of glittery snowflakes against a dark blue sky and looked forward to the day I would get to create this vision!

Our recent snow day gave me the chance to play and I was so happy with the results!  While it took a bit of time to use the stencil and glitter gel, and then more time to let it dry; the finished card has a very simple elegance to it and I love that the shimmery snowflakes are still the 'star' of the show!


I even did a little stamping on the inside so it wouldn't feel too plain!  I had so much fun stenciling that I made ten of these lovelies to add to my box, and I'm a little closer to being finished before Thanksgiving!


I hope you are inspired to do a little stencil magic of your own!  Thanks so much for stopping by and have a fabulous week!

Card Recipe: Paper-night of navy, whisper white, Stamp Set-Special Season (SU), Ink-night of navy, old olive, Accessories-Winter Farmhouse stencil (Simple Stories), white glitz glitter gel (Gina K)


Friday, November 15, 2019

Snowy Woods

Hi! I am so happy you are here!  I've managed to make a few Christmas cards to add to my box and while I was waiting for the glitter gel to dry on one design (gotta come back Monday to see that one!),  I decided to play around with embossing and sponging with a snowy woods scene.

I have pinned several ideas, but decided to just do my own thing for this one.  I started out inking the trees in very vanilla on the flip side of this, but didn't like the end product, so I turned the paper over and did the reverse.  The trees had a chilly vibe about them, and I thought this would make a good card to send to someone who is missing a loved one. Christmas isn't always merry and jolly for everyone and the sentiment on the inside is reflective of that as well.


I'm hoping to find a little more time this weekend to get a few more cards made.  My goal is to use two different DSP packs that are almost gone to make the rest of my cards, but I'm sure I'll break the rules and do a few unique ones as well!  Can't be too rigid when it comes to Christmas and holiday cards!!

Thanks so much for stopping in and I hope you have an amazing day!

Card Recipe: Paper-soft suede, naturals ivory, Ink-very vanilla, soft suede, Stamp Set- Curly Cute, Timeless Tidings, Accessories-woodland textured embossing folder, ink dauber

Tuesday, November 12, 2019

Belated Happy Mail post!

Hello! Today I have a very special card to share with you! My incredibly talented and sweet blog friend, Heather, sent me the most adorable Halloween card in October!  I thought it was so special that she thought of me and I immediately gave it a place of honor on our mantel.  I totally forgot to take a picture and post it until today when I was packing up the last of my Halloween decorations.  Isn't this just the sweetest little witch?!


We had our first actual snow of the year last night, mixed with a sleety rain and freezing temperatures, which gave us our first official snow day of the school year.  While I am enjoying the unscheduled day off, I really am not ready for winter... I'm hoping we'll still have one last glimpse of fall temperatures before winter officially settles in.

My surprise day off gave me the chance to sneak back into my crafty studio space.  I worked on some Christmas cards which will be shared later this week.  I'll probably be taking a break from scrapbooking until all of those Christmas cards are ready to be sent, but I'm already looking forward to Christmas break and spending a few days locked away to get more pages done!

Thanks so much for stopping by and have a great day!

Saturday, November 9, 2019

Scrapbook Saturday-stencil fun!

Hello! So glad you are here! I have a little confession to make...I've bought more stencils... Yes, I know I promised to use all my old supplies... Does it count if I bought the stencils to use up my old cardstock??  Please say yes!!

In the last few months, I have rediscovered the joy of visiting my LSS and talking with the owner whom I have known for a very long time!  Even if I don't buy much, it is so inspiring to wander through the store and get new ideas. The downfall to this is I discover new things that I love and really want to play with-like stencils!

I have had stencils in my stash for a very long time and when I first got them I did use them, but they were sometimes difficult to work with and I didn't like some of the ink marks that didn't blend correctly.  So I stopped using them and they sat there. And sat there...and sat there. Until one day I saw that my friend Hannah was teaching a class on stenciling using a variety of mediums.  I signed up, attended, had a blast, and was hooked.  I now have pixie spray that holds those stencils in place so it's easier to ink and glitter them up, and I am the proud owner of a growing collection of glitter paste.  The blending brushing to eliminate those pesky ink lines are on my wish list and I'm hoping Santa thinks I've been good enough to deserve them!  Did I mention I bought new stencils? LOL!

I am giving myself permission to indulge because it has reconnected me with some creative ideas and some good friends as well.  My last visit led to the purchase of two different snowflake stencils that I couldn't wait to use.  The one I'm sharing today is from Taylored Expressions and it made a fabulous 
background for  some snowy pics that have been in my stash.

my new stencil, white craft ink, and a dauber
(it actually worked well for this technique, but I'm
still asking for those brushes!!)

my blue paper got an upgrade!

pulled out some old 3D stickers to finish out the page

Had so much fun, I made another one!!

While I know I need to use my old supplies, it was a lot of fun to add something new to my table.  And...since this new stencil helped me scrap two pages of older photos with old embellishments, I'm still calling this a win for using up my stash!

My other stencil has smaller snowflakes and I'm thinking a little white glitter paste will make some wonderfully sparkly Christmas cards.  Guess I've found my inspiration for Monday's Christmas cards!!

Thanks so much for visiting and I hope you have a wonderful weekend! Find some time to play!! You won't regret it!


Thursday, November 7, 2019

Throwback Thursday-Feeling Fallish

Welcome! I'm not sure what the weather is like where you are, but it is feeling a lot like winter here, which really stinks because I LOVE fall!  We went from summer to a week of fall temps to winter and I wasn't finished with autumn!  I always love the chill in the morning air and the beautiful changing leaves that make fall in southern Indiana so special.  It has always been my favorite time of year and it is always so fleeting...

Today I managed to feel a little like fall while sharing this scrapbook page.  The photos are from many years ago on a beautiful fall day when my husband's nephew got married. The day and the decorations were the epitome of autumn and we had a wonderful time visiting with family.


I think everything on this page is throwback! Old cardstock base, old paper flowers, and even the journal block was a scrap of white paper I had laying in a basket.  I cut the letters with my cricut and ran them through the xyron sticker maker.  I am getting closer to finishing that 2011 album and I'm hoping I can squeeze creating those pages in between making Christmas and holiday cards. Wish me luck!!

Thanks so much for stopping by and I hope whatever the weather, you make it a great day!!

Monday, November 4, 2019

Merry Monday (and not a minute too soon!)

Hello!  While I am not nearly ready for Christmas, I am ready to get those cards going so I'm not rushing around at the last minute!  If all the rest of my cards are as easy and quick as today's I'll be done in no time!

I recently purchased a sheet of paper that had 12 3x4 blocks on it and they were absolutely perfect for making Christmas cards.  I know I made a pledge to use up my stash, but if it helps me get cards created quickly so I can make more pages, well...guess I just had to make the sacrifice! Ha!

I found that some of the blocks worked better with different shades of green, red, or blue, but once I had that figured out, it literally took me minutes to emboss the base and glue the layers together. Easy peasy! There were two blank frames that I stamped with sentiments, but other than the embossing, there really wasn't much to do.  Sometimes it's nice to have pretty papers do all the work for you!


So now I have 12 cards in my Christmas stash.  That's not nearly enough, but it's a start!  Thanks so much for stopping by today. I promise my next MM will have a little more effort put into it!  Have a wonderful week and I hope you find some time to be creative too!

Saturday, November 2, 2019

Scrapbook Saturday-Picture Perfect Sunsets

Well, hello! I cannot believe it is November already. 2019 is almost gone...how did that happen??  It has been rather chilly here and it seemed like the perfect excuse to stay inside and create.  

I decided to stop passing over these photos and finally get them on a page.  I took these one evening as the girls and I were outside admiring the beautiful evening sky.  We were in awe of the lining around the clouds and the beautiful blending of colors.  While I love the photos, I wasn't sure how I wanted to use them in the girls' scrapbooks.  After digging through some different papers, I came across a page that had journaling blocks.  I saw the 'wish' block and everything clicked into place.  We often think about the future of our children and hope everything will turn out well for them.  Recently, I've done a lot of reflecting and while I want my girls to be successful, I really want them to enjoy the everyday beauty and gifts that are often overlooked when we're too busy trying to be successful.  So I made a list of wishes to include in the album so they will always know what Mom means when she wishes them the best! 


This was another quick and easy page.  I already had the sunflower stamped and fussy cut from a play day making a thank you card, so all I had to do was add some leaves and the journal blocks.

Today, I also started on my Christmas cards and will be sharing them on Monday.  They were super, super easy and I now have 12 cards in my stash!! Woot! Woot!

Thanks so much for stopping by and I hope you have a fabulous November!!

Monday, October 28, 2019

Geocache, anyone?

Hi! I'm so glad you stopped by today! As if you couldn't guess, I'm sharing yet another scrapbook page, and (gasp!) the base is actually a relatively new paper!!  I got this fun house paper by Bo Bunny from a crop I attended this spring.  Everything else is rather old, but hey, gotta have a little fun with new stuff too!


The other pattern paper is Sycamore Street (SU) and I used some foam letter stickers, and spotty scallop ribbon to finish the page off.

This page has the only photos I have of my girls and their cousin Geocaching.  He introduced the girls to this treasure hunting activity and they loved locating the 'treasure' containers, even if they only contained a piece of paper.  They've gone on several adventures together, but this time I was along AND had my camera ready.  Another wonderful memory captured and ready for the album.

Thanks so much for stopping by today!  As we get closer to Thanksgiving, I will probably spend a little less time posting.  Since this is the last Christmas my baby will officially be living here full time, I want to soak up every last minute!  I hope you have a wonderful day and encourage you to make some wonderful memories of your own!

Saturday, October 26, 2019

Scrapbook Saturday-Trip Revisited

Hello! Today's pages are from a long ago trip to visit family near Chicago.  It was a great trip where we simply visited with loved ones and did a whole lot of nothing!  I was excited that it was finally light enough to get some photos of the wind farm that we passed on the way.

I used a lot of older supplies on these pages. I don't think there is anything on here less than 5 years old!  Both pages use Delicate Dots (SU) and I finished them with some older stickers and tags I've had in my stash.


Once again, pretty simple pages, but when you are as far behind as I am, simple is a good thing!

Thanks so much for visiting and have a wonderful weekend!

Thursday, October 24, 2019

Throwback Thursday-Waterfall of Photos

Welcome to throwback Thursday where everything is old, even the special technique for displaying lots of photos at once.

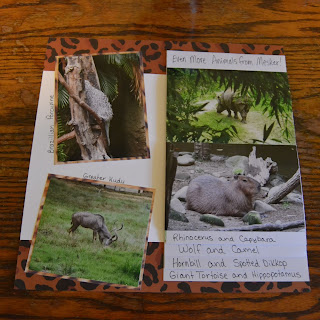
Our family has always loved watching animals.  Whether it's at the zoo or in their natural habitat, animals always amaze us.  Because of this, we often have an overabundance of animal photos.  I have found that the best way to put all of these wonderful pics on a page is using the waterfall technique.  You can buy ready made kits, but I think it's just as easy to make my own.  I don't really have dimensions, but basically, you cut the paper to the width of your photo and make each layer a little longer than the next.  I stapled my layers at the top and folded a strip of paper to cover them.  


The animal print paper was the last of a safari pack from many, many years ago.  It felt good to give the scraps a proper spot.  I also managed to find a home for the zoo letters.  They are more for little kids, but I figured this might be the last chance I can put them on a page before my girls grow up too much!

Thanks so much for visiting and have a terrific rest of the week!

Harvest of Friends

Hello! Well, my fall break is almost over and I can't believe I have not finished the first scrapbook page... DH has been in the process of remodeling our bathroom (last room in the house to be finished!!), and I've been trying to keep the house somewhat clean and organized during this process.  Add in two college visits, filling out financial aid forms, putting up fall decorations, and cleaning up some of the landscaping and my week is about shot!  I'm not going to complain though because it has been  a beautiful week and it looks like Saturday is going to be rainy and nasty, so maybe I can lock myself away then!

We also went to a co-worker's home Tuesday evening for a carry in dinner, drinks, and a campfire.  It was a beautiful evening and everyone from our teaching team was able to make it.  We don't get the chance to spend time together outside of school very often, and it was so nice to relax, eat wonderful food, enjoy a cozy fire, and talk about things other than work.  Of course, we did a little of that too, but tried to keep it to a minimum!

It was such a wonderful night and I wanted to let my co-worker (who is also a dear friend) know how much we appreciated her sharing her home with us for the evening.  I had also been seeing a lot of cards using the beautiful flower from Painted Harvest (SU), and I really wanted to play with that set to see where inspiration led.  I pulled different details from several different cards, so I don't have any one person to credit for this creation.


I've also been watching some videos showing how to use stencils to mask off  most of the card.  I knew those stencils that came with Just Journaling would come in handy eventually! I've never used them with the stamp because I didn't like the way the edges looked after I stamped, but it worked perfectly for the oval sponging area!  I used Barely Banana and Pumpkin Pie for the two shades in the oval.  I think they would have looked better if I had used a blending brush, but I didn't want to dig out the one I have.  The new set of brushes from Taylored Expressions would have worked fabulously...but Santa didn't bring me any early gifts, so I'll just have to wait.  After sponging the oval, I got busy stamping and fussy cutting the flower, die cutting the twig, leaves, and friend. I added a bit of sponging to the edges of the fussy cut flower to cover the white, and also added a little ink to the leaves to add dimension.  A strip of ribbon, a button, and a little background DSP and it was finished.

This was probably the most supplies I have used on a card in a reeeeeeaaaaaaaaly loooooong time! Because of this, I'm adding a 'card recipe' to the bottom in case you're interested.  Lots of inks used to create the depth and shading!!  The flower alone is a combo of daffodil delight, crushed curry, cajun craze and early espresso.

I'm hoping to play a little more with the dies and stamp set I used today.  There are so many possibilities and it was a lot of fun just playing around with different ideas.  I've also ordered a new Tim Holtz leaves die that I'm picking up tomorrow from our LSS.  I think I may have a problem...LOL!  At least I haven't gone out and bought a bunch of papers!  I'm still sticking to my goal of using up what I have to finish some scrapbooks before adding anything new.  Waaaay too much paper taking up space in my studio at the moment!!

Thanks so much for visiting and I hope you find some time to play with your craft supplies and make something amazing!  Have a wonderful day!

Card Recipe: Paper-Orchard Harvest DSP (SU ret), whisper white, always artichoke, early espresso, Ink-early espresso, crumb cake, cajun craze, always artichoke, daffodil delight, crushed curry, pumpkin pie, barely banana, Stamp Set- Painted Harvest (SU), Accessories- early espresso ribbon, Well Written dies (SU), Funky Floral dies (TH), oval stencil from Just Journaling stamp set (SU)

Tuesday, October 22, 2019

It's a potpourri of pages

I often like to come up with creative titles for my blog posts, but today all I could think was "these don't go together at all...".  It reminded me of the big bags of potpourri that used to be so popular.  The things didn't necessarily make sense together, but the scent was nice.

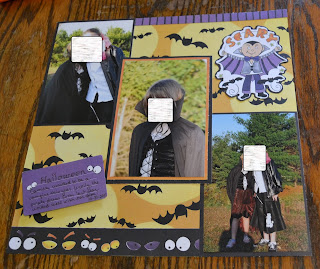
So today is a potpourri of pages.  They don't fit a theme, but I'm sharing them all the same! LOL!  The first page features some lovely Halloween pictures of the DDs.  I pulled out a Halloween paper pack that I've had forever and a day, and had never used it!!  It had papers, borders, journaling blocks, and cut out embellishments.  As you can see, I used a little of all of those.


 Page two is from my nephew's confirmation.  He is now a senior in college, so that makes these pics rather old as well.  I kept things simple with some papers from Woodland Walk and some letters cut with my Cricut. I fed them into my Xyron sticker maker so I wouldn't have to mess with gluing those little letters down.

The last two pages were also pretty simple.  A little more Woodland Walk, Cricut letters, and the last of the photos of our huge hickory tree.  If you want to zoom in on the pics, you'll see the lovely snake that just didn't want to abandon it's home.  My brother and I both felt bad about having to kill it, but when it struck at my brothers leg, he decided he wasn't going to risk getting bit.  


Well, I hope you enjoyed my potpourri and my snake photos didn't scare you off (or gross you out, sorry...).  I'll be back later this week with more pages.  Thanks so much for stopping by!

Saturday, October 19, 2019

Scrapbook Saturday-Pretty Pages

Hello! I have another quick post to share today.  We are officially on fall break and DD#2 and I are going to sneak some college visits into our week of relaxing and enjoying the beautiful fall weather.  But today is about getting a few more pages in the albums and I'm hoping to finish 2011 and 2012 by the end of next week.  Wish me luck!!

If my new pages go together as quickly as these did, I shouldn't have any trouble with that goal.  When I have the right pages, all I need are a few embellishments and some photo matting.  I'm not even sure where the first page came from... I'm thinking it may have been a gift from a crop since I don't remember buying it.  I added a few stickers and some pearl centered flowers and that was pretty much it.  The pink tab next to the second photo is actually a journaling block I tucked in behind the photo.  I haven't used this technique in a while, but I love how it keeps the pretty paper uncluttered. 


 The second page was equally easy.  I wasn't sure when I would ever use the alphabet paper, but this back to school photo worked perfectly.  I added a quote from a sheet and a journaling block from a Project Life kit I bought a loooong time ago. 

I really hope my pages don't get too boring for my blog viewers!  I really have a lot of memories to record in albums and time doesn't seem to be slowing down to wait for me to catch up!  I will probably take one day to work on cards since I'll be needing some birthday cards soon, and I really need to work on my Christmas cards if I'm going to have those ready in time. 

Well, I really need to do something productive like laundry and cleaning today, so I better end this with a thanks for stopping by and have a fabulous weekend!

Thursday, October 17, 2019

Throwback Thursday-Digging through the embellishments

Today's throwback features several embellishments I have had for a very long time.  These were the cut out pieces that come on a full sheet of cardstock.  I'm not sure what to call them, but you fussy cut them and then used them on your pages.  I have about 5 sheets of them and decided it was time some of them found a permanent home.

This page contains photos from a family reunion many years ago.
It is amazing to see how all of the kids have grown since then!

This page also contains older photos.  I think this may have
been the last time our girls went swimming with their daycare 
friends before they stopped going there.

I also managed to use some bits and pieces of pattern paper and some older cardstock bases, so these truly are throwbacks in every way!

Thanks so much for stopping by and have a wonderful day!

Saturday, October 12, 2019

Scrapbook Saturday!

I'm back as promised with a couple of pages!  I have been making some time to get more scrapbooking done.  Even though things have been a bit crazy, I am enjoying the downtime I give myself every week.  It has been a lot of fun going through pictures and I've even managed to organize and use some of my neglected and forgotten supplies.

Today's pages used some old papers, old stickers, old embellishments, and old pictures! The only newer thing I used was a page I bought about a year ago that was perfect for cutting into borders. I used several on these pages.


These are from DD#1 12th birthday party.  She and several friends had a pizza party and each guest created a scrapbook page for her at the party.  I put all of the pages in a smaller album for her, but never got the pictures printed until recently.  Not only did I finish that album, but also the two pages for her annual album!  It was fun playing with my supplies and remembering all the fun of that day. It is hard to believe that this same beautiful soul will soon be 21...  Don't do the math and remind me of how far behind I am!  

I hope you have enjoyed my pages and maybe are inspired to complete a few pages of your own.  Thanks so much for stopping by and have a wonderful weekend!


Wednesday, October 9, 2019

Leftovers never looked so good!

Hello! I haven't been able to post for a while, but have been creating quite a lot lately!  I will be sharing lots of scrapbook layouts soon, but wanted to share some fun cards I made using scraps that were in a pile on my table.  They all came together quite quickly and now I have extra cards and less scraps!


I didn't write down the supplies I used for these and I hate to admit that I'm a bit lazy today, so if you would like to know what I used, please ask in the comments and I'll share that info with you!  I hope you enjoyed my 'leftover' cards and who knows, maybe you'll be inspired to make some leftovers of your own!

Thanks so much for visiting and have a wonderful day!

Tuesday, September 3, 2019

Thanks for being you!

Hello! Today I have a thank you card to share.  I made several of these to send to my co-workers and friends for the kindness they showed during and after my dad's passing last month.

I used the stamp People Like You.  I always use markers to color this stamp because it is just so pretty with the different colors together on one layer.  This time, I actually stamped the sentiment frame separately, punched it out and added dimensionals to give it a little more layering.  I pulled out Sycamore Street DSP (ret) and the matching summer starfruit ribbon to finish off the card.


I work with a great group of people, and even those who retire still keep in touch and join in the occasional gathering.  When I called in to work to let them know I was going to stay with Dad, everyone was so kind and telling me not to worry about work and to focus on family time.  They knew I was concerned since it was the first week of school and there was so much going on.  I received so many texts checking up on my family and telling me to take as much time as I needed. It really helped ease my mind and made doing the right thing quite a bit easier.  After Dad passed, there were cards, more texts, and food arriving and the promise of a very special memorial gift.  They were paying for the dried flowers from Dad's floral arrangement to be made into a rosary and a bracelet for me.  I thought that was such a special way to remember him and wanted to make some equally special thank you cards for them. I was also reminded of a Charles Schulz quote"In Life, It's not where you go, it's who you travel with".  They definitely make my work 'road' a little smoother and happier!

Thanks so much for stopping by and reading my ramblings! Have a terrific day!


Saturday, August 31, 2019

Scrapbook Saturday-Pretty Sketchy

Hello! Today I have two pages using one sketch.  I loved the ability to use up some of my pretty papers with all those circles!  I found the sketch on a closed group on Facebook, so I'm not sure I can share the link here.  I pretty much followed the sketch exactly so you have some idea what it looked like!

I used some very old DSP from SU called Cutie Pie, which is so fitting since all three girls in the pics are exactly that!  I punched several 1" circles, ran a couple of strips of pattern paper above and below my photos, added a rub on title on the first and stamped a journaling spot on the second.  I think I spent more time arranging circles in different order than I did on anything else!  I'm a bit anal when it comes to things like that...


I took an unexpected break from scrapbooking at the beginning of the month.  My dad has been battling cancer for two years and we knew from the beginning his time was limited.  The first Sunday in August, we had a wonderful day with family; and Dad had a great time watching the grandkids play whiffleball in the yard.  Three days later, he was unable to even get out of bed.  He passed away in his sleep the following Sunday.  I was blessed to be able to be with him nonstop those last four days.  As hard as it was to see him go, it helped me know that he is at peace now and no longer suffering.  My dad was (and still is) my hero.  I have learned so many important lessons from him over the years and we've always had such a special relationship.  As we were gathering photos for the visitation, I was struck by how many wonderful moments I had been able to capture and record over the years and even with all of my photos, there were still moments that I wished I had used my camera more... That is one of the wonderfully special things about scrapbooking, we call it a craft, hobby, or pasttime, but it is so much more than that.  It is freezing a moment in time so you can go back and relive it when you need to; and passing on a legacy of memories that links to a new generation who will never get the chance to meet in person.  I understand even more now, the importance of journaling on those pages, capturing the stories, and preserving not only the photo but the entire moment. Because at some point in time, it may be all that is left. Both comforting and sad at the same time...

Thanks so much for stopping by today! I hope you have a wonderful day!

Monday, July 29, 2019

Merry Monday-Mixing the old and the new

Hello!  Through the magic of technology, my blog post should be showing up around the time I'm in my first training for the school year.  I can't believe the summer is almost over...  I still have so much scrapbooking to do... Maybe I can ask for an extension?

Today, I have a Christmas themed page to share with you.  I used a pretty good mixture of older and newer items. The cardstock and two of the pattern papers are older, as is the tag, ribbon, and photo!  The agenda border and the strip under the photo were both from a new paper I bought about two months ago.  This was such a fun page that brought back great memories.  DD2 went on the annual Christmas field trip to a local assisted living/nursing home, and I was able to chaperone.  It was such a great experience for the students and it really warmed my heart to see the generations coming together and enjoying the morning.  Normally shy students were singing with their 'Grands' and even the rowdy kiddos reigned themselves in and enjoyed their new friends.


Thanks so much for stopping in today.  As the school year starts, I never know exactly how much 'free' time I'll have for creating and posting, but I'm going to do my best to keep my 'mental therapy' going throughout the year!  Have a great day and I hope you find some time to be crafty this week!