Showing posts with label top note die. Show all posts

Wednesday, January 2, 2019

Have yours'elf' a happy new year!

Hello and Happy New Year!  I am sharing one final Christmas project before leaving this wonderful holiday behind.  

One of my co-workers wanted to make something fun for her son's preschool class.  She showed me the picture of the candy cane elves and asked how hard they would be to make.  After a quick look, I realized everything was made with punches and that it would be pretty easy to knock these out.  The only punch I didn't have was the mitten...  She drew, traced, and cut out the mittens and I made the elf bodies and shoes.  She also did all of the final assembly.  The top photo shows a close up of the elves before they were attached to the candy canes and the bottom photo is the finished project.


I knew we did well when her son gave his approval and told us they look just like real elves!  We received our inspiration from Jackie Topa.  If you look up Candy Cane Elves, you can find the directions.  We simplified our version just a little, but I think they are still pretty cute!

I hope your new year is one filled with happiness and peace!  

Sunday, September 9, 2018

Scrappy Christmas Cards

Hello! Just a quick post with some Christmas cards I created from a pile of scraps.  I decided since so many of the scraps were pretty small, I would go with a quilted theme.  I'm not sure what you would call these particular quilt patterns, crazy??  No matter what you call them, they used up quite a bit of the smaller pieces of some very old Christmas DSP.  There are still a few bigger pieces left, but I think they'll have to wait for another day (maybe a scrapbook layout).

I pieced and glued my scraps onto a 4 x 5 1/4 piece of copy paper, ran the whole thing through the embossing folder and finished my card.  Not too difficult other than trying to find the right placement for the scraps...  I also managed to use the negative cut of a top note die that has been in my stash for a loooong time.  So glad it has a home now!


School and DD2 have been keeping me quite busy and I really need to get more Christmas cards made if they're going to be ready in time!  Wish me luck and thanks so much for stopping by!! Have a wonderful day!

Card Recipes:  Paper-real red, very vanilla, Merry Moments dsp, Ink-chocolate chip, Stamp Set-Joyous Celebrations, Accessories-oval and scallop oval punch, hexagon punch, top note die, square lattice folder

Thursday, June 28, 2018

Throwback Thursday Birthday

Welcome! I'm so glad you are here because I'm feeling a little proud today!  I've managed to use some goodies from my stash to make a card!! Yes, you heard correctly.  This card is made from left overs and bits & pieces!  The base is the only fairly new item on this baby!!

I am so bad at hanging onto things and then never using them, but since we moved a year ago, I have been trying to do better and use up those things or toss them(gasp!). Today's card used up 5 pieces from the 'throwback' pile!


The card base was part of a set from this year's Sale-a-bration, and it just so happens to coordinate with a stack of flowers I have from a very old SU kit.  The white frame was the leftover of a top note that I used quite some time ago in scrapbooking.  We won't discuss how many times I have passed over this piece before today...  After assembling all those goodies, all it took was a quick sentiment stamp and my throwback card is finished and I'm feeling all kinds of proud!

I hope I've encouraged you to use some of your throwback supplies! You know...when you use your supplies you have room to buy more!! Food for thought!  Have a wonderful day and thanks so much for stopping by today!

Monday, February 17, 2014

A Punchy Penguin and Thoughts on Morning

Hello and Happy Monday!!!! What's that you say? I can't use happy and Monday in the same sentence? Well, more on that later...

Recently we celebrated DD#1's birthday and she loves penguins so when I saw this @ I knew I wanted to recreate it for her card.  It was super easy to make too, thanks to all of the punches and the top note die!


I am happy to say she loved her card! I am one of those mean moms who won't let her kids eat cereal completely loaded with sugar.  A little sugar is ok but if it's more than 10 g, no dice... Did I mention diabetes runs in my DH's family?  So for her birthday, I indulged and bought a box of Cocoa Puffs for her.  When she woke up birthday morning she found her birthday card taped to the box of cereal.  I could hear her squeals at the other end of the house!  Such happiness coming from a non-morning person!!  Which leads to the second part of my post.

I recently came across a quote on pinterest that I just can't buy into.  It was something to the effect that since we choose to be happy, someone who is not a morning person chooses not to be happy.  Now I will admit I am NOT a morning person, but I do consider myself to be a happy person.  I do agree that we have to make a conscious effort to direct our moods and we can choose how we respond to things; I just don't think that not waking up chipper is a 'choice'.  I simply need a little more time to ease into my day.  My oldest DD is the same way-quite pleasant after you give her a chance to completely wake up. 

What is my theory? I think people are predisposed to their morning attitudes and sleep cycles.  When DD#1 was a baby, she would wake up and be content to lay in her bed for a while before calling for attention.  DD#2 (my morning person) would wake up and instantly want to be out of bed, changed and fed so she could start her day.  She even resorted to shaking the sides of her crib to get our attention as she got older! :)

I also think having morning lovers and haters in the same household leads to better social skills.  For example, DD#2 learned at a very early age not to talk to her sister until after breakfast, Mom required a cup of coffee before turning human, and Dad, well Dad worked nights so well all gave him a wide berth until after lunch!  The rest of us learned that no matter what we thought, DD#2 would never sleep in and would always have a perky smile on her face as soon as her feet hit the floor.  We don't have to like it but we accept it!  On the plus side, she is one person I never have to wait on to get ready.  She is usually dressed, breakfast done, and teeth brushed before I finish my first cup of coffee.  She also likes going out in the cold to start my car! Not sure where she got that gene, but so glad she does!!

So if you don't like mornings, especially Monday mornings, don't worry... You're in good company and I'm happy I'm not alone!  Hope you have a great week!

Card Recipe:  Paper-basic black, whisper white, pumpkin pie, elegant eggplant, Ink-elegant eggplant, stampin' chalk marker, Stamp Set-pennant parade, Accessories-top note die, 1" circle punch, oval punch, scallop oval punch, decorative label punch
  

Thursday, December 5, 2013

Day 5 of Accomplishments-Two birds with one stone...

No, I didn't kill the proverbial turtle doves... but I did manage to add two Christmas cards to my stash AND help DD#1 complete her demonstration speech.

DD had to give a demonstration speech at school. No problem right?  Well... no food of any kind, no live animals, and make it original... EASY...  Well, after a little thought we came up with the idea of her showing how to make a card.  After all, that is something she knows how to do very well and we wouldn't even need to run to the store for supplies.  So we went through some of my cards to find one she liked-no luck, but a quick scan through my photo album of completed projects turned up a pretty easy card for her to share with the class.  We worked together to create the first one and then she prepared the supplies for the demo card.  I am proud to say that she received an A on her speech and she was the only one to ever demonstrate how to make a card!

Apologies on the shadowy dark photos... I was working under the gun to get these downloaded before I went to bed last night.

Here is my version:


And the Grade A card created by DD:


Well, I'm off to dig out our stockings.  St. Nick comes tonight!! Maybe he'll bring me some craft supplies!! I hope that your holiday preparations are going well and that you are finding plenty of time to be creative! Have a fabulous day!

Card Recipe: Paper-real red, crumb cake, chocolate chip, Stamp Sets-Teeny Tiny Wishes, Ink-chocolate chip, Accessories-top note die, assorted ribbon scraps

Wednesday, August 22, 2012

Now that's my idea of quilting...

Hi! I am so glad you stopped in today because I am sharing a 'quilting' project we made at my stamp club meeting.  No, I didn't develop amazing sewing skills overnight! A shudder just ran down my spine thinking about that one!  But I do have a super easy way to give the feel of quilting to a card without touching a needle and thread.  


When I opened the package of Orchard Harvest DSP, I loved all of the great colors and fun patterns.  The country fabric style made me think of quilts.  So I set out to make my own.  This is by no means an original concept.  I have seen versions of this all over blogland and can't really credit any one person.  So if you've ever made a card similar to this, consider yourself credited and thanks for the inspiration!

I started with a 4x5 piece of cardstock (color doesn't matter, scraps would be fine) and attached 1 1/4" squares of different patterned paper.  It works a lot better if you start in one corner and work across and down at the same time.  Then I lined up the piece on the top note die and ran it through the big shot. Taadaa!    It can be made even more authentic with faux stitch lines from a marker or run it through the big shot inside an embossing folder.  I decided to keep this one simple.  I did however emboss the early espresso piece to dress it up a bit.  So there you go, your very own quilted card!

I hope you week is full of crafty goodness and thanks so much for visiting my little blog!

Card Recipe: Cardstock-island indigo, early espresso, very vanilla, Orchard Harvest DSP, Ink-early espresso, Stamp Set-Curly Cute,  Accessories-vintage wallpaper folder, top note die, large oval die, island indigo ruffled ribbon


Monday, January 2, 2012

Snowfall

Happy 2012! I hope that everyone had a wonderful new year!  Our's was pretty low key.  DH went to bed early because he had to work bright and early on  new years day.  The girls watched The Twilight Zone marathon and I crafted until 11:45 when we switched channels to watch the ball drop. Then we turned in for the night! Such wild and crazy party animals!!

One of my blogging friends invited me to join her in her new year's resolution of posting one scrapbook page a week.  Now, to be quite honest, I don't normally make resolutions because they tend to be very short lived (more like a 'to do' list for a week or two...), but this seemed like a wonderful plan to help keep me on track with my scrapbooking. So I am officially announcing that my new year's resolution for 2012 is to post at least one scrapbook page a week on my blog! (Oh the pressure...) I know that some of my dear friends will be sure to remind me if I start slipping on this!

So here is week number one's page-


Apologies for the shadows...the sun was starting to go down as I took my picture. It was also a little windy and my ribbon shifted as I took the picture.  It really is straight on the page now!  I used an old Page Maps sketch for my layout.

Page Recipe: Cardstock-baja breeze, early espresso, whisper white, Ski Slope DSP (ret), baja breeze DSP from subtles stack, Ink-early espresso, baja breeze (sponged around top note), Stamp Set-Broadsheet Alphabet, Accessories-top note die, baja breeze seam binding

Saturday, November 26, 2011

Tinted Glimmer Paper

A few posts back, I shared a picture of the glimmer paper ornaments I punched out and tinted.  I finally used these to make some Christmas cards. I got the information on tinting the paper and the card design from Debbie, you can see the full directions on her blog, but it's pretty basic.  I punched my ornaments first.  I took re-inkers and squeezed a little ink into a lid, then used the aqua painters and ink to paint the ornaments. You can use your heat gun to set the ink or if you do several, like I did, just put them on paper towel and let them air dry.  This was a little messy and my fingers were inky by the time I was done, but this really is a simple and fun, yet beautiful technique. I was amazed at the amount of shimmer that still came through and after sponging the edges with soft suede, they really took on an antiqued look.  Here is my card.


If you saw the card we made at the crop, this is the same layout, only I used linen thread for the 'hook' and the glimmer ornaments. Be sure to check back on my blog and see the other creative idea that came from my aqua painter and re-inkers!

Card Recipe: Cardstock-garden green, whisper white, glimmer paper, Ink- cherry cobbler & marina mist re-inkers, garden green, soft suede, Stamp Set-Lovely as a Tree, Accessories-ornament punch, linen thread, square lattice folder, top note die

Sunday, November 20, 2011

Crop Project #2

Friday night was our daycare and preschool's fundraiser Crop night.  This is the second project that I taught.


Recognize the branches of the tree?  It's the pine tree from Lovely as a Tree turned sideways and stamped twice! This card was a CASE of Debbie's card, I just changed the papers a bit.  I also did a card like this using the tinted glimmer paper and will show that picture soon.  The ladies really enjoyed this card!  Most of the people attending were scrapbookers and they loved trying something new.

Card Recipe:Cardstock-whisper white, garden green, cherry cobbler, marina mist, Stamp Sets-Lovely as a Tree, Word Play (sentiment), Ink-soft suede, garden green, cherry cobbler, Accessories- ornament punch, snowburst folder, square lattice folder, top note die, cherry cobbler bakers twine

Saturday, August 27, 2011

Getting personal and My first club project!

Today was my birthday (29 again!!) and it was a fabulous day!  Fridays are my early days at work and I'm usually finished by 11:30.  My wonderful husband took a half day of vacation and took me out to eat at a little Italian restaurant for lunch.  Then in the evening, my Mom called to sing Happy Birthday before our family went to our local Dairy Queen for dinner.  An entire day without having to cook or do dishes! Woo!Hoo!  I am feeling so blessed to have such a wonderful family to share this day!
I don't normally share much personal information on my blog because I figure most people come here to see ideas, but I also feel that my blog is an extension of me.  I've also made some wonderful friends through my blog.  I jokingly call them cyber friends since I have never physically met them, but we still get to know each other and share our love of creating with paper and stamps.  Sometimes we even motivate each other just by leaving a little comment.  I love my blogging friends! OK, I'm finished being all personal and mushy, so on the the creativity!

This weekend is my first club's first meeting and I am so excited.  Before becoming a demonstrator, I belonged to a club formed by my upline.  It was such a fun experience and it really encouraged me to use my supplies more often and in different ways.  I know we are going to have a wonderful time!  Since the summer mini ends in a few days, one of our cards features the stamp Sail Away.  I love this stamp even though I have never been on a sailboat!  I will be sad to see it go since it is such a great image for masculine cards.  I'm just glad I have it!!  Anyway, on to the card...


Originally, I knotted the twine in the center, but wasn't sure I liked it that way.  So I made another where it is just wrapped around and the knotted in the back where it's not visible.  I really wish I knew how to do some sailors knots...


Card Recipe: Cardstock-real red, whisper white, pacific point, Ink-jet black stazon, Stamp Set-Sail Away, Accessories-square lattice folder, top note die, white bakers twine, pastels

Wednesday, July 20, 2011

Pajama Party!

I found more preschool pictures of my youngest (now going into 4th grade...) that somehow were missed while scrapbooking her preschool years.  This was the day that our class had a pajama party (learning the letter p) and her Daddy, Pat the Policeman, came to visit.  She was so proud to be able to show him off and loved it when he let the children try on his hat.
I saw the sketch at Stamping 411 and I decided to adapt it to a scrapbook layout and finally get those preschool pictures into their album! The pink top note will hold the journaling that will be done tomorrow.


Layout recipe: cardstock-very vanilla, Lap of Luxury DSP (ret.), ink-concord crush, stamp set-Delight in Life (ret.), accessories-pretty in pink satin ribbon, top note die, 5 petal flower punch, decorative label punch

Tuesday, May 3, 2011

Crafty Sistah's Challenge-Scrapbook Layout

Since May is National Scrapbooking month, our Crafty Sistah's challenge was to create a page and give the 'recipe'.  Here it is...

For my family who is viewing this, I am very behind on my scrapbooking...
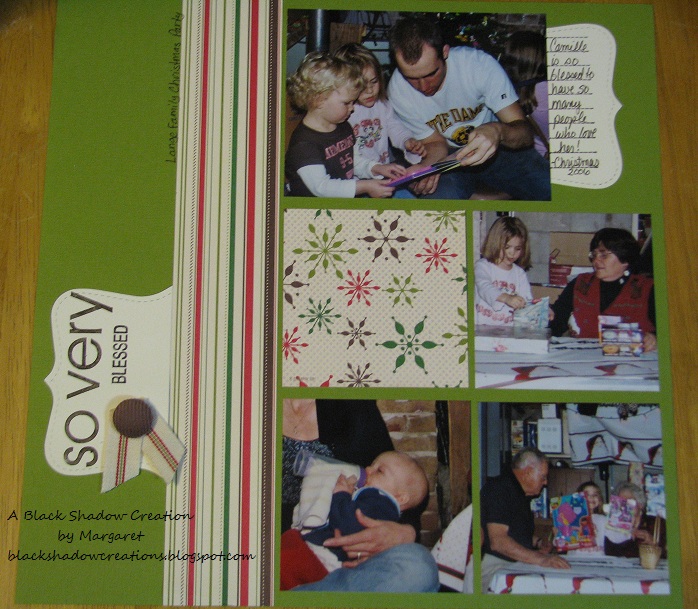
Now, for the recipe- base is old olive, also used very vanilla and the DSP is Merry Moments (retired); title and journal tags were made w/ the top note die & big shot; stamp sets- So Very and Notes & Details (also retired); ink-Early Espresso classic ink pad and marker; ribbon and corduroy button are also retired.  I used a layout from Page Maps. This was a great layout!  Super easy to put together and fit 4 pictures on it!