Showing posts with label Cute by the Inch. Show all posts

Sunday, January 27, 2013

Anything But a Card Challenge 11- Tie it up!

Hello! I am so glad you stopped by to visit and  I hope you had a marvelous weekend! My youngest was not feeling well earlier this week providing me with an additional day at home. So while she rested, I managed to get a little housecleaning done and also squeezed in some crafting time. One of the things I finished was my project for Anything But a Card.  You still have time to join us with your own wonderful creation and the challenge is 'tie it up'.  We really love variety and there are so many different ways to approach this challenge.  I decided to use some bakers twine on my quotes journal page.


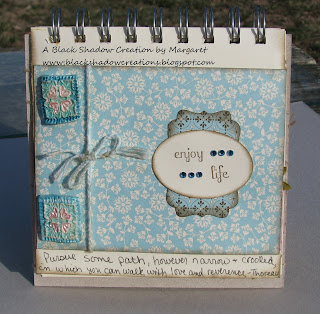
The 'tie it up'  portion of my page uses pool party bakers twine.  I braided three strands of twine and then tied that piece around my cardstock.  I also used some of my hand made stamped tiles. I used scupley clay and a stamp to create the tiles and then painted them with acrylic paints after they were baked.  I wanted my 'bling' to match the blues on my page so I colored some clear rhinestones with a blue sharpie.

My quotes journal is slowly being completed thanks to some inspiring challenges, and I am so happy that I will have such a pretty way to display these wonderful quotes when it is finished.

Project Recipe: Cardstock-very vanilla, Spice Cake DSP (ret), Ink-soft suede, Stamp Set-fabulous phrases, cute by the inch (tile), Accessories-large oval punch, decorative label punch, pool party bakers twine, basic rhinestones, sculpey clay, acrylic paints

Sunday, January 13, 2013

Anything But a Card Challenge -Things With Wings

It is time for week two of the 'Things With Wings' challenge at Anything But a Card Challenges and that means that it's my turn to share a project!  If you click on the link above, you will go to the post with Mr. Linky (I'm trying to make it super easy for you to join us-wink!wink!), which is week one. I hope you take a minute to check out all of the wonderful inspiration and projects that have already been linked up!  
I had so many different thoughts running through my head for this challenge, and my dear blogging sister, Lisa did nothing to help!!  One of my first ideas was butterflies with a quote for my journal and it also was the first project I tried -yes...I did more than one!  


I have quite a collection of various brands of glitter glues, and a few bottles of liquid pearls.  Unfortunately, the clear and silver are the two glitters that I use most of the time, leaving all of the other colors feeling quite neglected.  I also realized I have never used my yellow pearls...  Well, I made a promise to myself over the holidays that I was going to play, and so I did!  I found my quote first (in a rather large stack of vellum quotes) and wanted to make a pastel background to be slightly visible behind the vellum. I had shaded the right corner to have the illusion of sunlight and it looked great until I put the vellum over it, then it just looked kind of muddled. I thought the yellow pearls would possibly make a nice sun.  I tried a 'dot' approach, my version of pointillism, but it didn't look right.  So I took my blending tool (aka pointer finger) and smeared the dots together, kind of a funky effect!  Then came the two tone ribbon (new SU goodies!!), a ribbon flower with some felt pieces tucked in for leaves and a punched butterfly to ensure that the whole wings thing was covered!  I didn't like the naked edges of the vellum and pulled out the green glitter glue to frame it.  When I was done, I was thinking maybe I should have bypassed the liquid pearls and just used all green, but oh well!  I have to say that the page is growing on me the more I look at it and it was a lot of fun playing with the different materials.

A few days later, and an unfortunate but necessary trip to Wal-Mart, I found myself in the craft aisle.  My youngest DD had Christmas money to spend and wanted some new art supplies and while she debated her options, my eyes landed on a package of Sculpey Oven Bake Clay. Hmmm... I know that many crafty people out in Blogland use this stuff to make all kinds of wonderful things and I did make that promise to play... (can you see this getting me in hot water with DH?)  So into the cart it went and somehow some metallic acrylics ended up in there too... Don't know how that happened!  I would love to say that the clay came out as soon as I got home, but the truth is it sat there all week taunting me.  Which may have been a good thing because in the mean time, I came across a very retired stamp set called Nature's Wonders.  There is this absolutely beautiful dragonfly stamp in this set and suddenly inspiration hit! I was going to stamp my clay!!  Didn't know if this would work; didn't know if it would clog up the stamp; didn't care! Well... I would have cared if it ruined my stamp, but I really wanted to try this!  So I kneaded the clay until it was really soft, then patted it fairly flat (a little less than 1/4") and then gently pressed the stamp onto the clay.  I had to wiggle it a little to get it to release, but I liked the slightly uneven appearance.  Then I trimmed the edges and set it aside to bake.  I tried this with a few different stamps and it was so much fun!  I followed the baking directions on the package and when they cooled, I painted them with the acrylics.  My girls asked if they could paint them and I selfishly said "Nope, not this time." But I did promise to let them make their own, so everyone was happy!

Here is my dragonfly-not sure it's completely done being painted, but I still like it!


and in keeping with the 'wings' theme, an owl...


Both of these are much smaller than they appear in the picture.  The owl is about 1" and the dragonfly is a little larger.  I'm not sure what I'm going to do with these yet, but I'm sure that will be fun too!

Have a great week and happy crafting!

Journal Page Recipe:  Cardstock-sahara sand, Stamp Set-Butterfly Prints, Ink-concord crush, Accessories-pastels, basic pearls, very vanilla seam binding, jumbo sticky round, vintage tag and green felt flowers (ret), butterfly punch, green glitter glue, buttercup liquid pearls

Clay Tiles Recipe:  white Sculpey clay, metallic acrylic paints kit, Stamp Sets-Cute By the Inch, Nature's Wonders


Wednesday, July 20, 2011

Memory Lane

My introduction to paper crafting was after the birth of my oldest daughter. I received a free scrapbooking sample in the mail. I was hooked! Over the years, my interests have grown to include card making and other paper crafting, but I still love to scrapbook. I just don't always have enough time to keep up!  As I was going through some of my older photo CDs, I found these pictures of my youngest daughter when she was in preschool and realized that I had not scrapped them... So here is my walk down memory lane, and my submission to two challenges-Clean and Simple Stamping provided the sketch and the color combo came from Create, Ink!


Layout recipe: cardstock-island indigo, baja breeze, baja breeze & rich razzleberry DSP, ink-rich razzleberry, stamp set- Cute by the Inch, accessories-vintage flowers (ret.) and crumb cake seam binding, scallop circle punch, scallop trim border punch