Sunday, December 30, 2018

Oh 'deer' it's almost new years...

Hello! Once again, time has slipped away and the post I intended for Christmas day didn't happen.  So even if I didn't post, know that I was wishing everyone a very happy Christmas season!  I even had a card to share...

I always try to make some Christmas themed thank you cards to give to friends and family.  This year I went with a very simple idea-a reindeer face.  DH didn't think everyone would immediately see the deer, so I added a mouth.  Of course, the inside sentiment gave it away anyway!


The card was so easy to replicate. The hardest part was using the corner rounder on the top where it was two layers... I created the inside using MDS and a variety of stamps and text I had on the program.

I hope you have a wonderful, healthy, and peace filled new year! Thanks so much for visiting and have a fantastic day!

Card Recipe: Paper-soft suede, basic black, real red, Accessories-3/4 and 1 3/8 circle punches, MDS software program


Thursday, December 6, 2018

Cozy Little Christmas Card

Hello!  I'm so glad you stopped in again!  My mini break taking care of DH has come to an end and I'm back to work again.  It was actually pretty nice having the time to get the decorations up and I even did a little baking.  I didn't get a ton of crafting time though.  However, I did manage to make a few cards using the Snow Festival DSP that was in my paper pile.

This pattern reminds me of a cozy warm sweater that someone's granny may have made as a gift, so I'm going with the cozy little Christmas card theme!  The hardest part was finding a way to add a sentiment without taking away from the sweater theme.  I probably spent over an hour thinking and testing out different ideas.  I finally settled on the layered circle oval with a little soft suede distressing around the edges to make them stand out from the white and baja breeze on the pattern.  It took me another 10 minutes to get the right sharpie shading for the enamel dots so they went with the colors as well.


I ended up making 6 of these and now I think my card stash might just be complete!  Now I just need to get those Christmas stamps purchased and address those envelopes... Wish me luck!!

Thanks so much for stopping by and I hope you have a wonderful day.  Happy crafting!  For my fellow Christians of German descent, Happy Feast Day of St. Nicholas! Hope he brought you something wonderful!

Monday, December 3, 2018

Handmade for the Holidays

Hi!  I have something a little different to share with you today.  Every year, my daughters participate in our family's Thanksgiving Day ornament swap.  My girls create their handmade ornaments, wrap them, and join in the Sneaky Santa game played to receive new ornaments.  My Mom and her sisters still get together for Thanksgiving, so it's a pretty big crowd and the game is always a lot of fun.  Most players bring purchased ornaments, so the handmade ones are quite unique and always a crowd favorite.  

DD1 loves to embroider and wanted to use embroidery on her ornaments.  She was trying to think of a way to frame her pieces, when she received inspiration from a beautiful handmade ornament I received from a dear blogging friend, Heather.  She loved the idea of using the canning rings as a frame and quickly set to work creating her rustic Christmas ornaments.

DD1's ornaments

Heather's ornament


DD2 enjoys making things out of paper and found materials, so she created three tag style ornaments using wood tags as her base and applying pretty Christmas papers.  She really liked the poinsettia I made for my scrapbook page and wanted to make her own to go on the tag. 

DD2's ornaments

I think all of these ornaments are absolutely beautiful! Now I just need to convince my DDs to make a few extra ornaments to add to their mother's tree!

Thanks so much for visiting and I hope these talented people inspired you to make some lovely decorations for your own tree, or maybe even to give as gifts!  Have a wonderful week, and for those who celebrate Advent with me, Happy First Week!

Thursday, November 29, 2018

Scrapbooking with some Christmas Cocoa

I am still on that mission to finish up my pack of Christmas Cocoa pattern paper!  Today's project used up two larger pieces of paper and some smaller pieces as well.  I'm also happy that I have another Christmas scrapbook page ready for a photo!


The poinsettia was made using both pattern paper and cardstock.  I punched lots of petals with the poinsettia punch, inked the edges to give the flower a little depth and then began gluing all of the pieces together.  The silk leaves were in my 'bits and pieces' basket just waiting for the perfect use.  I also managed to use a wooden Christmas tag that I bought a few years ago, and the strip of sparkly, red glitter is some new ribbon that I bought at Big Lots (yes...I know I didn't really need to add to my ribbon stash, but this was oh so pretty and it worked so well on this page!).  

Now the only things left from this pack is a full sheet of the red and white that you see at the top of the scrapbook page, and three smaller pieces.  This just might happen!!

On a side note, I am enjoying (?) an extended Thanksgiving break due to my DH having shoulder surgery on Tuesday.  I have the rest of the week off and while I am spending some time playing nursemaid, I am enjoying the extra time to start decorating for Christmas and winter.  I might even make some cookies for my patient if he manages to behave himself!

Thanks so much for stopping by and have a wonderful day!

Monday, November 26, 2018

A little Christmas Cocoa on a Merry Monday

Hello!  I have been diligently working on using up that pack of Christmas Cocoa paper and adding cards to my Christmas box at the same time.  Today's cards use some of the smaller pieces of pattern paper.

used the postage stamp punch on the card on the left
1" squares on the card on the right

 
made a little background using four strips of 
different patterns-there's a 5th piece behind the 'merry' cutout

this used up a larger piece topped with a thinner strip.
I used a bit of ricrac to make the bow.

I hope you found some inspiration in my cards for today.  I am getting pretty creative with the different ways to use up scraps and I'm happy that all of those little pieces are finding good homes!!
Thanks so much for stopping by and have a marvelous day!

Monday, November 19, 2018

Christmas Cocoa going fast!

Hello! I'm glad you stopped by so I could share with you not only two Christmas cards, but also the preparation for another celebration!  I was so proud of myself for using up the entire pack of Merry Moments and my pack of Christmas Cocoa was just daring me to try to do the same to it, so....

I am on a mission to finish up this pack of paper as well!  There were two full sheets and several medium and small size pieces as well.  I managed to get rid of one of the full sheets with today's cards.  I made several of the top card because I love how it shows off those pretty snowflakes.  I also went with Season's Greetings so it is a bit more versatile.


The bottom card has a thin strip of striped paper from the pack.  I just couldn't bear to toss this piece and because it was so long, I was able to get two cards with it!  I added a few wooden snowflake embellishments that have been in my stash for a while, and chose to leave off the sentiment.

I'm getting really close to filling my Christmas card box and I am pretty sure these will be ready to go by December 1!  Now I just need to do some brainstorming for the rest of those scraps and that one full sheet... Wish me luck!  Thanks so much for stopping by and have a wonderful day!

Thursday, November 15, 2018

Throwback Thursday with yet another fun fold...

Hello! I'm so glad you stopped by! I think I'm still on my paper high from Monday, but hey...gotta keep going, right?  As the title shares, today's card is another fun fold design only with a birthday theme.  I promise this will be the last of these for a while!

I used Tea Party DSP once again, and I'm thinking I might need to do a scrapbook session using this pack.  I've forgotten how much I loved the pretty floral designs and colors in this pack.


You can find the instructions for this card on last Monday's post (includes dimensions), but it's really a pretty easy card to put together.  The sentiment stamp is from A Country Welcome (no longer in business) and it's been in my stash since the early years of card making.  The rubber is getting a little wonky and doesn't want to stamp properly, which totally bums me out... I really like the font on this and it works well with so many different papers.  I have lots of other birthday stamps, but this one seems to be my 'go to'.  Any suggestions on fixing it, or am I going to have to pitch it eventually?

Well, I'm off to do some domestic stuff.  No matter how hard I try, I can't manage to get the laundry to wash, dry, and fold itself... and for some reason, my family thinks they need to eat on a daily basis...  Thanks so much for visiting and I hope you have a marvelous day!

Monday, November 12, 2018

Merry Moments-A Cause for Celebration!

WARNING: PHOTO HEAVY POST!  No really... LOTS of photos!!!

Hello! I am having a little party in my studio today because I just did the impossible!! Well...almost impossible (for me especially).  I have completely finished a pack of Christmas paper! An entire pack has been used up!! Shocked?! I can hardly believe it myself!

If this is your first time visiting, I would like to clarify that I'm not crazy (my mother had me tested) and I do have a very good reason to celebrate.  You see, I am a bit of a paper hoarder (don't laugh at the understating of this issue if you're a regular) and since we moved into our new home, I have been working diligently to use my incredibly large supply of patterned paper.  A few years ago I celebrated using all of Ski Slope (a veeerrry retired pack of SU paper) and now I get to celebrate again as I have once again used an entire pack of paper.  Merry Moments has always been one of my favorites because it has such a wonderful vintage feel to it, and I have used it a lot in scrapbooking and card making.  After a recent perusing of my Christmas stash, I realized I didn't have a full sheet of any of these papers and that was all the incentive I needed to get busy and finish it off.  I'm not going to lie, it took an entire day of planning and positioning to do this, and I did feel a little sad that it's all gone, but now there is one less package of Christmas paper on the shelf and I'm even closer to having my Christmas cards done on time.

I know you didn't really come here to read my ramblings, so here are the SEVEN different things I created using the last of Merry Moments.


I had 1/2 sheets of these patterns and managed to make 10 cards from them!

I even used the tiny bits to make a quilt card and a little embellishment for 
either a card or a scrapbook page!

Here I used the biggest piece of paper, as well as some tiny strips to make
my scrapbook page.  This will eventually hold two or three photos.

I would love to say that this means that I can go buy more paper, but there is still a lot more on that shelf, and unless the paper is truly crying my name, I won't be buying anything new yet!  I've actually been eyeing the pack of Christmas Cocoa that only has 2 full sheets left and lots of bits and pieces... Who knows? I may be celebrating again really soon!

I hope this has inspired you to dig into your older papers and use them up! Have a fabulous day and thanks so much for stopping by to celebrate with me!

Thursday, November 8, 2018

Throwback Thursday Playing around with Fun Folds!

Surprise! Yes, this is my second post of the week!  I did some cleaning over our fall break and I guess I found my mojo in the process!  I have a throwback project today, which means I'm digging into my older supplies and using them up!

Earlier this week, I shared some Christmas cards I made using a fun fold (you can get the instructions for these cards on that post!) and it inspired me to make a few more cards using this.  A quick peek in my card storage boxes showed me that while I have a lot of thinking of you and thank you cards, I didn't have but ONE anniversary card...can't have that!!  So today's cards are going into my stash boxes so I'm ready for those special days.


I had a hard time choosing patterned paper for these.  I have so much paper and I really need to use more!  I decided to pull out some of my older paper (many of the colors in these are now discontinued) and make some true throwback cards.  The cards on the left in both photos use Cottage Wall and the cards on the right use Tea Party.  I had to do some digging to find the almost amethyst cardstock and I don't have much of it left...  Hopefully it will get me through the Tea Party paper!  The sentiment on the top photo is from Stampabilities and the bottom sentiment is from Word Play.

Our family is hosting Thanksgiving again this year, and while everyone brings a dish or two to share, the majority of the cooking falls on DH and I.  I really need to take an inventory of my pantry and see what needs to be added to the grocery list.  I know if I don't do it while I'm thinking about it, I will forget until the very last second!  Please tell me I'm not alone in this!  Everyone thinks I'm organized, but it's really catastrophe prevention 99% of the time!  Thanks so much for visiting and have a fabulous day!

Monday, November 5, 2018

Mondays keep getting merrier!

Happy Monday and as you may have guessed from the title, I have another Christmas card post!!  My box is slowly filling with cards and I'm starting to think that I just might be able to mail these babies out at the beginning of December instead of the beginning of January!  

Today's cards are very quick and easy and it's a fun fold I haven't used in quite a while.  I'll share the measurements at the end of my post.


I have been making an effort to use up my hoarded Christmas papers and I can actually see the packs getting smaller finally!  The papers I used for today's cards are from Holiday Treasures, a very retired pack that I still love! The papers have a vintage feel that seems perfect for the holidays!  I also used the sentiment set Wacky Wishes, which hasn't seen ink in quite a while.  I think I heard it crying "pick me!" as I looked through my stamps, so I did! 

This fold is quite easy.  You start with a 12x12 sheet of cardstock and get two bases from it.  Cut the papers into 5 1/2 x 12 pieces.  There will be a strip of 1" paper left that you can either toss or save for another purpose.  Score the paper at 2",4", 8", and 10".  Then simply fold your card on the creases.  The 4 and 8 are folded in toward the center and the 2 and 10 are folded out.  This gives you two nice flaps to decorate. I cut my pattern paper into 1 3/4 x 5 1/4 pieces and glued them to the flaps.  Then I stamped the sentiment, mounted it onto cardstock and glued the left half to the left flap of the card base.  Make sure you don't glue the entire sentiment piece down or you won't be able to open the card.  I hope the instructions are easy enough to follow. If you have any questions, just ask!

Well, that's it for me today.  I hope you have a wonderful day and thanks so much for stopping by!

Friday, November 2, 2018

Sympathy, Hope, and Kindness

Hello! Today's post features two card designs I made recently and also a bit of philosophy, musing, and personal reflection.  You'll be happy to know that I'm sharing the cards first, so if you want to skip the rest it will be quite painless for you to do so!

I've recently had an increased need for sympathy cards.  I always have a supply of these on hand because I hate making these at the last minute, however, my supply has been steadily getting smaller and I needed to add some new replacements.  While I was picking out the paper for my cards, I was admiring the back of the gray pattern and thinking these would make great 'all occasion/thinking of you' cards.  I can always use those too!  I managed to make a total of six cards from one 12x12 sheet of paper and didn't have any scraps to set aside!


My flowers were stamped on whisper white using basic gray, then colored with pretty in pink and perfect plum pastels.  I used white for the flowers so the colors would be true and not muted by the vanilla background.  The hardest part of making these cards was deciding exactly how to place the flowers... other than that, they went together pretty quickly.

Now for the mental exploration of these cards...  Lately there has been a lot of thought been given to the finality of life and how best to use the time we are given.  This started several years ago when my brother almost died in a motorcycle accident followed by my dad suffering a major stroke.  At that time, I was questioning the reasons behind what was happening and looking for some brilliant insight to make me understand the grand scheme of things.  No such luck!  Helping my mom care for my dad on a daily basis and accepting the personality changes in my brother (major brain injury) left me feeling tired, empty, and completely broken.  A little less than two years ago, my dad was diagnosed with colon cancer.  He had surgery to remove the growth and was on schedule to begin chemotherapy when he fell and broke his hip.  So instead of chemo, he had another surgery... After his hip healed, he began receiving chemo which left him incredibly weak, sick, and quite grumpy (not that I blame him for that!).  He had just finished his sixth treatment when he decided he was done feeling terrible all the time.  He stopped chemo and slowly began to feel more like himself.  In the past month, we have found that he still has some cancerous growths, but they are growing at a much slower pace than normal for his type of cancer.  There is a good chance that he will end up dying from something other than cancer, which is both great and sad at the same time.  

All of this had me thinking about the quality of our lives versus the quantity and a good friend told me to read the book Tuesdays with Morrie.  If you have never read this book, you should.  It is a short story and very basic to read, so it's manageable even if you don't care much for reading.  The story was exactly what I was trying to sort out in my thoughts about death.  It is a beautiful story about two friends sharing the beauty of life while learning about preparing for death.  I can honestly say that it has given me great insight, and also shown me how I want to live my life from now on.  

During Fall Break, my sisters, my youngest DD, my parents and I went to a local historical museum.  There are sections dedicated to the German immigrants, local military, and origins of agriculture in our area.  We had a wonderful time letting my dad share his insights on all of the above and he took great pleasure in telling my daughter about using most of the farm equipment they had on display.  We played several rounds of "Do you know what that is?" and "What is that for?", without being able to use the information boards they had available.  Dad knew almost all of the tools and equipment, although my sisters and I did pretty good on the things we had seen Grandpa and Dad use on the farm.  It was such an amazing day and I was so happy to have another wonderful memory to add to my treasure chest.  This was also the reason I really wanted to use the Life is Beautiful side of the patterned paper.  Because when you stop to enjoy it, it really is! 

If you've read all the way to this point, I hope this has inspired you to take the time to enjoy some simple, happy times and share something with those you love.  Even the most ordinary things can become great gifts over time.  Have a wonderful day!


Monday, October 29, 2018

Sweet Birthday

Hello! I'm taking a break from Christmas to share a fun little card I made for a friend.  Both of my DDs work for a friend of mine at an ice cream and sandwich shop.  She and her husband are great people and wonderful employers.  They are incredibly patient with their staff (mostly high schoolers), but also teach them work skills they can use in the future.   The people who work there are always courteous and professional, and obviously love their jobs!  My friend recently celebrated her birthday on the last day of the season(closed during the winter months), and I knew her day was going to be busy so I wanted to make a fun little card to lighten the day.


Now what else could I possibly put on her card??  The pattern paper is left over from some graduation cards I made for their co-workers who graduated in May, but it worked just as well for this sweet birthday card!  I also inked up Honeycomb Happiness for the first time and pulled out the coordinating embellishments to make my cones three dimensional.  The girls loved the card and I'm happy to share that my friend loved it as well.  She thought the honeycomb scoops were too cool! Ha! See what I did there?! Ice cream-cool...anyway...

I hope you enjoyed my card and maybe you'll find the time to get some real ice cream!  It's pretty chilly right now, but my dad always says it's never too cold for ice cream!  Have a wonderful day!


Monday, October 22, 2018

Monday is Merry-Three in a row!

Hi!  I am back for the third week in a row with another Christmas card! AND it's FALL BREAK!!  I've scheduled this to post early this morning, so it's possible that while you're reading this I could still be asleep or at the very least drinking my morning coffee in my pjs!  But enough of my personal happy moment...you came here to see something creative and Christmasy (is that a word?!).

I'm sticking with the quick and simple style again and once again, I've pulled from the fall cards I made earlier this month for the layout.  I've used the beautiful Christmas Cocoa paper again.  I love that this paper has just a hint of shimmer to it, so you really don't need a lot of embellishing!  I also decided to go with a winter theme on this one instead of Christmas.  I thought this could be friends who don't celebrate Christmas or maybe someone who isn't that into celebrating this season.


I am really looking forward to getting a lot of things done this week!  I have some work to do in our garage, in our landscaping, and of course in my craft studio!  I'm hoping to do some reorganizing to make things a little easier to find and more likely to use!  Of course, there must be some time for creating too!  Wish me luck!

Thanks so much for visiting my blog today and have a wonderful week!

Card Recipe: Paper-Christmas Cocoa DSP, soft suede, whisper white, Ink-soft suede, Stamp Set-Seasonal Memories (hero arts)

Monday, October 15, 2018

Another Merry Monday!

Oh my goodness! Posting two weeks in a row with Christmas cards!! Slowly but surely, I'm going to get these cards completed by December!!  I played with a similar design to my card from Thursday and used Festive Four again!  I also pulled out some Christmas paper that I haven't used in a while!

I've decided that my cards are going to be pretty basic and easy until I have more in that box!  Then maybe I'll work on some fancier designs!


I love this cute lil' snowman and the striped paper seemed to be pretty enough without any ribbon!

Thanks so much for stopping by and I hope you have a great week!

Card Recipe: Paper-Christmas Cocoa DSP (ret), whisper white, Ink-soft suede, real red, tuxedo black, Stamp Set-Festive Four

Thursday, October 11, 2018

Throwback Thursday-Sending more 'Happy Mail'

Hello!  I've taken a little break from making Christmas cards to play with some pretty fall colors.  Unfortunately, it doesn't feel much like fall right now.  I think September was cooler than October!  I'm hoping we get a few weeks of chilly weather before we slide right into winter...

I think today's cards are throwbacks in every sense of the word.  Stamps, cardstock, pattern paper, and even the ribbon are all things that have been a part of my crafty stash for a very long time!  It felt good to put them to good use again!

I don't normally send a lot of fall/Halloween cards, but I'm making an effort to send more cards that aren't birthday or Christmas.  One of my classes were talking about letters this week and one of the students asked "Who even sends letters?"  It made me sad, but then I realized that I don't really send letters anymore either.  I did share with them that I send homemade cards with notes in them and they looked at me like they had never heard of such a thing! Lol! Guess I'm officially old now...  This conversation and a recent guest speaker from Rachel's Challenge inspired me to reach out to loved ones a little more often.  Soon these cards will be addressed to some family and friends who are very dear to me to let them know I'm thinking about them!


Fall is my favorite season and I have quite a few different sets of fall themed DSP.  I decided to use the long retired Orchard Harvest and blew the dust off of two of my favorite fall stamps.  I even dug in my retired cardstock drawer to find the more mustard paper!  I'm not sure how long ago I purchased the burlap ribbon, but I'm guessing it's been a while since I have no clue where it came from!  Both cards were pretty easy to put together and it was fun doing a bit of coloring again!  I hope you are inspired to make and send your own cards to let someone special know that you're thinking about them too!  Have a wonderful day!

Card Recipes: Paper-more mustard, naturals ivory, Orchard Harvest DSP (ret), Ink-tangelo twist, pear pizzazz, daffodil delight, early espresso, tuxedo black, Stamp Set-Festive Four, Seasonal Memories (hero arts), Accessories-burlap ribbon

Monday, October 8, 2018

Monday is Merry!

 Hello!  My stash of Christmas cards is looking a bit empty and now that it's October, I'm getting a little worried that I may not be done on time!  I always think I'm going to make cards all summer long and then that never happens...  So today, I threw together some super simple and quick cards to add to my box of cards.

I love the fun patterns in Home for Christmas DSP and they make creating a quick card so easy.  All I needed was a little sentiment and some ribbon and these were together in no time!

 I used Warm Words for the sentiment on this one.  I absolutely love this sentiment set!!

I inked the set Reason for the Season for the first time with this card.  I'm itching to play with the poinsettias in this set!! So pretty!!

I'm thinking I'll be doing quite a few cards like this if I want to have all of my cards ready to go by December!  I'm counting the days until our fall break when DD2 and I can have some time to do fun things together and I'm hoping to squeeze in some creative time as well!  Only two more weeks!! 

Thanks so much for stopping by and have a wonderful day!

Card Recipes: Paper-real red, whisper white,  pool party, Home for Christmas DSP, Ink-pool party, real red, Stamp Sets-Warm Words, Reason for the Season, Joyous Celebrations, Accessories-large oval punch, pool party satin ribbon, gold glitter ribbon (from stash)

Saturday, September 29, 2018

Simple Sunburst Christmas

Well, hello!  I am back with more Christmas cards and a new type of design for me.  I know sunburst cards have been around for a while, but I had yet to attempt to create one until today.  After looking at all kinds of options of pattern paper and color combinations (and getting a mild headache and a bit overwhelmed by options), I decided to stick to a really simple design for my first attempt.  Using the sunburst thinlit seemed like a perfect way to achieve this look, but I'm thinking that if you're wanting a mix of patterns, it may not be the best choice.  I managed to get two for one by using the cut offs of the die and gluing them on another card base! Gotta love a time and paper saver!!

I've also decided that a smaller, less busy pattern would be best for this technique if you want a variety of papers to be used.  Maybe next time...


I do like the bold colors shooting out of the circular sentiment, and the less traditional patterned paper.  

I wish I could say that I had almost filled up my card box with Christmas cards, but we're not even close to that point and I'm sure I'm not the only person who manages to reach December without finishing all of their Christmas cards!  Come on fellow procrastinators...back me up!

Thanks so much for visiting and I hope you find time to try something new too!! Have a wonderful day!

Card Recipe: Paper-mossy meadow, cherry cobbler, whisper white, Season of Cheer (ret), Ink-mossy meadow, Stamp Set-Wacky Wishes (ret), Accessories-Sunburst Thinlits die, Circle Framelits


Sunday, September 9, 2018

Scrappy Christmas Cards

Hello! Just a quick post with some Christmas cards I created from a pile of scraps.  I decided since so many of the scraps were pretty small, I would go with a quilted theme.  I'm not sure what you would call these particular quilt patterns, crazy??  No matter what you call them, they used up quite a bit of the smaller pieces of some very old Christmas DSP.  There are still a few bigger pieces left, but I think they'll have to wait for another day (maybe a scrapbook layout).

I pieced and glued my scraps onto a 4 x 5 1/4 piece of copy paper, ran the whole thing through the embossing folder and finished my card.  Not too difficult other than trying to find the right placement for the scraps...  I also managed to use the negative cut of a top note die that has been in my stash for a loooong time.  So glad it has a home now!


School and DD2 have been keeping me quite busy and I really need to get more Christmas cards made if they're going to be ready in time!  Wish me luck and thanks so much for stopping by!! Have a wonderful day!

Card Recipes:  Paper-real red, very vanilla, Merry Moments dsp, Ink-chocolate chip, Stamp Set-Joyous Celebrations, Accessories-oval and scallop oval punch, hexagon punch, top note die, square lattice folder

Saturday, August 18, 2018

A 3 Step Anniversary Card

Well, hello! Long time, no post!!  Our 'back to school' chaos is finally turning back into a routine and I've managed to have a Saturday where I don't have a million things to do (other than cleaning my house, which doesn't count!).  I always think that things won't change much when the DDs and I head back to school and then that first week happens and I'm a zombie by 5 pm, and sound asleep by 10 pm.  It really makes me appreciate the time that I have during the summer to get everything done!

Today, I have an anniversary card to share with you, and once again I'm making an effort to use up some of my older supplies and ink up some forgotten stamps.  In this case, the stamp had never seen ink even though it's not technically 'new'... Please tell me I'm not the only one who has this happen!
I really love the effect of the triple stamping on this pretty flower! It gives it some depth without being heavy and bulky.  And the background dsp? Yeah...that is super old! Anyone remember Raspberry Tart? Not only is the paper long retired, but most of the colors in it are as well!


It felt great to use quite a bit of my older supplies and I think it turned out beautifully!  Now I just need to get to the post office to buy more stamps so I can actually mail some of those handmade cards!

I've been playing a bit with some older Christmas dsp scraps and hope to have something finished to share by next weekend. Wish me luck!!  Have a wonderful day and thanks so much for stopping by!

Card Recipe:  Paper-whisper white, pretty in pink, Raspberry Tart dsp, Stamp Sets-Lotus Blossom, Wonderful Words, Ink-real red, rose red, pretty in pink, kiwi kiss, Accessories-pretty in pink satin ribbon

Monday, July 2, 2018

Quick Cards Are Great!

Hi! Today I have 4 super quick cards to share (or as my blogging pal Lynn calls them 'Get 'er done' cards!).  Don't get me wrong, I love spending time in my creative space playing and making all kinds of things, but the reality is that often I don't have that kind of time and my cards need to be quick as well as great.  This is when the right pattern paper can be a lifesaver!!  An eyecatching design can take a card from 'eh' to OHHH!

For today's cards I used some great papers from a Halloween set, but while the colors are traditional for Halloween, the patterns are quite versatile, especially those handsome plaid and houndstooth papers!!


These literally took minutes to put together! I added a bit of ribbon on three of them just to add a little extra something (and to use some of my ribbon mountain...).  Four really easy cards and they look great too!  Gotta love that!!

Thanks so much for visiting and have a wonderful day!

Card Recipes: Paper-Howlstooth & Scaringbone dsp, very vanilla, basic black, tangerine tango, Ink-tangerine tango, Stamp-sentiment from A Country Welcome, Accessories- basic black, very vanilla, and tangerine tango ribbon


Thursday, June 28, 2018

Throwback Thursday Birthday

Welcome! I'm so glad you are here because I'm feeling a little proud today!  I've managed to use some goodies from my stash to make a card!! Yes, you heard correctly.  This card is made from left overs and bits & pieces!  The base is the only fairly new item on this baby!!

I am so bad at hanging onto things and then never using them, but since we moved a year ago, I have been trying to do better and use up those things or toss them(gasp!). Today's card used up 5 pieces from the 'throwback' pile!


The card base was part of a set from this year's Sale-a-bration, and it just so happens to coordinate with a stack of flowers I have from a very old SU kit.  The white frame was the leftover of a top note that I used quite some time ago in scrapbooking.  We won't discuss how many times I have passed over this piece before today...  After assembling all those goodies, all it took was a quick sentiment stamp and my throwback card is finished and I'm feeling all kinds of proud!

I hope I've encouraged you to use some of your throwback supplies! You know...when you use your supplies you have room to buy more!! Food for thought!  Have a wonderful day and thanks so much for stopping by today!

Tuesday, June 26, 2018

Yee! Haw! It's Your Birthday!

Hello! Or should I say "Howdy!"? Today I have a fun birthday card using one of my 'treasure hunt' stamps from a recent bargain hunting trip!  Although I passed up several wonderful stamps that day, I couldn't say no to this adorable little sheriff!


It was fun to color an image again too! I hadn't done that in a little while...  I also used some reeeeeeeeaaaaaaaaly old paper from my stash. Anyone remember Play Date?? My kids were little when I bought this stuff...  I thought the numbers had a touch of western flair to them, so I decided to use it.  There is still some of this paper left and I really need to find a use for it or donate it because I don't have too many little kid pages to scrapbook anymore!

I am so glad you visited today and I hope you have a wonderful day! Happy crafting!

Card Recipe:  Paper-Play Date dsp, whisper white, kraft, Ink-memento tuxedo black, real red, old olive, early espresso, tempting turquoise, crumb cake, hello honey, blush blossom, Stamp-Remembering Your Birthday (sentiment) and SU sheriff stamp (not sure what set it was originally from...)

Saturday, June 23, 2018

Cool Congratulations!

Hello! I am so happy you stopped in today because I have a fun little card to share with you!  I love making handmade cards, especially the ability to personalize it in a special way for the recipient.  Sure I could go buy a graduation card that looks like hundreds of others and has zero personal touches, but instead I chose to do homemade-complete with school colors, or in this case ice cream!  What? You don't immediately think of ice cream cones when you think of graduation cards?? Hmm...

Just teasing! This tasty little graduation card was made for a wonderful young lady who works with both DDs at our local ice cream shop.  She is pretty close to being another daughter and often tells my girls that she is my favorite child!  A store bought card would be an atrocity for this special girl!


I found the ice cream paper (American Crafts) at JoAnn's and paired it with a daffodil delight base.  I stamped the sentiment with melon mambo ink and colored some enamel dots with a pink sharpie to bling it up just a little.  A sweet card for a sweet young lady!  Although, this would also make a fun birthday or hello card for summer too!

Thanks so much for stopping by to visit! Have a super day and happy crafting!

Wednesday, June 20, 2018

Treasure Hunting and Graduation Cards

Hi!  I am so glad you stopped by to visit today!  I am attempting to catch up on blogging some things I have been creating the past few months, so if the timing of my cards seems a little off, this explains why!  Today I have two graduation cards to share with you.  There was a time when I didn't own the first graduation stamp and bought (gasp!) any cards I needed for that occasion.  It's amazing how that changes as your children get older (personally, I'm not aging, but WOW are they changing!).  I still don't own a lot of graduation stamps, but I do tend to make quite a few cards now.

The first card is incredibly basic and was super quick to whip up, which was fortunate since time snuck up on me and I was madly creating a few of these the day of the parties... The nice part of this simple design is it is so easy to personalize a card with school colors.  I ended up making this design in three different color combinations!

not sure why the black base color looks so wonky... trust me, it's basic black! 

The inside is a white mat with the phrase "the tassel was worth the hassle" in the same font as the front sentiment.  How cute is that?!

The second card design was a little more decorative and was used for a few female graduates.  I used a star embossing folder on the red base, stamped the image, mounted that on the star pattern paper, added a bit of ribbon, and mounted that to the base.  Not too difficult, but I think the embossing really dressed up the card. 


I have a little back story about the images I used on both of these cards.  I am big fan of thrift stores, flea markets, and antique/collectible stores.  I could waste an entire day just wandering through the aisles, digging through bins of goodies, and pretending I'm a modern day treasure hunter!  There have been several times that I have left empty handed (and a little sad) when I didn't find any diamonds in the rough, but there have also been just as many times that I've had to control myself to keep from buying a car full of treasures!  There may have been a few times that I had to go back and get DH's truck to bring home some furniture pieces...but we don't talk about that much! I think DH is trying to block those times from memory!  But I digress...

A few months ago, I went to one of our local collectible shops looking for a few dining room chairs (got 6 of those btw, and found out they belonged to my great uncle and aunt!) and while we were there, I had to take a spin around the store to see what hidden gems were awaiting discovery.  Imagine my surprise when I found a container full of Stampin' UP stamps! OOOOHHHH!! JACKPOT!!!  They were all in great condition and I eagerly dove in and looked them over. DD#1 swears I muttered "My precious!", but I don't recall that at all...  In what was most likely the greatest show of human restraint, I managed to only buy four stamps from the box- three of which were graduation themed.  I could totally defend the need to add those to my collection!  I also bought a super sweet little sheriff stamp that I couldn't leave there! I'll be sharing him before too long on a little guy's birthday card! 

 I'm wondering if anyone else gets this excited over finding things that others chose to eliminate from their lives.  I hope so, because I hate to think that I'm alone in this; not to mention I donated a ton of perfectly good items to charity thrift stores when we moved and I'd like to think someone else is really enjoying those things now!  Kind of a small version of karma for household and craft things!

If you are still reading, thanks so much for putting up with my musings and thanks so much for stopping by to visit! I hope you have a marvelous day, and happy crafting!


Sunday, June 17, 2018

Happy Fathers Day, aka NOT Woman of the Year day!

Hello and for all of you in the US, Happy Fathers Day!  Today I will be sharing the two cards I made for this special day, one for my dad and one for DH (from the girls, of course).  If you were intrigued by the lovely title of my post, let me enlighten you (if not intrigued...well, you'll just have to scroll down, I guess!).  

I feel like I always struggle to make cards for guys.  Pretty flowers and cute kiddie papers are naturally more my thing and I can whip things up in a snap when I'm going that route.  Masculine is a completely different situation... like embellishing...  Most ribbons are quite feminine and then there's flowers, pearls, and rhinestones... Yeah... not very manly...  Don't get me wrong, I know there are men who would enjoy a beautiful card (and to be quite honest, my Dad would probably love the card anyway), but I always try to add a bit of a personal touch to my cards to fit the people receiving them.  Did I mention both my father and DH are meat and potatoes, truck driving, getting dirty, fixing/making kind of guys? So...no flowers, no pretty ribbon, and no bling!  Instead they always end up with a truck or tool type of card.  

While my card this year is still in the 'tool' genre, it's not covered with saws and hammers.  Instead I pulled out a wonderful background stamp and got to work.  I was moving right along, found some great twine in my stash that looked manly enough and was symbolically patting myself on the back and giving myself all kinds of praise when I went to put the sentiments on the cards.  You will notice that the card on the right is horizontal...yeah...they were both planned to be that way, but there was one little problem...can you spot it??


In my excitement of having such a great guy card design, I did not pay attention to the numbers on the rulers and they were stamped upside down...Might have been kind of witty to have a Man of the Year badge on a backwards card, but then again, maybe not so much... Woman of the Year, I am not!  So now there are two differently oriented cards of the same design!  All things considered, I think they turned out OK and I know both guys will feel loved no matter what their cards look like.

I will leave you today of a slightly aged photo of my first favorite guy-the one responsible for my snarky, sarcastic, quick wit and stubborn streak (just ask my mother, she'll tell you it's ALL him!).  I hope you have a wonderful day and if you still have your dad nearby, be sure to give him a big ol' hug!

Dad and I, just a few years ago! 

Card Recipe:  Paper-basic black, kraft, Stamps-Backgrounds Rule (SU), Sentiment stamp by Inkadinkado, Ink-Tuxedo Black (memento), Soft Suede, Accessories-twine from stash

Thursday, June 14, 2018

Not Paper Crafty, But Still Handmade!

Hello! If you came here looking for a card, scrapbook page, or any other type of paper craft, I am sorry to say that today's post won't help you at all!  However, this post does explain in part why I haven't been creating and blogging as much!  

About a year and a half ago, we decided to change our dream of building a home in the country to finding a dream just a bit more affordable to our future plans.  Neither DH nor I want to be working full time when we're 70; we'd much rather be finding fun adventures and just enjoying life.  So we started searching for a different home.  After several tours and lots of drive bys, DH suggested a home that had been in foreclosure and vacant for over 4 years.  I'll be honest, I drug my feet, and looking at the interior photos online didn't improve my viewpoint.  Finally, he convinced me to just drive by, and maybe get out and look around.  We had no sooner stepped out of the car when we were approached by the next door neighbor.  He was a co-worker and good friend!  We got the 'low down' on the house that we knew we wouldn't get from the real estate agent.  Things like 'are there any psycho neighbors', 'are there lawn and landscape police', 'is this house going to fall down around us', you know, the important stuff!  After talking to him and later touring the home, we decided to make an offer which was accepted.  Then began three backbreaking, mind numbing, very long months of remodeling and repairing to the interior so we could move in.  After living here a year, we decided to tackle the exterior.

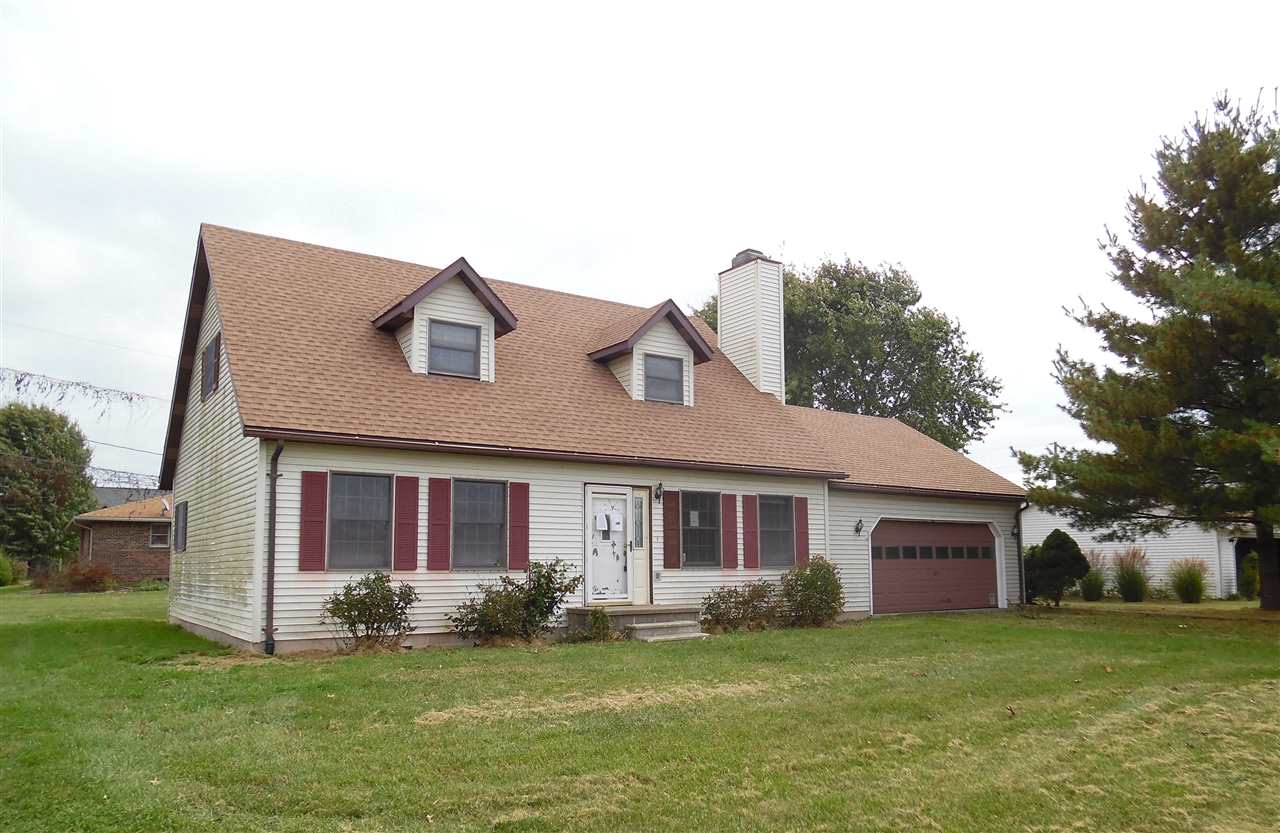
The before picture: grime on the siding, grass covered driveway, 
dying lawn, out of control shrubbery, front door in need of replacing


After: power washed siding, a large covered porch added, 
shrubs moved/removed and new landscaping added.  
We poured the front part of the driveway when we built the porch. 
 This fall/next spring the rest will be finished.  
After the wood cures, we will be staining all of the woodwork.

My Mother's Day gift this year was a beautiful and very comfortable porch swing.  It's the perfect place for my morning coffee and a wonderful spot to sit and watch the rain fall!

We've also had a few hospitalization trips involving my parents that diverted my time, but I'm so thankful to still have both of them around!  Time well spent even if it wasn't always fun or happy!  So now you know why I haven't been here as much and hopefully will forgive any future absences! 

I'm still trying to figure out my craft studio and keep rearranging furniture to find the perfect layout.  If  When I get that accomplished I'll share some photos.  Have a wonderful day and thanks so much for stopping by!

Tuesday, June 12, 2018

Happy Mail and Scrapbooking

Hello! I am back with another post after a bit of a break!  I am quickly learning that even though I may have the best intentions of creating and posting, life is always going to do what it does and often that isn't going to leave much time for my creating...  I've also learned that I'm better off not getting frustrated and bent out of shape over this!

Today I am sharing some long overdue goodies!  The first is some wonderful happy mail that I received from a dear blogging and stamping friend, AnnMarie!  It's a sweet little thank you card and an adorable matching little photo book!! You should really go visit her blog; she makes some fabulous things there!!


My second photo is a scrapbook page I made at a Relay for Life crop in April.  Yes...that long ago!  I worked on scrapping the photos from DD#2s performance in Beauty and the Beast.  They did an amazing job and of course I took a ton of photos.  Most of the pages were so packed full of photos and had very little embellishing, so I will spare you the monotony of seeing them.  


It was a lot of fun to be with such a wonderful group of ladies and I hadn't had a day to create in um... forever!  It took a little coaxing for my muse to wake up and decide to help me, but between my sister and a few good friends, it finally kicked in and I managed to get most of the pictures onto pages!  Maybe I need to block out a day a month to work on pages-no interruptions. Wouldn't that be wonderful?!

I am so thankful that you stopped by today and I hope you have a fantastic day! Happy crafting!

Thursday, April 19, 2018

Throw Back-Play day

Hi and welcome!  Today I'm sharing some 'throw back Thursday' projects that are perfectly named in so many ways!  I am finally caught up on birthday and anniversary cards, so I had some time to just play around in my studio.  I have a tiered basket that holds unfinished projects and various odds & ends.  The idea is that if I see these things all the time, I will be encouraged to use them.  I wish I could say this was a perfect idea, but more often than not, I'm busy making something specific and don't have time to 'treasure hunt' in the baskets.  Today however, I spied two unfinished art journal pages that were begging to be completed.  I started my art journal years ago as a way to experiment with new techniques and it has also become a great place to collect quotes and words of wisdom.  This is the first 'throwback'. Next, I found a baggie of molded clay pieces that I made a very long time ago and had saved for a rainy day-'throwback' number two!  Finally, I pulled out some well loved, but recently uninked stamp sets making the third part of my 'throwback'.

I decided if this was going to be a play day, I was going to get a little messy and inky.  I colored the clay pieces with markers (and ended up with as much ink on my fingers as on the clay pieces), and pulled out an old plastic stamp case. A quick hunt through my reinkers and I was ready to go.  I actually used copy paper instead of watercolor paper this time since the page was already going to be quite lumpy from the clay parts.  It was a little tricky getting the paper out of the ink and took a very long time to dry, but the end result was quite pretty.  A little stamping, doodling, and gluing and I was done!  


This would have been a perfect creative session if my eldest DD (home from college) hadn't interrupted me to ask if I could help her file her taxes... Nothing like waiting til the last minute!  Luckily, it was fairly quick and painless to do hers, but the next time I decide to have a play day, I'm going to lock the door!

I hope I've inspired you to dig through your stash and use some of those forgotten items!  If you're like me, you could do this every day for a year and still have plenty of things left over!  Thank you so much for visiting and have a wonderful day!

Project Recipe: Stamp Sets-Faith in Nature, Gorgeous Grunge, Ink-blushing bride, Baja breeze, crumb cake, garden green, real red, summer sun, early espresso, black fine tip Sharpie, Paper-always artichoke, Accessories- molded clay pieces, Martha Stewart leaf punch