Showing posts with label bird builder punch. Show all posts

Wednesday, January 2, 2019

Have yours'elf' a happy new year!

Hello and Happy New Year!  I am sharing one final Christmas project before leaving this wonderful holiday behind.  

One of my co-workers wanted to make something fun for her son's preschool class.  She showed me the picture of the candy cane elves and asked how hard they would be to make.  After a quick look, I realized everything was made with punches and that it would be pretty easy to knock these out.  The only punch I didn't have was the mitten...  She drew, traced, and cut out the mittens and I made the elf bodies and shoes.  She also did all of the final assembly.  The top photo shows a close up of the elves before they were attached to the candy canes and the bottom photo is the finished project.


I knew we did well when her son gave his approval and told us they look just like real elves!  We received our inspiration from Jackie Topa.  If you look up Candy Cane Elves, you can find the directions.  We simplified our version just a little, but I think they are still pretty cute!

I hope your new year is one filled with happiness and peace!  

Tuesday, June 14, 2016

Murphy's Law


Hello! Just in case you've been wondering, I am still here! I spent some time doing several uninteresting, yet important things around the house, and finally got a chance to get back in my crafty space. I've been working on my #1DD's scrapbooks and refilling my card stash, and it has been so wonderful to be creative again. I have all kinds of photos of my projects and was all ready to start blogging again. I turned on my laptop and everything lit up like it always does with one exception...no monitor.  So now I am without a way to properly post. Hopefully, I will be able to get it fixed! I used my phone for this post and it's not the best!

I did manage to get a photo uploaded (sorry for the shoddy pic) and thought I'd share it while I filled you in on the status of my blog.  This is one of my 'clean up' cards. I used bits and pieces of things I had in bags and boxes.


I don't have any steps to explain since it literally took minutes to put this together. I hope I will be back to proper blogging soon, and thanks for your patience!! Have a wonderful day!


Sunday, October 19, 2014

ABAC Challenge 40-Springing into Fall

Hello there! Fall is in it's full glory in southern Indiana and I couldn't be happier!  This is my favorite season for so many reasons.  I love the beautiful colors that seem to appear overnight; the air is somehow 'cleaner' and cooler, and it is the perfect time for campfires. So needless to say, I chose to do a fall project for Anything But a Card's Autumn Magic Spring Wonder challenge.  Of course, if you are on the other side of the globe, Spring may be inspiring you to make something equally colorful but in a different way!  I hope you will join us in celebrating both Spring and Autumn with a project of your own!

I knew immediately what my project would be.  We have two wonderful friends who have done so much to help us over the past year, and while I know I can't repay their kindness, I can reciprocate with a special thank you gift!  I bought an unfinished wood birdhouse to alter for a fall decoration.

I started with a base of light blue acrylic paint to match the mixer in their kitchen.  DD#1 took one look and said "Isn't her mixer more of a greenish color?" AHHHH! So on went a coat of Bahama Blue acrylic paint which is a cross between mint and turquoise.  This was deemed closer to the shade of the mixer. The roof was painted with Antique Copper metallic acrylic paint and the base was painted espresso brown.

I glued a large piece of aluminum foil to some printer paper, then cut the pieces to fit the dimensions of the roofs.  These were painted with the antique copper paint, set off to dry, then ran through the Fancy Fan embossing folder. It made a pretty cool shingle-like pattern.  I added some bahama blue accents to the foil roof to give the oxidation effect.  The blue/green house was given a generous coat of clear rock candy crackle paint to age the paint job to match the roof.  When the crackling was finished, I brushed on some crumb cake ink to fill in the cracks and age it a bit more.


My final touches were adding a few punched leaves in pumpkin pie, real red, and chocolate chip dsp. and some buttons.  I rubbed a little of the copper paint onto two vintage buttons and threaded some coastal cabana bakers twine through the holes.


The ultimate compliment came when DH declared the house to be really cool! He couldn't believe that I made the roof. :)  

Whether you prefer Spring or Fall, I hope you will join us in this month's challenge.  We would love to see your creations!!

Thanks so much for stopping by! I hope you have a fantastic week!

Friday, October 11, 2013

Flashback Friday- Getting Inky!

Hello! I'm apologizing in advance... Today's post is a little picture heavy, but I did include some cute, furry kitten photos so I hope I'm forgiven!  As I was making some phone calls and paying bills last week, I was grumbling to myself  that I really needed to get a little more organized with all of the papers that seem to accumulate when the girls go back to school.  Sign this, send in $ for that, be sure the choir gowns are altered by the first concert, return fundraiser information now...  It is enough to drive me batty some days!  Just as I was wondering what in the world I could find that would organize and I would actually use, Shadow's big ol' Lab tail knocked a clipboard off of a shelf.  I picked it up and was going to return it to the shelf when inspiration struck.  I should have taken a before picture, but didn't think of it until it was already painted.  The clipboard was one that I had bought to use for preschool and the kids helped 'decorate' it with stray marks from markers and pencils.  I gave the whole clipboard a good coat of off white acrylic paint.  As the paint was drying, I went to Pinterest to see what ideas I could borrow to make my new organization board.

I really wasn't in the mood for a neat and clean papered clipboard, of which there were TONS of photos.  I liked them, but didn't really want to do the whole paper thing.  I did however find some inspiration in a mini clipboard that was all inky and stamped-not my usual style, but it looked like a lot of fun!  

So I pulled out some of my favorite stamps, lots of ink pads, and got busy.  I'm not sure if it was the acrylic paint or the clipboard, but my bold browns were sucked right in, leaving behind a very muted design.  I really liked it, and quickly decided to exchange my subtle blues and greens for the stronger, brighter colors.  The funny thing was I would never have combined the different shades that I used, but they really worked well together once they were dry.  Then I went back and sponged some browns and blues, and a little vanilla for good measure.


When I finished, the chrome clip looked completely out of place! Can't have that!!  So I pulled out the vanilla flower trim and made it all inky as well.  The newsprint bird was a suggestion from my oldest DD, and I added some 'vintage' crochet ribbon to finish it off.


Now I just have to convince myself to clip important notes and paper on here.  Not an easy task since it will cover up all of the inky goodness, but maybe it will motivate me to take care of those papers so I can see the clipboard again.


I hadn't intended to share photos of the kittens, but they were weaving in and out of the table legs as I was trying to take my pictures.  I figured if they were feeling so photogenic, I should oblige.

Katniss decided to climb up my leg as I took her photo. Ouch!

Beauty was too busy swiping to sit still, but finally
I was able to capture this shot.

Where was Shadow during all of this?  Why, resting comfortably on the deck like a good dog.  I'm pretty sure he's convinced that we make way too much fuss over the silly cats who don't even have the courtesy to stay out of my pictures.  He does however make quite a big deal of strutting back into the house with me.  I'm certain he makes faces at them through the window as he enjoys his place inside.

I hope you have a wonderful weekend and find some time to play with your craft supplies too!

Project Recipe: Paper-very vanilla, First Edition DSP (ret), Stamp Sets-Faith in Nature (ret), Inspired by Nature (ret), Warm Words (ret), World Map, Ink-soft suede, early espresso, baked brown sugar, marina mist, not quite navy, night of navy, garden green, old olive, Accessories-bird builder punch, scallop oval punch, vanilla flower trim, Chantilly crochet trim

Monday, October 1, 2012

Scrapbook Monday!! A little time to play!

Surprise! It's been a little while since I've posted a Scrapbook Monday, but I actually made a little time to play on Friday and managed to get a few pages done.  Several weeks ago I tried my hand at rolled fabric flowers and realized they can be quite addictive.  I liked them so well, I used them as my 'make and take' project at our team meeting.  There were a few strips of fabric left over and as I was cleaning my work space, I found them.  Hmmm.... So much for cleaning!  I pulled out a few sticky rounds and got busy making more rolled flowers.  


The fabric was from Candy Cane Christmas, but I didn't feel like making a Christmas project.  Instead, I chose a picture of 'the girls' getting ready to head out to our local Christkindlemarkt. *insert history lesson here*  Our surrounding communities were established by German immigrants and continue to have a strong German heritage.  A nearby town honors this history by holding a town-wide Christmas market the weekend before Thanksgiving.  It marks the beginning of advent as well as following an age old tradition of craftsmen, bakers, and artisans selling their wares in preparation of Christmas gift giving.  My Mom, sisters, daughters, and I go every year and have a wonderful time seeing all of the handmade crafts, tasting delicious foods, sampling wine from local wineries, and browsing the antique booths and shops.  We spend the entire day shopping and while we don't buy a whole lot, we have a fabulous time together.  My oldest DD has an amazing relationship with a milliner that sets up shop every year.  DD saves her money to buy a new hat and then spends some quality time trying on the various hats and visiting with the hat maker.  The hat she is wearing in the photo is one of Patrica's creations.  DD#2 waits patiently for our last stop where she buys a huge bag of kettle corn that is made on site in a HUGE copper kettle.  Warm kettle corn is also a bit addictive.  I have two downfalls at this annual event...

  1. wine tasting (I don't hit every booth (yikes!) but always have such a hard time deciding what to buy)
  2. antiques (see story below)

Last year I came across some old printing press letters.  I looked and looked at them and talked myself out of the complete alphabet set for $100 and settled for a few individual word blocks.  After I got home, I kicked myself for not buying the alphabet.  Especially after I actually inked up the word blocks.  The effect was so cool!  I am sure that somewhere an antique expert is freaking out that I inked up and used them, but what good would they be if I just let them sit?!

I am just as bad at the booth with the vintage post cards!  Good thing there are Grandma and Auntie to take the girls as my other sister (and partner in crime) spend an eternity looking at things!!

I hope you enjoyed my little story and learned a little about German history as well!  Have a wonderful week!!

Page recipe: Cardstock- real red, whisper white, garden green, Baja breeze, the DSP is SU, but I'm not sure which collection it came from..., Ink-basic black marker, Accessories- Candy Cane Christmas fabric, sticky round, blushing bride ruffled ribbon (ret), bird builder punch, and some letter stickers from my stash that amazingly enough matched the colors. *the large circle was made by tracing a saucer onto whisper white and cutting it out.  I drew the journaling lines with a basic black marker.

Saturday, September 22, 2012

Anything But a Card Challenges #2- Texture

So glad you stopped in to visit my little ol' blog today!  We have a challenge going on at Anything But a Card Challenges to make anything but a card with TEXTURE!!  Think fabric, canvas, wire, fibers, embossing, layering, crimping, studs, jewels...you get the picture!  Now any of my regular followers will be shocked that my first thought was FABRIC. Yes... I know...don't faint on me!  It is true that I do not sew if I can help it, but for whatever irrational reason, I have quite a bit of Stampin' UP's fabric.  Some were give aways from my upline, others I bought thinking I would do something with them.  Not that the reason matters, what is important is I have this stuff just sitting in a container taking up space and taunting me.  So when I saw the new sticky rounds in the Holiday catalog, I knew that this could be the solution to my neglected fabric stash!

Here is what a non-sewing scrapbooker does with fabric (and ribbon)...


Now I have to give a small warning... These can be a bit frustrating until you get the hang of twisting and sticking as you go, but once you get the hang of it, they are a little addictive.  I had intended to make one or two out of fabric, but ended up making several, some made with seam binding ribbon as well!  Between the fabric flowers and the Vintage Flowers embellishments, there is quite a bit of texture on this page.  This might have posed a problem if I was going to put it in an album, but I decided this one will be going in a 12x12 shadowbox frame, so 'lumpiness' will not be an issue! Oh, it's not showing up in the picture, but my cardstock base is textured too!


You still have time to play along with us and link up your creation with texture!  Hope to see you there!!  

Page Recipe: Cardstock-Baja breeze, very vanilla, pear pizzazz, Springtime Vintage DSP (ret), Stamp Sets-Curly Cute, Reason To Smile, Accessories-Baja breeze & rose red seam binding, vintage flowers, bird builder punch, springtime vintage fabric, scallop trim border, jumbo sticky rounds


Saturday, July 7, 2012

The intervention...

Hello, my name is Margaret and I have a problem.  I started making Christmas cards about a month ago to use up my old Christmas DSP.  I thought I could handle it, just make a few cards, use up some old paper, and then I would stop.  I was in control... or so I thought.  I have recently come to realize that I have an addiction to creating Christmas cards.  I've even started looking at other old packages of  Christmas DSP, just to see what was there...  I knew I hit rock bottom when I became frustrated that I had to make a birthday card. "That won't use up my Christmas paper... I have to use up my Christmas paper!!"  So that's my story.  I am a Christmas card addict.  The saddest part of this is I will have to find a way to control my behavior.  After all, Christmas is an annual holiday, and there will always be new DSP to buy, therefore making my current DSP old.  It's a vicious cycle...  But I can change... if I have to...I guess...

All silliness aside, I am really enjoying making my cards early (gasp!) and I was so excited when I realized I only had two full sheets and some little scraps left of my Merry Moments paper.  Bring on the new paper!!  

I once again used a Merry Monday sketch for my cards.  I'm just obsessive enough to feel that I need to do the sketches in order, but really would have liked to skip this one.  It was a wonderful sketch and I had this brilliant card pictured in my head, but when I attempted to put my vision to paper, I did not love it.  So I decided to try the sketch again with a different idea.  Not overly crazy with that one either...  But I finished the sketch and the next few are very basic and I think they will be a lot easier for me to use.  So here are both of my cards using sketch #7 from Merry Monday.  

   
My initial plan was for the cardinal to be resting on the branch, but it just didn't look right.  I also thought the background would be less bare and more 'forest-like' with the pine tree images.  I just feel like the whole vision fell short of what I wanted...


First of all... apologies for the washed out image... grr...
I decided to go a completely different route with this one.  I wanted to use the shaker frame, but didn't want to actually have a shaker card (confusing, I know).  So I stamped my image twice, added dazzling details to the bottom image and then layered the second image on top.  I think I would have been happier with this one if I had embossed the red background.

So do you ever have this problem?  Finishing a card and then really not liking it?  

Hope everyone has a fabulous rest of the weekend! Happy crafting!

Card Recipe #1-Cardstock-old olive, very vanilla, real red, Merry Memories DSP(ret), Ink-chocolate chip, old olive, Stamp Sets- Lovely as a Tree, Bells and Boughs, Language of Friendship, Punches-scallop oval, scallop circle, bird builder

Card Recipe #2-Cardstock-real red, very vanilla, garden green, Merry Memories DSP, Ink-real red, asst. markers, Stamp Sets- Sweet Snowglobe (ret), Warm Words (ret), Punches-1 3/4" circle, large oval, scallop oval, Accessories-dazzling details, shaker frame


Thursday, May 17, 2012

Out of the Box for Mother's Day

I am officially on summer vacation!! I can not tell you how wonderful it is going to be to sleep in the next few days!  But enough of me rubbing my good fortune in your faces!!

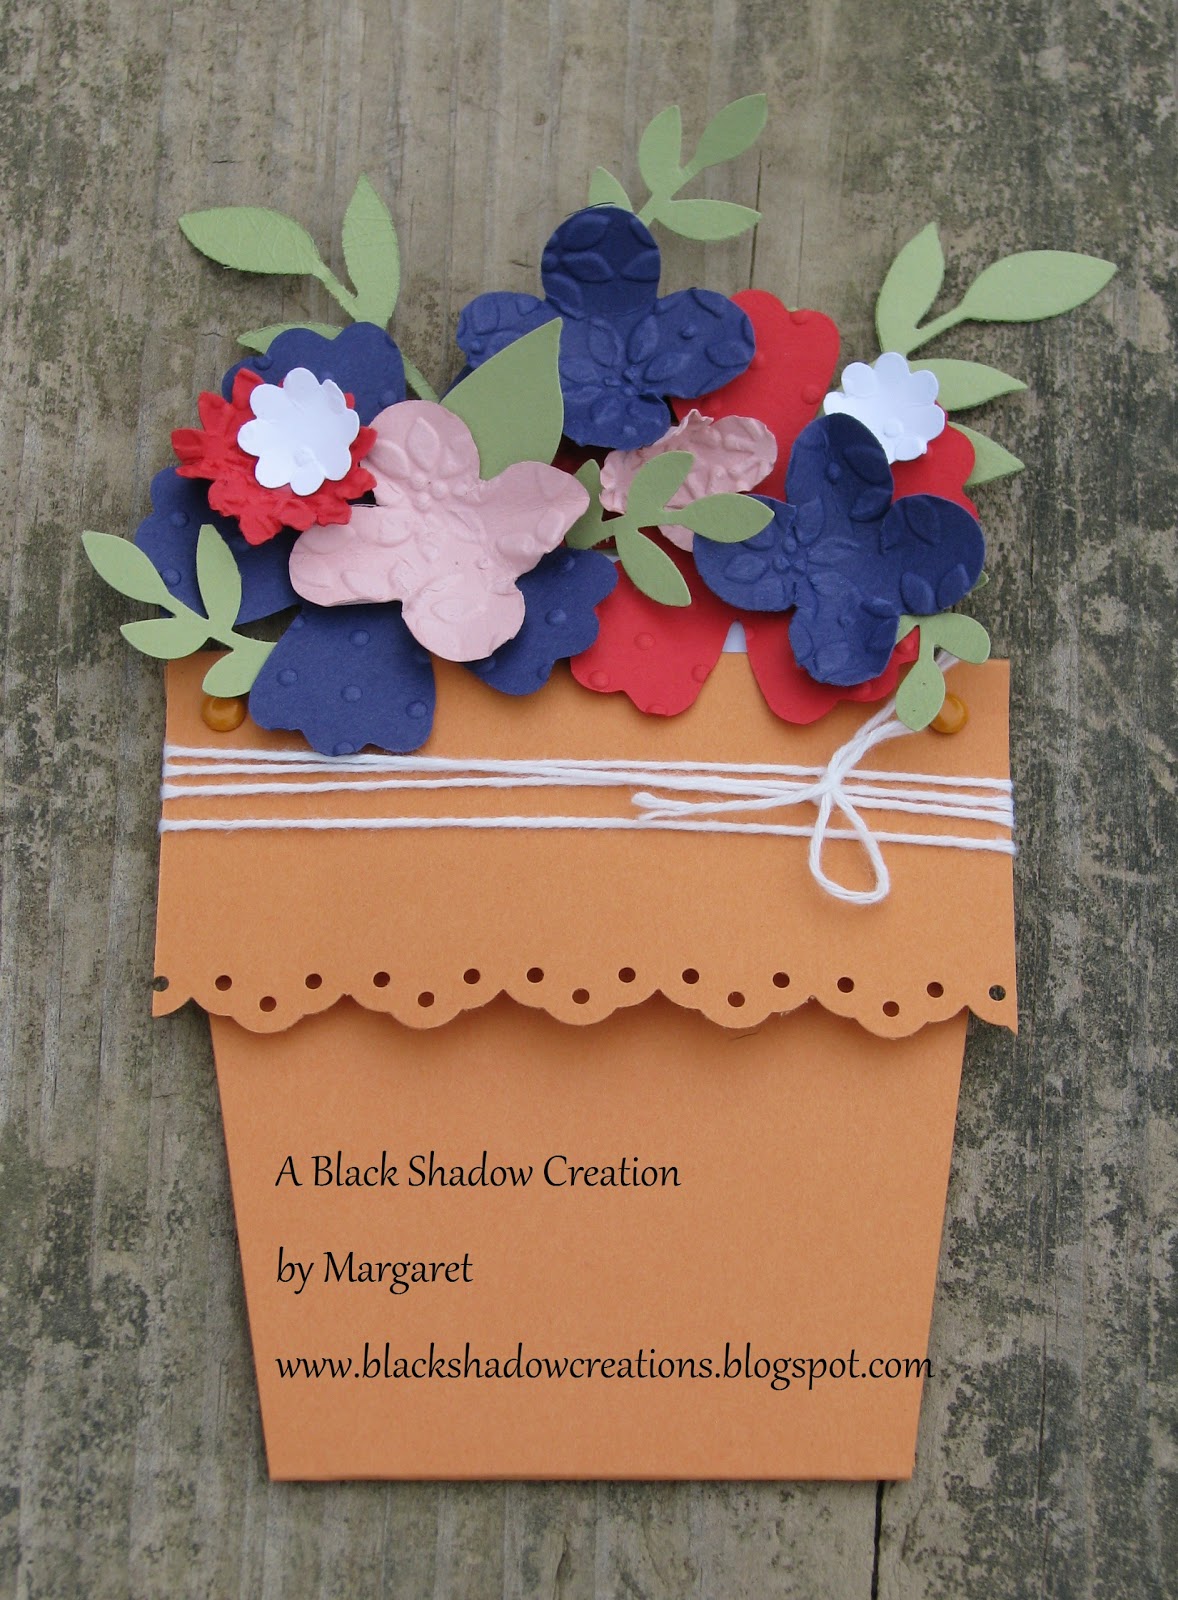
Last weekend, I needed to make a couple of Mother's Day cards for Mom and my MIL.   I have seen flower pot cards on different blogs, but never saved a link.  I went to Pinterest to see if I could find one with instructions.  *Here's a little background on me... I'm not sure why, but I tend to make most of my cards the standard size.  I've done a some square cards and even a few shaped cards, but I always end up going back to good ol' 4 1/4" x 5 1/2".  And my cards ALWAYS  fit in the envelope (stop laughing, Lisa M, don't you judge me!!).  So I was trying to stay away from any designs that would be too big.  I found the perfect one here and Brenda's step by step instructions were fabulous! Even better, it would fit a standard card envelope!

So I got busy cutting and scoring the pot, making the insert and then the fun part-the flowers!!  I wasn't sure how many I would need and didn't want to stop to make more after I started assembling so I made a nice variety to choose from. Then something incredible happened, well at least for me...  I went crazy! I kept adding more leaves and flowers and absolutely loved how it was turning out.  I finally hit a point where I looked at it and thought 'OK, I'm finished.'  Then it hit me... There was NO WAY this was going to fit in a standard envelope!!!  I had completely stepped out of my comfort zone, had a wonderful time, made a card both Moms would love, and I had no idea how I was going to present it to them!  Luckily after a little digging, I found some larger envelopes, left over from who knows what, and there was enough room to slip the cards in without squishing them.  Problem solved!  I'm just glad I didn't have to mail these!


I decided to use all of the retiring In Colors on this card.  I absolutely love pear pizzazz, but hadn't really used a lot of the other colors.  I'm also hoping I haven't forgotten any of the supplies.  It was a bit of a whirlwind of creativity on this one!

If you would like to recreate this card, I highly suggest clicking on the link above! Her directions and pictures really made this easy to create!

Card Recipe: Cardstock-2010-2012 In Colors, whisper white, Ink-pear pizzazz, concord crush, Stamp set-Fresh Vintage (from SAB), sentiment-unknown, Accessories-bakers twine, Boho Blossoms punch, eyelet border punch, bird builder punch, fun flowers die, floral fusion and little leaves sizzlit dies, square lattice folder, perfect polka dots folder, petals a plenty folder

Monday, March 26, 2012

Scrapbook Monday-The big 5-0

Hello and welcome to another Scrapbook Monday!  I am so glad you popped in to visit!

A few years ago, we had a surprise 50th birthday party for my sister.  Her birthday is a week before my daughter and she thought she was going to my daughter's party.  She was very surprised when she walked in and saw black decorations and lots of people yelling at her!  My oldest sister and I did the decorations for the party and my girls made her a crown made of black pipe cleaners and purple beads.  We also found these awesome pink and purple feather boas at the dollar store and had to buy two for the birthday girls to wear.

I also started an album for her as a gift and here I am, a few years later, finally working on the pages...Since we decorated with lots of black, I went with that as the primary color and accented it with purple (my sister's favorite color!).  I'm hoping to get this album finished this week and maybe she'll get it before her next birthday!

Today's page is when she walked in and was crowned 'Queen for a Day'.  There's not a lot of SU product on this since I already had a packet of black and ivory scrapbooking supplies from a wedding project many moons ago.  Using up more of my stash...Yee! Haw!


Don't you just love my little blinged out owl?  Owls are another of my sis's favorite things.  I tried to replicate the whole crown theme with pearls and I think it turned out pretty good.  Well, time for me to get back to work.  I'm forcing myself to do more cleaning than crafting for the first few days of my break.  Hopefully I'll make enough progress to spend my last few days being super crafty.  Wish me luck!

Page Recipe:  Cardstock-mostly 'stash' paper, garden green, whisper white, Ink-soft suede and concord crush, peach parfait, & crumb cake markers, Stamp Sets- Punch Bunch, Notes and Details, Extras- basic pearls, owl builder  & bird builder punches, scallop border punch, spiral border punch (ret)