Showing posts with label dazzling details. Show all posts

Friday, December 20, 2019

Glittery Greetings!

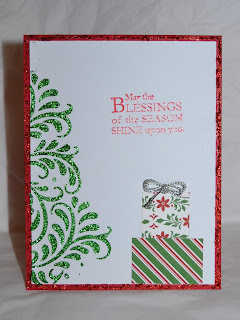
Hi! Today I'm here with something a bit new!  I've been putting a lot of effort into using my older supplies for Christmas cards, but I just had to play a little with a new stencil and new color of glitter gel I bought at our LSS.  I used a border stencil, with a tilt to create that glittery green tree. It was a bit tricky to get the placement right and not get glitter where it didn't go, but I thought it made a great tree.  What I wasn't counting on was all the white space left on the layer.  A quick change in plans led to the gifts made of DSP.  A Christmas tree should have gifts, right?!


I heat embossed the sentiment to make it stand out a bit and then ran some cherry cobbler dazzling details around the edge to frame the card in glittery goodness!  A lot more time then I usually spend on Christmas cards, but it was a lot of fun!

I will  have a few more posts with Christmas cards and then I'll be back in scrapbooking mode after the holidays.  Thanks so much for visiting today!

Card Recipe: Paper-whisper white, real red, Dashing Along DSP, Stamp Set-Star Studded Season, Ink-real red, versamark, Accessories-Gina K Autumn Wishes stencil, holiday pine glitz glitter gel, silver twine, clear embossing powder, cherry cobbler dazzling details
Thursday, June 29, 2017

Merry Monday- Ready for Christmoose?!

Hi! I'm feeling a bit giddy right now! I am finally finding time to resume playing along with challenges again!! I've always enjoyed the fun of coming up with an idea based off of someone else's suggestions.  When I saw the challenge at Merry Monday Christmas Challenges was 'use a moose', I knew I had to dig out one of the cute moose images I had!  


The stamp is from Riley & Co, but I don't remember what it was called, sorry!  I colored Riley and his penguin friend with markers and added a little crystal effects to the earmuffs and scarf.  A little snow-tex was added to the 'ground' to complete the scene.  I also managed to use one of the wooden snowflakes that I've had for some time.  I covered it in white craft ink and then covered it with dazzling details for some added sparkle! There is also a hint of pastels on the background to create the sky.  Not a super complicated card, but I had a lot of fun playing with some supplies that have been neglected for some time!

On a personal note, I can't believe that June is almost over and that means Christmas will be here well before I'm ready!  Good thing the Merry Monday ladies helped me get an extra card added to my very small pile of completed Christmas cards!  If you get a chance, be sure to visit their challenge site and see all of the super cute moose cards, or even better, make your own super cute card and join in the fun!

Thanks so much for stopping by and have a wonderful day!

Card Recipe: Paper-whisper white, real red, Raspberry Tart dsp (ret), Ink-Memento tuxedo black, crumb cake, pumpkin pie, old olive, real red, creamy caramel, tip top taupe, Stamp-Riley & Co., Accessories-crystal effects, dazzling details, snow-tex, wood snowflake and white ribbon from stash

Wednesday, July 29, 2015

An Elegant Occasion

Hello! I am so glad you stopped by to visit! Summer break is coming to an end and I'm bouncing between emotions of happiness to be going back to work and getting a paycheck, frustration that once again my 'to do' list was longer than my summer, and sadness that my full days with my girls are coming to an end.  Fortunately, this week will be less hectic than some and maybe, just maybe we'll squeeze a little day tripping in there!

About a month ago, my niece was married and I made the wedding thank yous for them.  I'm pretty sure it's safe to post  a photo of one now that they've been sent out.


She wanted something simple, but elegant, so I used the retired elegant lines embossing folder on some whisper white cardstock.  I added some silver dazzling details, the sentiment in wisteria wonder, and attached all of that to a wisteria wonder base.  I think they turned out very pretty and elegant!

Even though the wedding day was a bit rainy, it was a beautiful occasion and we had a great time celebrating with the happy couple. And while I was so happy to be able to help them out by making the thank yous, I am even more relieved that they were completed on time for the big day!!

Thanks so much for taking the time to visit my blog today and I hope you have a fantastically creative week!

Card Recipe: Paper-wisteria wonder, whisper white, Ink-wisteria wonder, Stamp Set-Regarding Dahlias (sentiment), Accessories-elegant lines ef, silver dazzling details

Sunday, February 15, 2015

Anything But a Card Challenge 44-Friendship

It is week three of ABAC Challenges Friendship theme and my turn to share.  There has been a wonderfully creative showing from the team this month and I hope you stop by and check them out!  I have to admit that while this theme has so many options, I really struggled with coming up with something.  My brain kept going back to a Valentines style of project, but other than cards, I don't make many things for Valentines Day.  My inspiration hit when I was looking for a stamp set for a birthday card and I saw Blooming With Happiness.  I have used this for wedding and shower projects, and actually forgot about the friendship sentiment that came with this set until I saw it.  I decided to make another page for my art/quote journal using the umbrella and the sentiment.

It was a dreary wintry day when I made this and I think this led to my unusually bright color palette.  I must admit that looking at this page makes me long for the beautiful spring colors that will be making their appearance in about a month!


I used a heart and a dot mask to create the background.  The umbrella and sentiment were stamped on a scrap piece of very vanilla card stock, and I colored the image with melon mambo and daffodil delight markers.  Dazzling details and crystal effects were added to the umbrella.  I pulled out a remnant piece of pink organza, cut small square pieces, stacked them together, and randomly snipped the edges to make my tattered bloom.  A green glittery brad holds the layers together.  There is also a bit of the organza behind the panel with the image and sentiment.  I also added some pretty flowers (a gift from Hippie Aud), and a few leaves created with a MS punch.

You still have a few days left to join us in our Friendship challenge; I hope to see your project linked up with us!  Thanks so much for stopping by!

Project Recipe: Paper-very vanilla, green from stash bucket, Ink-memento tuxedo black, melon mambo, daffodil delight, Stamp Set-Blooming With Happiness, Accessories-dazzling details, crystal effects, pink organza, paper flowers (Hippie Aud), polka dot and heart masks, MS leaf punch, assorted retired SU brads

Thursday, December 25, 2014

Merry Christmas!

Hello! I purposely left the photo of my last batch of Christmsas cards for today, so I would have something to share.  This is another of the super easy designs that I pulled off at the last minute.  Starting with the glittery card base made it very easy.  I think the hardest thing was waiting for the dazzling details to dry so I could put it all together!


Now that my girls are a little older and share the Santa Magic with us, I'm hoping they will let us sleep in until a suitable hour this morning!  But even if they don't, I know today will be a beautiful day filled with family, lots of coffee, and the creation of many happy memories!

I also wanted to take a minute to share some love with my blog followers and visitors.  I know that there are many throughout the world who do not celebrate Christmas, so I hope that you will appreciate my deepest wish that you and your loved ones find happiness and peace as we approach a new year.  For the Christmas celebrators, I hope this season brings you closer to to the ones you love and that we all enter this holiday season with the knowledge that 'presence' is so much more important than 'presents', and for my fellow Christians, may we keep in mind the true reason for our celebrations and share His love with others throughout the world.

Merry Christmas, Happy Hanukkah, Happy Kwanzaa, and Seasons Greetings to all! 

Friday, March 28, 2014

No, really... I was cleaning...

Hello! I am so glad you stopped by because I need to share a true story with someone who will understand, and possibly believe my story.  Because my family doesn't...

**Warning: Extremely Lengthy and Possibly Boring Story**

It all started as I was cleaning the kitchen earlier this week.  I did a major purge of my cabinets and pantry resulting in a lot of things ending up in a donation box or the trash.  I did not, however, throw away several different sized empty coffee containers.  They were moved to my craft area under the eye rolls of my family members.  I told them that if I couldn't come up with a use for them by the end of the month, I would get rid of them (the containers, not my family-although I was quite tempted...).

After the kitchen was cleaned, I realized I needed a better system for keeping our daily medicines organized.  Since we no longer have any littles, I don't worry about keeping things up high and out of sight.  So our vitamins, advil, and prescriptions are sitting on the counter, which is great until one of them gets knocked onto the floor and rolls under something or gets pushed to the back of the counter where it hides behind the whole wheat flour container (found some of my allergy meds there during the clean).  As I was pondering where I could find something that would look nice sitting on the counter, my eyes spied the stack of coffee containers. Hmmm...

The next morning instead of cleaning up my crafting space like I had planned, I got busy transforming the coffee canister into a lovely medicine bowl.  This would have been perfectly acceptable except that I shared my cleaning plans with DH so I would stay accountable.  His smug grin said it all.  Nothing wiped it off his face either-not my insisting that it was divine intervention that called me to use one of the containers, not the reassurance that this was actually finishing the kitchen clean up, not even the reminder that "Hey! I told you I'd find a use for those containers you rolled your eyes at yesterday!".

So now I have a perfectly lovely container that keeps our medicines and vitamins neat and tidy, and a super messy work space.  But like my fellow procrastinator Annie always says "Tomorrow... Tomorrow... I'll clean ya, tomorrow!  You're always a day away..." or something like that...  I'm pretty sure the mess isn't going anywhere and since we are scheduled for wind and rain tomorrow, it will be a perfect day for tidying up the ol' crafting space!

If you've made it this far, you will be glad to know that I do actually have a few pictures of the medicine container that is causing my family to doubt my ability to get the house organized.


I placed the plastic lid on the bottom since the edge of the canister was metal
and I didn't want to risk the can rusting. The crochet ribbon is hiding it from view.


The butterflies are covered in dazzling details but it was hard
to get a good shot of all of the glittery goodness.

Now you have heard my tale, sad but true, about a royal family who doubts their queen's ability to stop crafting long enough to keep the castle in proper order.  But I know that you saw the deeper meaning of this story.  The queen just saved one of the coffee containers from imminent doom, and I'll let you in on a little secret...she has plans for the other ones too!  Don't you just love a happy ending?

Thanks so much for stopping by and have a marvelous weekend!!

Project Recipe: Precious Butterflies and Inspired by Nature stamp sets, garden green & not quite navy ink, rose red & not quite navy cardstock, bitty butterfly punch, butterfly punch (ret), First Edition DSP, dazzling details, crochet ribbon

Sunday, February 16, 2014

Tic Tac Love Challenge-A Cheesy Remake

Hello! Hope everyone is having a wonderful weekend and feeling quite loved (It is Valentines weekend after all!).  Personally, we don't really do a lot for this holiday.  When the girls were in grade school they would make their own Valentines to share with their classmates, but now that they're getting older, there's not a lot of Valentine crafting happening.  So I was a little stumped on whether I wanted to make an actual Valentines project for this month's Anything But a Card Tic Tac Love Challenge, or go with an all purpose idea.  I compromised and made something that had a romantic feel but could be used for other occasions.  I decided to go with the top row.  Red, Recycle, Glitter.  Yes... I know my red is quite 'pink' but it is rose red so I'm pushing the envelope here!  I made up for my little act of rebellion by following the other squares to the letter.  My recycled container once held wedges of spreadable cheese, and I used both glass glitter and dazzling details for the glitter square.

I painted the cardboard container with vintage white acrylic paint and topped that with TH black soot distress crackle paint.  It's hard to see in the photo, but there are some fine crackle lines on there making it look just a bit aged.  I glued a circle of Junior Varsity DSP to cover the top of the container and used the spiral flower die to make the two larger blooms.  This was my first time using the die and while I'm ok with the results, I really need to play a lot more to get the rolling just right.  I inked the edges of the First Edition DSP with rose red ink before assembling the flowers, then added dazzling details to the edges of the petals.  I covered the seam around the rose red DSP with champagne glass glitter.  Then I decorated the top with the flowers and leaves.


 a close up of the sparkly flowers...

On a side note, these photos were taken with my new camera.  I would love to say this was a planned purchase, but unfortunately, my good ol' Canon bit the dust last week.  I was going to try to find a repair shop (none in our area) when my DH made the comment that it might be cheaper in the long run to just buy a new one.  WELL...Since you put it that way, twist my arm and I'll go pick out a new one!  I did some research, took advice from other shutterbugs, and finally decided to try a Nikon this time.  So far I really like it, although I must admit I don't have a clue what most of the buttons and settings do... :)  Hopefully, I will have some time to read the manual soon and learn a little more.

I hope you find some time to play along with our Tic Tac Love challenge; there's still a week left!  Have a wonderful week and thanks so much for stopping by!

Project Recipe:  empty cheese container, Junior Varsity DSP (ret), First Edition DSP (ret), circle framelits, spiral flower die, little leaves sizzlit, boho blossom punch, champagne glass glitter, dazzling details, vintage white acrylic paint, TH black soot distress crackle paint

Wednesday, February 5, 2014

Mission Impossible

Hello! I am so thrilled that you are here!  We are half way through the week and I am ready for the weekend!!  My mom pulled a muscle in her back a few weeks ago and I've been doing double duty between my house and theirs. The recent colder temperatures  and the early arrival of lambs has made things a little stressful and I'm looking forward to a break!  Add to that all of the yucky snow and sleet that we received yesterday and I am ready for a new start! Is it Friday yet? But I digress...

Have you ever been struck by the fact that you're fighting a losing battle?  Like getting all of the laundry washed, dried, folded, and put away and then you turn around and BOOM! A clothes bomb has exploded in your laundry room?  Or that moment when you let the dishwater out of the sink because you KNOW you checked the entire house for stray cups and all of the dishes are clean, only to have one of the kids bring you a cereal bowl from under their bed (not that they are allowed to eat cereal in bed!)?  Yeah, me too!

I would love to say that I scrapbooked all of my photos (I wish!), but actually I just realized that while I have completed a lot of scrapbook pages, there are still a LOT of photos left and that doesn't include the ones that are still on my memory cards waiting to be printed, or the ones on the computer waiting to be dropped on a digital page.  I have decided that I'm like an agent on Mission Impossible.  My mission if I choose to accept it, is to get as many photos onto some sort of page and document the story as accurately as my mind will allow.  I will probably never achieve the status of Mission Completed, but at some point I have got to start making some sort of progress!  One goal that I think I might actually achieve is to use up all of the older 12x12 cardstock papers.  I am at the point where there are mostly oranges and yellows left on the pile and I'm thinking they may become some sort of card boxes at some point.  My ribbon and embellishments are a totally different story, but one mission at a time!

Today's page used the last of my older pink stash.  I also snuck a few vellum letter stickers on there. Those babies are OLD!


I had a hard time selecting a layout for this page.  I wanted all five photos on one page and was trying to figure out how to make it work.  I remembered that a long time ago, I had made a quilt-like page that had lots of pictures and thought that might work.  The hardest part was balancing the embellishments.  I have such a hard time with 'white' space.  But when I was finished, I managed to have all five photos and even a tiny shot of my in-law's Lab.  Shadow loves her and he couldn't bear for me to throw her in the trash bin!

Well, I better slip on my black sunglasses and get back to being an agent.  I just have to decide whether my mission will involve dishes, laundry, or pictures...  Wish me luck!

Page Recipe: Paper-pink base from stash, strawberry slush, pistachio pudding, Stamp Set-Just Journaling, Ink-crumb cake, pistachio pudding, black journaling marker, Accessories-paper daisies, Boho blossom punch, bitty butterfly punch, 1 3/4" and 1 3/8" circle punches, Martha Stewart leaf punch, dazzling details, green vellum stickers from stash.

Saturday, December 14, 2013

Day 14- The Last of the Christmas Cards!

Hello and welcome to day 14! This post celebrates two accomplishments! The first is the completion of my Christmas cards and they're all in the mail now!! The second is that as you read this, I am celebrating our family's annual cookie day.  Yes, I have the arduous task of making, baking, and tasting lots of yummy Christmas cookies! How will I manage??  This is one of my favorite Christmas activities because not only do I spend the day with my favorite ladies, we also recreate some of the recipes that have been in my family for generations.  As an added bonus, most of these cookies will be given as gifts which means I can cross that off of my list too!

My last card uses one of my favorite Christmas stamps.  I love the vintage style of Christmas Postcard and it's fun to color too!


After coloring the image, I added some cherry cobbler dazzling details and yellow glitter glue for just a bit of sparkle.

BTW- No, I did not forget how to count... Day 13 is still in the works and will be posted as soon as I finish my project and get a decent photo!

Thanks so much for stopping by today!  I'm not sure if I will continue to have daily posts since a lot of my 'to do' list is not so crafty, but I will still be popping in to share the creations I have made for gifts.  Have a wonderful weekend!

Card Recipe: Paper-chocolate chip, whisper white, Berry Bouquet DSP (ret), Stamp-Christmas Postcard, Ink-black stazon, chocolate chip, wild wasabi, so saffron, real red, cherry cobbler, Accessories-cherry cobbler seam binding, cherry cobbler dazzling details, Ovals collection framelits, yellow glitter glue

Wednesday, December 11, 2013

Day 11-A little something sweet

Hello! I am back again with another Christmas card.  We are having our annual family Cookie Day this weekend and I have really been in the mood for some yummy treats.  I guess that's what inspired me to pull out the gingerbread man stamp from Scentsational Season.  I remembered seeing a fun card made by Sarah-Jane last year, and did a little searching to find it.  Unfortunately, I didn't have the fabulous ribbon slides that she used, so I did a little creative searching and used one of the antique brads instead.


I think this is quite a cute card and now I am really making myself hungry for the real thing!  Of course... after a day of cookie making with my mom and sisters, I will probably be so sick from cookie dough that I won't eat too many baked cookies!

Well, I'm off to get more things finished and try to clean the house a little. Wish me luck!  Have a wonderful day and thanks so much for stopping by!

Card Recipe: Paper-crumb cake, cherry cobbler, very vanilla, Be of Good Cheer DSP (ret), Ink-crumb cake, Stamp Set-Scentsational Season, Accessories-holiday collection framelits, silver dazzling details, cherry cobbler crochet yarn (ret)

Tuesday, December 10, 2013

Day 10-Out with the old...

Hello! I can not believe that in 15 short days, we will be celebrating Christmas... How can a celebration that never changes dates sneak up on you???  Please tell me I'm not alone!

I am happy to say that I'm very close to being finished with my cards!  I am also glad that I have been using a lot of my supplies that I've had for a while.  I am really trying to commit myself to only keeping things I use or love.  Of course crafting supplies have to be replenished, but I could probably go quite a while without buying anything! So I am making an effort to use up a lot of my goodies instead of just adding to the supplies!!

Today's card uses many retired items that haven't been used in a while.  I pretty much CASEd this card from France Martin.  I saw her card a LONG time ago and saved the photo to my computer (prePinterest days...), but didn't save the actual link to her blog post.  But I still wanted to give her credit since I loved her card so much!  I used corduroy brads where she used bakers twine and jingle bells, and the background embossing & DSP is different, but otherwise it's almost exactly like hers.


I really enjoyed breaking out the red glimmer paper again and I LOVE those brads-so sad they're no longer available...but I parted with some all the same.  I also forgot how fussy those bits of stocking are to handle.  I may have muttered a few choice words as I tried to glue them perfectly to the glimmer paper...  But in the end, it really is a pretty, sparkly card!

I have some major Christmas shopping to do this week and I'm hoping to have most of it done by the weekend.  I would love to have everything wrapped and ready by next week, but I'm not sure that will happen! Gotta be realistic...

I am so glad you stopped by and I really appreciate my blog friends that leave such wonderful comments.  It makes my day even happier!  I hope you have a wonderful day and find some time amid the busyness to do something fun!

Card Recipe: Paper-whisper white, ruby red (ret), baja breeze (ret), old olive, red glimmer paper, Holiday Treasures DSP (ret), Accessories-1 3/8" circle punch, large scallop punch, stocking builder punch (ret), baja breeze corduroy buttons (ret), snowburst embossing folder (ret), dazzling details

Sunday, July 28, 2013

Anything But a Card Challenge 24-Christmas Album

Hello! We are in week 2 of challenge 24 at Anything But a Card Challenges.  Our challenge is to celebrate Christmas in July (or Hanukkah, Kwanzaa, or winter) and you are welcome to share just about anything!

I had originally planned to scrapbook some photos from past Christmases, but it has been so terribly hot and humid here this week that I just couldn't get myself motivated.  I did however begin to alter a chipboard mini album which will feature some of my favorite holiday tradition photos.

The chipboard album came from the clearance bin at Michaels.  I think they were a quarter and I just couldn't pass them up.  Since I'm making an effort to actually use some of these things instead of letting them gather dust, I chose the wreath shape for this week's project.


I also used the retired Be of Good Cheer DSP.  This pattern reminded me of a berry covered holly wreath, so much so that I added some cherry cobbler dazzling details to really make the dots dimensional and festive! The silver ribbon is from the new Holiday catalog which goes live on August 1st.  I absolutely love this!! It's the perfect size for cards and smaller creations and it's so pretty!!

a close up showing the 'bling' factor...

On the back side, I painted the chipboard with Folk Art vintage white acrylic paint.  After the paint dried, I added a few strips of Season of Style washi tape (from the new Holiday catalog too) and mounted my photo on another piece of DSP.  I was debating what to add next when a piece of cherry cobbler tulle caught my eye.  I played with this a few months ago and opted not to use it.  I wanted a slightly tattered look, so I cut fringes  and scrunched them up before using glue dots to attach my shabby bow.  The snowflake was an extra punched from wax paper for a project completed long ago, but I kept it in my 'someday' container.  Apparently today is 'someday'!


You probably can't tell from the pic, but my DD is making Christmas cards.  The girls and I get together every year with my sister to work on Christmas projects.  Usually it's cards, but we've also made a Christmas Bingo game, and photo ornaments over the years too.

I'm hoping to get a few more pages finished this week since it's the last week of summer vacation.  I'm sure things will get quite a bit busier once the girls are back to their activities and schedules...  Maybe I'll manage to keep myself busy with some crafting projects while they're gone during the day!

I hope I have inspired you to pull out your holiday goodies and make something crafty to link up with our challenge!  Just remember, anything BUT a card!

Project Recipe:  Paper-Be of Good Cheer DSP (ret), very vanilla, Stamp Set-Joyous Celebrations, Ink-cherry cobbler, gumball green(sponging), Accessories-silver dazzling details, cherry cobbler dazzling details, silver 1/8" ribbon, basic rhinestones, large scallop circle punch, non-su snowflake punch, Season of Style washi tape, chipboard mini album, cherry cobbler tulle

Thursday, January 24, 2013

And the saga continues...

If you are a new follower to my blog, first of all...Welcome! So glad you joined me! and second, this post may make absolutely no sense to you at all.  I am providing back links in case you would like to understand it, but if nothing else, I hope you will enjoy my card for today!

It all started a little over a year ago when Chip met Rocky and they went on their first date...


Apparently it was quite a date because 10 days later, this card shared they were married and moved to Boulder...


During their next visit to my blog, we learned that the gestation period for lawn gnomes is around 5 months, either that or they were trying to keep a little secret from all of us...


The arrival of Chip Jr., (or Slip, as his family calls him) and another move, this time to Little Rock, was announced in June.  Since then, I haven't heard much from them. I assumed they were keeping pretty busy with their new baby and didn't have time to write or call.  

So imagine my surprise when Rocky sent me their latest family photo...


Seems they have been very busy!  You will notice that Chip Jr. had quite a growth spurt over the past 7 months.  That's him on the left and then there are the newly arrived twins, a sweet little girl named Pebble, and another little boy, named Flint.  If you can manage to read the sentiment on the card, you will notice that they have also relocated again... 'Snow Place Like Gnome'.  Rocky tells me they have family there.  When I asked her about the additional frog, she shared the sad news that the original pet frog was no longer with them (wait for it...) He croaked a few months ago.  But with the two babies, they decided to go ahead and get two new pet frogs.  Chip has a new job working in the mines, but he's not sure he likes working with all of the dwarfs.  He claims they are quite a 'dopey' bunch.

So if you have lawn gnomes at your home, be sure to keep a close eye on them because they are apparently more fertile than rabbits and grow faster too! Next thing you know, they'll be taking over your yard!

Well, I hope you have enjoyed the latest 'pun'-filled adventures of Chip and Rocky.  I can't be sure,but I thought I heard groans and boos coming from my computer.  Surely not...

On a little more serious note, this card was inspired by my blogging friend, Lisa.  She kept throwing out hints about the gnomes and I thought that it would only be fitting to use some goodies I received from her on my card.  The dimensional snowman and the alpha stamps for the sentiment were prizes I won from her fabulous blog!  I also used some brand spankin' new DSP on this!  Sycamore Street is a new DSP available during Sale-a-bration and it's FREE with a purchase of $50!!

Card Recipe: Cardstock-whisper white, Sycamore Street DSP, Ink-black stazon, various SU markers, Stamp Sets-Gnome Sweet Gnome (ret), tiny alphabet set from Lisa, Accessories-pastels, dazzling details, crystal effects, 3D snowman from Lisa


Friday, November 30, 2012

Color Me Beautiful Challenge #14-Holiday Tints and Goodbye...

Hello! I'm running a little behind on today's post, but I do have a good report on my Dad! His carotid surgery yesterday was successful and he is already resting comfortably in his recliner this evening! We knew he was going to be OK when he complained about his clear liquid diet for dinner last night. Seems the ICU unit frowns upon steak and potatoes after major surgery...

On a sad note, I am posting the very last challenge for Color Me Beautiful.  I have really enjoyed being a part of the design team and the ladies are absolutely fabulous!  It has also made me step out of my comfort zone several times as I used colors I don't normally gravitate towards.  The good news is that everyone who plays along this time is a winner (not that you weren't already winners in my book!).  So without further ado, here is the last inspiration photo...


and the lovely Stampin' UP colors...

I fudged the rules just a bit and added quite a lot of silver glitter and shimmer.  I really was drawn to the silver trim on the ribbon and thought my Christmas card needed that special touch.


The swirly tree just cried out for a bright silver star and some silver dazzling details, and my layered snowflake (leftover from my ornaments!) really needed a silver brad to bling it up a bit.  Of course when I was almost done, I just HAD to put a few spritzes of vanilla shimmer over the whole thing! My picture does nothing to show the shimmer and shine that really appears on the card! I could use this baby to guide Santa in for a landing!! Hee!Hee!

I really would love to see you play along with our final challenge and link up your own version of Holiday Tints!  All of the team members have made some amazing things and would love if you popped in for a little visit!!

Well, that's it for me tonight!  The girls and I are going to get some much needed cleaning done tomorrow so we can start decorating for Christmas.  I'll be back on Sunday with my Beside the Sea project for ABAC that doubles as a little Christmas gift!

Card Recipe: Cardstock-primrose petals, baja breeze, crumb cake, sahara sand, Ink-rose red, Stamp Set-Snow Swirled, Accessories-snow flurry die, silver glimmer brad, rose red seam binding, silver dazzling details, vanilla shimmer smooch spritz

Wednesday, August 8, 2012

Lovely as a Christmas Tree

Hello all! Well, it's officially back to school time for my girls and back to work for me. As you are reading this, we are trying to readjust to the routine and survive our first day back!  My classes don't start until Monday, but I have a lot of planning and preparing to do before then!

This will probably be the last of my Christmas cards for a little while.  I have some other fun things to share in the week to come and have some other projects that I need to complete.  Plus, before long the weather will become cooler and then I'll be in fall mode!  I used Merry Monday sketch #17.  I have to credit my blog friend, Sherry,  for the snowflake inspiration! I was looking at the circles on the sketch and trying to come up with something to put in their place when I saw her card.  I loved her snowflakes and thought they would go so well with the pine tree and DSP that I wanted to use. It's a little hard to see in the picture, but I added dazzling details to the pine needles and the ground. Gotta have a white Christmas!


I hope the rest of your week is full of crafty goodness and thanks so much for stopping by!

Card Recipe: Cardstock-cherry cobbler, gumball green, very vanilla, Be of Good Cheer DSP, Ink-gumball green, early espresso markers, Stamp Set-Lovely as a Tree, accessories-1" circle punch, dazzling details, basic rhinestones, non SU snowflake punch

Friday, July 6, 2012

Flashback Friday and another Merry Monday Sketch

I am cruising right through the older Merry Monday sketches.  Today I used sketch #6 and actually used a different older DSP! Yay!!!  I have moved on to Ski Slope (not sure how long I've had this paper...) and since this was a favorite when it was new, I only had about 1/2 of a pack to begin with.  Woo! Hoo!  I also used one of the first Christmas stamps I ever bought.  I stopped using this one after DD#2 was born because there were only 3 snow people, but today I threw that thinking out the window and inked this baby up!  I didn't even mind coloring the images since there were only two cards being made.  I tried to keep the colors neutral so they didn't clash with the dsp.


After putting the whole thing together and photographing it, I really think I should have matted the image on a piece of riding hood red paper to make it stand out a little more... hmmm...

This card definitely fit the original purpose of my Flashback Fridays.  I used retired DSP, a very old stamp, and the snowflake brad was also from my older stash!  After putting a little glitter on the snow drifts, I decided to glitter up the brad as well.  It looked much better with a little bling!

I hope all of my fellow Americans enjoyed some fireworks and festivities over the holiday!  Our day was pretty low key- a family cookout and then a trip in town to watch the fireworks display.

Card Recipe: Cardstock-baja breeze, whisper white, Ink-stazon black, various markers, Accessories-dazzling details, 1" circle punch, Flashback items-Ski Slope DSP, snowflake brad, snow family stamp (non SU)


Saturday, June 30, 2012

Umm... Another Christmas Card...

No, it's not Flashback Friday, but in my desperate attempt to use up my older Christmas DSP, I have another card to share this week!  I had to get a little creative with this one.  I used the sketch #5 from Merry Monday and knew I wanted to use the snowman circle from Tags Til Christmas, but there wasn't any blue in the DSP... So I grabbed the color coach and found that marina mist was suggested with real red and old olive, which were colors in the DSP! BINGO! Of  course, the snowy image just begged for some dazzling details as well!  Who am I to argue with a snowman stamp?!


I colored the image with markers and also did a little 'splitting' of the sentiment using the marina mist marker.  I love being able to color only what I want to stamp.  Makes fitting things into a punched shape much easier!!

I think there's just enough DSP left to make that mini album and possibly a few scrappy cards or a page or two.  As happy as that makes me, I am even more amazed that I have 10 Christmas cards made already!  I just won't know what to do when December arrives...  Maybe I'll get some more scrapbook pages finished!  Hope you are finding time to enjoy your weekend! Happy crafting!

Card Recipe: Cardstock-very vanilla, real red, Merry Moments DSP (ret), Ink-marina mist, real red, pumpkin pie, basic black (markers), Stamp Set-Tags Til Christmas, Star Studded Season, Punches-large oval, scallop oval, 1 3/4 circle, 2 3/8 scallop circle, Accessories- dazzling details


Monday, April 23, 2012

Scrapbook Monday- Fun Flowers part 2

Hope everyone had a great weekend! Mine was busy, but spent a lot of quality time with friends and family, so it was pretty enjoyable!

Today's page is the second page I used the fun flowers die to embellish.  Nothing too fancy...


I also used the Boho Blossom and Butterfly punches.  I stamped the background in elegant eggplant using a stamp  from the retired set, Sprinkles.  A little ribbon and some dazzling details and we're done!

Page Recipe: whisper white cardstock, dp from stash, Just Journaling stamp, black stazon & elegant eggplant ink, Fun Flowers die, boho blossoms & butterfly punches, title cut w/ cricut, black scallop dots ribbon, dazzling details

Friday, March 30, 2012

Tiffany's Challenge

Every month our SU group, The Crafty SisTAHS, get together.  Tiffany, my upline's upline, hosts the meeting and everyone takes turns with sharing, making a project, choosing a swap theme, and bringing snacks.  This month, Tiffany had a challenge for all of us to make a card using a sketch and some cardstock she gave us.  We were allowed to add a neutral color and any embellishments, but couldn't change the color combo.  The colors were wisteria wonder, cherry cobbler, and pretty in pink.  Very girly colors! So I pulled out the stamp, Packed For Mom for the first time; added some whisper white, and began to put my card together. I had a great time playing with this image! I knew I wanted to color some of the images and pop up the flower and the next think I knew...the dazzling details  and crystal elements came out and there was even some fussy cutting too!


A closer shot of the image...


I have to confess that I did use a different base than the one Tiffany gave me.  I knew I wanted to use bakers twine as the 3 ribbon/bows part of the sketch and couldn't wrap them with the base she gave us.  So I cut a new piece the long way for my card.  Hopefully, she'll forgive me for taking liberties with her challenge : )  I really enjoyed doing this and hope she will continue to offer these challenges.  I really didn't use wisteria wonder too much before, but now I think it's starting to grow on me!  Thanks, Tiffany!

Card Recipe:  Cardstock-wisteria wonder, cherry cobbler, pretty in pink, whisper white, Ink-black Stazon and several markers, Stamp Sets-Packed For Mom and Party This Way (sent), Punches-modern label, large oval, word window, 3/4 " circle, Extras- white bakers twine, cherry cobbler & original dazzling details, crystal effects, basic rhinestones, perfect polka dots embossing folder


Thursday, January 19, 2012

Another Challenge Card!

Wednesday, I actually managed to squeeze in some crafting time to play along with some challenges! So if you're in shock at seeing another post from me already this week, now you know why!  Top Tip Tuesday has two different sketches (created by Lisa!) to choose from.  I chose the CAS one, although my card doesn't really look super CAS!  LOL!  My tip for TTT is pretty simple, but it is not something I realized when I first started making cards.  **When you are using several similar embellishments or stamped images, you can easily add dimension and interest by randomly popping some of them up with dimensionals (or pop dots).  I usually lay out my pieces and then decide which ones I want to 'pop'.**    Shopping Our Stash had a challenge to use borders of some kind.  My assorted hearts make the border on this card. BTW- If you have never played along w/ SOS, it is so fun! They actually encourage you to dig through those wonderful treasures that are hiding in your stash and use them (Wow, such a novel idea!!!).  The only relatively new thing on this card was the heart embosslit I used! The DP I used has not been pulled out in ages!


I have actually started to acquire quite the collection of completed Valentine cards! I may actually be finished by Valentines Day!!

Card Recipe: Cardstock-real red, pretty in pink, whisper white, Raspberry Tart DSP (ret), red glimmer paper, Ink-black Stazon and assorted SU markers, Stamp Sets- Gift Givers, Precious Butterflies (sentiment), Accessories-heart to heart punch, scallop oval punch, large oval punch, full heart punch, Fashionable Hearts embosslit, dazzling details and pink glitter glue