Showing posts with label 1 3/4 circle punch. Show all posts

Friday, December 13, 2019

Flashback Friday-Christmas Stickers and Paper

Hello! I've been digging through my Christmas papers again and found some older DSP and as luck would have it, I had a partial sheet of stickers that coordinated perfectly! SCORE!!

I also went with a tri-fold card base which I haven't used in quite a while! It gave the perfect place for me to add those stickers!!


I'm slowly filling my box with cards and using up all that old paper at the same time!  I just might finish before Christmas after all!

I hope to share the last of my Christmas cards next week! Until then, thanks so much for stopping by and have a wonderful day!

Card Recipe:  Paper-Holiday Treasures DSP, old olive, very vanilla, Accessories-Samantha Walker stickers, pearls, 1 3/4 circle punch

Wednesday, January 2, 2019

Have yours'elf' a happy new year!

Hello and Happy New Year!  I am sharing one final Christmas project before leaving this wonderful holiday behind.  

One of my co-workers wanted to make something fun for her son's preschool class.  She showed me the picture of the candy cane elves and asked how hard they would be to make.  After a quick look, I realized everything was made with punches and that it would be pretty easy to knock these out.  The only punch I didn't have was the mitten...  She drew, traced, and cut out the mittens and I made the elf bodies and shoes.  She also did all of the final assembly.  The top photo shows a close up of the elves before they were attached to the candy canes and the bottom photo is the finished project.


I knew we did well when her son gave his approval and told us they look just like real elves!  We received our inspiration from Jackie Topa.  If you look up Candy Cane Elves, you can find the directions.  We simplified our version just a little, but I think they are still pretty cute!

I hope your new year is one filled with happiness and peace!  

Thursday, March 19, 2015

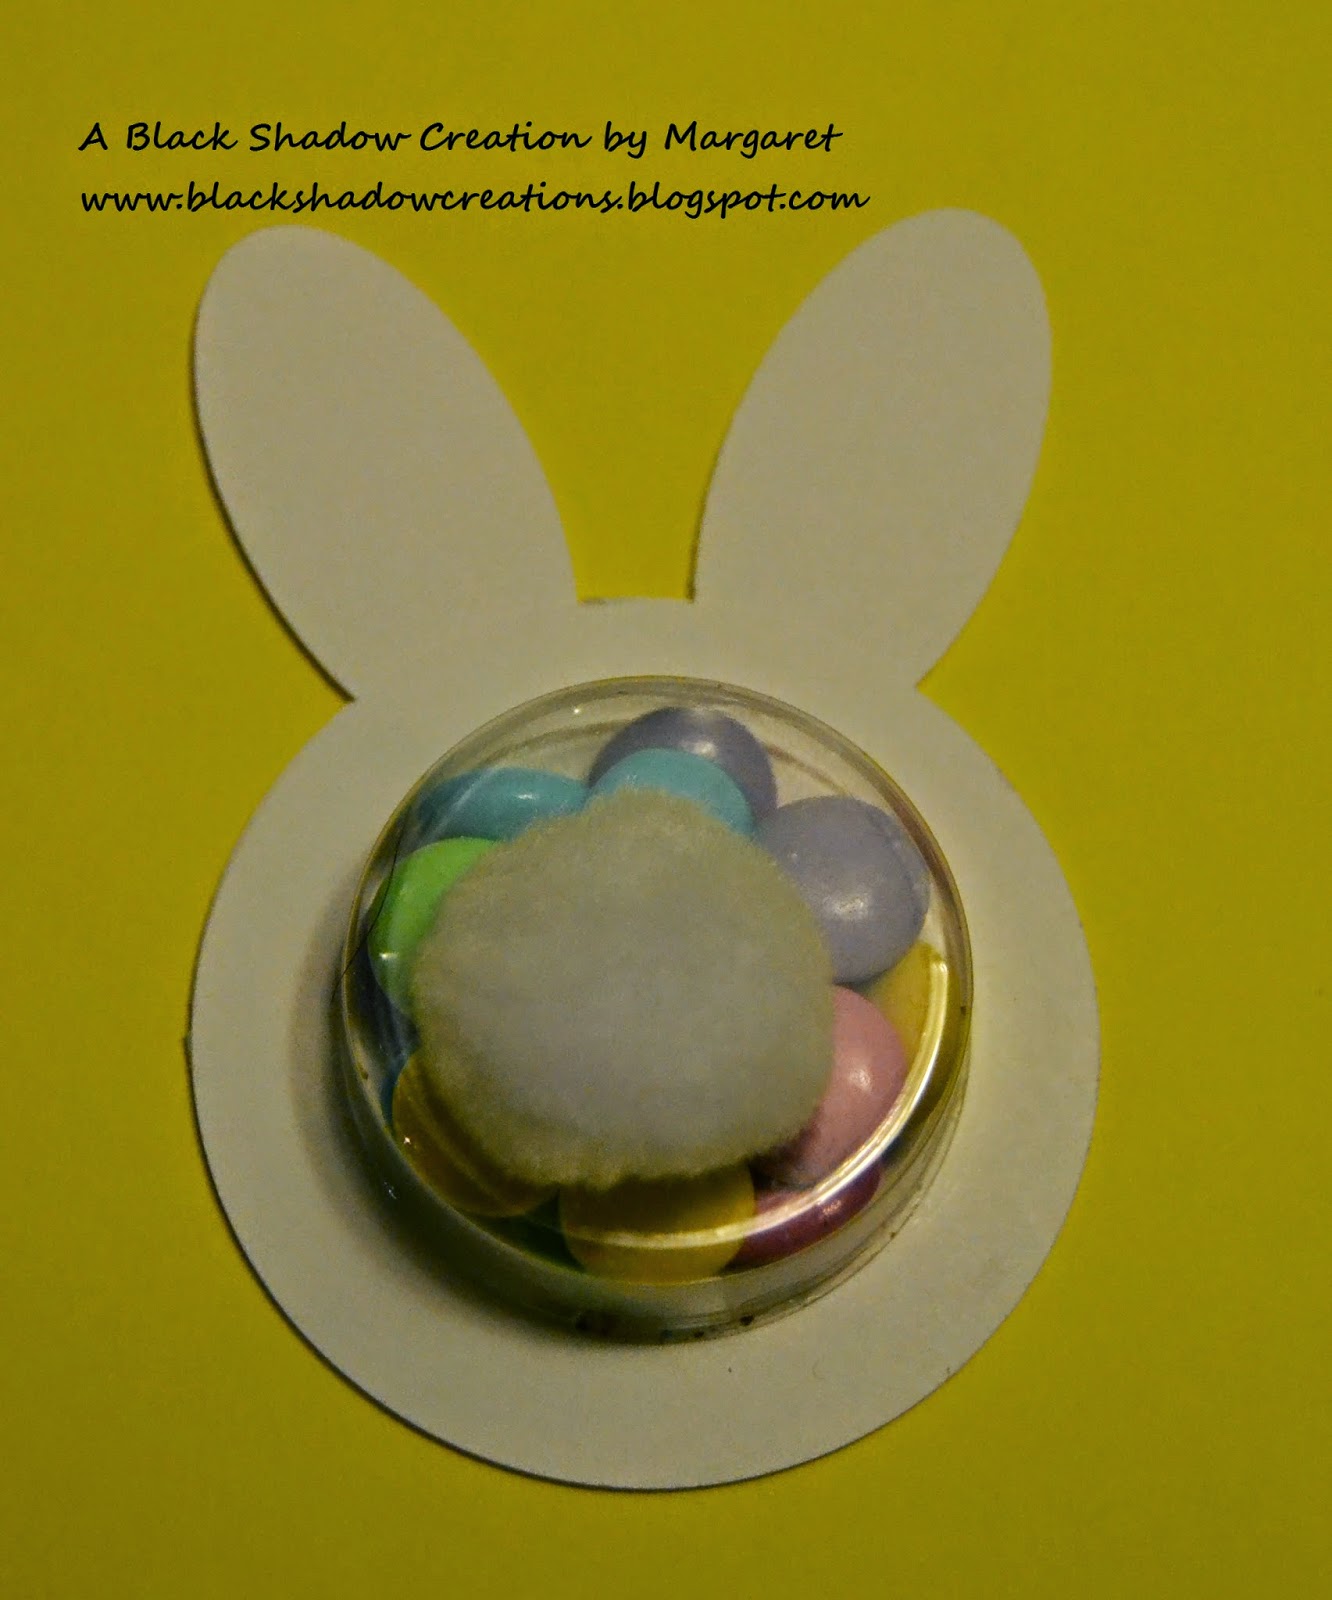
Bunny Butts, Anyone?

Hello! So very happy you stopped by for a visit! Today I have a cute little treat that is super easy to make and perfect for Easter.  This was my 'make and take' project for a recent fundraiser at my school.  My girls have affectionately named these Bunny Butts. 


If you need something that is easily reproduced (like bunnies...), this is a terrific option.  I punched out all of the pieces for 30 of these while watching tv one evening.  They are even easier to put together.  For each Bunny you need a 2 1/2" circle with a 1 3/4" circle punched out, a complete 2 1/2" circle, and two small ovals.  I also used a circle treat cup ($2.95 for 12) and a 1" white pompom.  The snack size bags of pastel m&ms fit perfectly inside the cups!

We had a lot of fun making these at the Ladies Day Out and I think they could be cute table setting decorations for Easter as well.  I have been playing around with a lot of my new to me supplies and will have quite a bit to share with you soon!  Spring Break is almost here and I have big plans to get a lot of scrapbooking completed and lots of other creative things accomplished too!

Well, I better get hopping back to work! Thanks so much for stopping by!

Project Recipe: Paper-whisper white, Accessories-2 1/2" and 1 3/4" circle punches, small oval punch, circle treat cups, white pompoms

Friday, March 6, 2015

Flashback Friday- Ladies Day Goodies

Hello! I am back again with another Flashback Friday, and I'm so glad you stopped in to visit!  I really need to get back to regular postings on Fridays.  It encourages me to use my older goodies to create something new, and occasionally even makes a dent in my mountain of paper!

I was so happy on Monday that the temperatures were finally above freezing and all of the snow was melting away.  We even had rain on Tuesday to wash all of the dirty grimy stuff off of the roads!  But apparently winter is not quite ready to give up yet because I woke up Wednesday morning to a school cancellation because we were expecting rain turning to sleet turning to snow.  I was really hoping the weather people were wrong and I would have a day off without all of the nasty weather.  No Such Luck!  It was raining when I woke up and by 10 it had already started to shower little pellets of ice.  By the time DH left for work that evening, we had over 6 inches of snow on the ground... Yuck!

On a more positive note, the snow day did give me a chance to work on some things for an upcoming fundraiser I am participating in at our school.  Two of our teachers are raising money to attend a training on autism and are hosting a Ladies Day Out.  Lots of different vendors, including me, and some of our students made things to sell in their booth.  I've never participated in an event like this and am not quite sure what might possibly sell besides the wonderful Stampin' UP items from the catalog.  I made a lot of cards with the thought that if they don't sell I can still use them, and I also made a few little Easter goodies.  I will also have a fun little 'make and take' that I will share with you next week.

Today's creation is a little treat holder.  I found the cutest mini Uno and Apples to Apples games at Wal-Mart in the Easter section, and I made little folders to pretty them up a little.

The folder measures 2 1/2 x 2 1/2, so you can 
have some idea of how little the card sets are!


My base is 2 1/2 x 5 1/2.  I scored the base at 2 1/2 and 3.  Then I used some retired DSP and added the cute little bunny from Tags So Much!  Hopefully, some other people will think these are as cute as I do!

I will try to post more of my creations in the following week, and I hope I can share that the event was a huge success!  Have a wonderful weekend!

Project Recipe: Paper-pistachio pudding, crisp cantaloupe, pool party, whisper white, Sweet Sorbet DSP (ret), Stamp Set-Tags So Much (ret), Ink-memento tuxedo black, pistachio pudding, crisp cantaloupe,pool party,blushing bride,  Accessories-1 3/4" circle punch, decorative label punch 


Friday, January 2, 2015

A New Year and a New Outlook

Hello and Happy New Year!  I am so glad you stopped by!  Today, I have two cards to share and I'm pretty sure they will be the last of my 'Christmasy' cards for a little while!  I am also sharing my  new year outlook as well (most of you know my feelings on resolutions-great for a week or two!).

My two cards are one design, but different papers, colors, and ribbons.  I found the design on Pinterest and you can see the original by Amy Frillici, here.  This is such a wonderful design for using up scraps, and is a pretty quick and easy card too!  I made several of these to use as thank you cards for the wonderful gifts I received from co-workers and loved ones.


I had to smile as I created the second version.  The paper is the very retired Ski Slope and there was not an entire sheet of any of the patterns-a small pile of scraps yet I managed to make two cards and still have a tiny bit left.  It reminded me of my blogging friend, Lynn, who once commented about the secret reproducing of scraps.  Perhaps I need to separate my scraps like we do the sheep... hehe!

With the beginning of a new year, everyone tends to reflect on the past year and make improvement plans for the future.  I can honestly say that my reflection process started around October-about the time that the days were rushing past so fast that I was left completely unorganized.  I am by nature a procrastinator,but also do a pretty good job of keeping deadlines in sight.  So this swirling chaos of three months without stopping for a breath really caught me off guard.  I began to take inventory of what had changed, what was working, and what really needed to go.  Unfortunately, blogging was one of the first things that moved to the bottom of  the list.  I came to the conclusion that I had been saying 'yes' to too many things (worthwhile and important things, but way too many), and also allowing too many 'issues' to take over my mind.  

I spent the better part of the days after Christmas focusing on family and giving myself a break. During this time, I tried to re-prioritize  things and also let go of a lot of unneeded baggage.  I am happy to say that my blog made the 'keep' list, however, I know there will be times when it has to sit for a little while-hopefully not too long!  Instead of making resolutions, I found something that I am going to do my best to follow every day...


I would like to wish you a new year full of peace, love, and kindness! Thanks so much for taking the time to visit my blog!

Tuesday, June 3, 2014

Shopping list? I don't think so!

Hi! I am so glad you are here!  I'm not sure exactly what I should call today's creation, but one thing it is NOT is a shopping list holder!  Let me elaborate.  One of the things I set out to accomplish is getting some of my older Paper Pumpkin kits put together.  Today's kit was supposed to make a shopping list holder.  It even has a roll of lined paper that was to be attached at the top.  Don't get me wrong, I like shopping lists.  They are essential to me actually getting real food in the house instead of all of the impulse buys I would otherwise make.  But I already have a system.  We have a magnetic list on the fridge and the theory is that when someone uses the last of something, it goes on the list.  It works about 60% of the time with the other people in the house, but I use it 99% of the time so I call it a success.

So there I was, looking at a kit that I knew I really did not want to make, when I started thinking the lined paper would make a wonderful journaling strip for scrapbooking.  Then I studied the thick woodgrain embossed base...way too nice not to use for something... I'm still not sure exactly what to call this, but it will probably have a photo placed on it in the future.  Let's call it a wall hanging!  The only thing from the kit that I did not repurpose was the extra wide rubber band that was supposed to hold the paper at the bottom.  I still have it, but it will likely end up with a more practical purpose rather than decorative.


I also added lots of goodies from the artisan kit and even used up a
skinny strip of leftover dsp to make a rolled 'thing'.  It's not exactly
a flower, but it still looked pretty good with the other embellishments.


As I was making this, I was thinking about a fellow blog friend
who is going through a very rough time and decided
to use this sentiment from the Trust God stamp set.


I'm pretty sure everything but the punches, very vanilla cardstock, and soft suede ink are retired.  Felt good to use up a bit more of the older goodies!  

Thanks so much for stopping by and I hope you have a wonderful day!

Project Recipe: Stamp Set-Trust God, Punches-decorative label, 1 3/4" circle, Accessories-paper pumpkin kit, linen thread, victorian crochet trim, artisan kit, inka gold metallic rub

Wednesday, February 5, 2014

Mission Impossible

Hello! I am so thrilled that you are here!  We are half way through the week and I am ready for the weekend!!  My mom pulled a muscle in her back a few weeks ago and I've been doing double duty between my house and theirs. The recent colder temperatures  and the early arrival of lambs has made things a little stressful and I'm looking forward to a break!  Add to that all of the yucky snow and sleet that we received yesterday and I am ready for a new start! Is it Friday yet? But I digress...

Have you ever been struck by the fact that you're fighting a losing battle?  Like getting all of the laundry washed, dried, folded, and put away and then you turn around and BOOM! A clothes bomb has exploded in your laundry room?  Or that moment when you let the dishwater out of the sink because you KNOW you checked the entire house for stray cups and all of the dishes are clean, only to have one of the kids bring you a cereal bowl from under their bed (not that they are allowed to eat cereal in bed!)?  Yeah, me too!

I would love to say that I scrapbooked all of my photos (I wish!), but actually I just realized that while I have completed a lot of scrapbook pages, there are still a LOT of photos left and that doesn't include the ones that are still on my memory cards waiting to be printed, or the ones on the computer waiting to be dropped on a digital page.  I have decided that I'm like an agent on Mission Impossible.  My mission if I choose to accept it, is to get as many photos onto some sort of page and document the story as accurately as my mind will allow.  I will probably never achieve the status of Mission Completed, but at some point I have got to start making some sort of progress!  One goal that I think I might actually achieve is to use up all of the older 12x12 cardstock papers.  I am at the point where there are mostly oranges and yellows left on the pile and I'm thinking they may become some sort of card boxes at some point.  My ribbon and embellishments are a totally different story, but one mission at a time!

Today's page used the last of my older pink stash.  I also snuck a few vellum letter stickers on there. Those babies are OLD!


I had a hard time selecting a layout for this page.  I wanted all five photos on one page and was trying to figure out how to make it work.  I remembered that a long time ago, I had made a quilt-like page that had lots of pictures and thought that might work.  The hardest part was balancing the embellishments.  I have such a hard time with 'white' space.  But when I was finished, I managed to have all five photos and even a tiny shot of my in-law's Lab.  Shadow loves her and he couldn't bear for me to throw her in the trash bin!

Well, I better slip on my black sunglasses and get back to being an agent.  I just have to decide whether my mission will involve dishes, laundry, or pictures...  Wish me luck!

Page Recipe: Paper-pink base from stash, strawberry slush, pistachio pudding, Stamp Set-Just Journaling, Ink-crumb cake, pistachio pudding, black journaling marker, Accessories-paper daisies, Boho blossom punch, bitty butterfly punch, 1 3/4" and 1 3/8" circle punches, Martha Stewart leaf punch, dazzling details, green vellum stickers from stash.

Sunday, August 25, 2013

ABAC Challenge 26- One Sassy Fairy!

Hello and happy Sunday to you!  I am so glad you are here because I have quite the interesting post today, at least, I hope you find it interesting!

Our current challenge at Anything But A Card Challenges is Fairies or fairy tales.  While I absolutely love this challenge, it was truly a challenge for me.  Now let me clarify that I am not anti-fairy.  I have nothing against the tiny little winged flitters, but my girls never got into the whole fairy themed merchandise and I never bought any fairy images.  I was going online for a digital image, when I stopped by the ABAC site to see the inspiration posted by my incredibly creative teamies.  That is where I found this!  The fairy name generator!!  How fun is this???  So I took a little bunny trail to the website and found my fairy name and background.

My fairy name is
Columbine Cornweb
She creates bounty and harvest. 

She lives in mushroom fields and quiet meadows. 
She can only be seen in the mist of an early morning. 

She wears lilac and purple like columbine flowers and has butterfly wings the colour of yellow corn.

This led me to creating my very own fairy based on the generated information.  The purple was not a problem; I had plenty of that since it's DD #1's favorite color.  I realized I didn't have any columbine images, but I did buy a gorgeous retired SU coneflower and grass stamp recently.  Besides, if I'm truly a fairy that lives among the meadows, wouldn't I love coneflowers just as much?!

I managed to create the background without a glitch when I realized I still needed a fairy... Hmmm... I did have a Sassy Susie stamp that might work.  Yep! She's even sitting in a chair! Hmm...chairs in a meadow? What I needed was a mushroom.  So I punched an oval and rounded the bottom with a circle punch and used the word window punch to make the stem. A little fussy cutting and Sassy Susie, um I mean Columbine was almost ready.  A butterfly punch, vellum, and some elegant eggplant ink created the snazzy wings and now Columbine was ready to perch on her toadstool.  I also found a sentiment from Blooming With Happiness that fit her pesonality.  It wasn't until I posted my picture with the information that I noticed that her wings were supposed to be yellow... Oops! It was a little too late to change them now.  Honestly I'm not completely sold that I would have corn yellow wings anyway.  Growing up on a farm, I am aware that corn is tasty, but it's also very 'hairy' and itchy. I would much rather have lovely eggplant purple wings!

So here is Columbine Coneflowerweb, taking a break from germinating and planting to say 'hello'!  She would love it if you would join us this week with your own fairy or fairy tale creation!  Be sure to check out the fabulous creations shared by the design team as well!


Have a fairy-tastic week and happy crafting!!

Project Recipe: Paper-whisper white, vellum, Ink-wisteria wonder, elegant eggplant, certainly celery, baked brown sugar, blush blossom, basic black, crumb cake, Stamp Set-Sassy Susie, Blooming With Happiness, Inspired by Nature, Accessories-pastels, butterfly punch, 1 3/4" circle punch, large oval punch, word window punch

Wednesday, July 10, 2013

Christmas in July, sorta...

It's beginning to look a lot like Christmas...NOT!  I am nowhere near ready to celebrate, but last year, I started my Christmas cards early and was so glad to have them finished before December 24th!  So I decided to do this again this year.  There's nothing better to put you in the Christmas spirit than a muggy summer day!  I also continued last year's trend of using up some of my older papers.  I used a very retired Ski Slope.  Sketch #83 from Operation Write Home gave me a perfect starting point for using lots of patterned paper.


I figured while I was digging through and trimming my scraps, I would go ahead and make four cards.


During one of my cleaning sprees, I found a box of Christmas cards I had saved from different classes and stamp a stacks I attended.  I took pictures of my favorite designs and added them to my stash.  Between these and my four new cards, I have a pretty good start on my Christmas cards.  Now I just need to keep making them! Wish me luck!

I hope you have a wonderful day and find some time to be crafty!

Card Recipe: Paper-chocolate chip, whisper white, baja breeze, Ski Slope DSP (ret), Stamp Set-That's the Ticket, Ink-kiwi kiss (ret), Accessories-ticket duo punch, 1 3/4" circle punch


Sunday, September 9, 2012

ABACC #1 My first project!!

Hello!  It is week two of the bi-weekly Anything Goes challenge at ABACC (anything but a card challenge) and I am one of the featured designers this week!  If you haven't already checked out the other ladies work, you really need to pop in!  I am in awe of the talent coming from this group and feel just a tad bit intimidated!  But only a little!!

I had a chipboard journal in my stash for over a year, from last year's Stampin' UP regional event as a matter of fact!  I kept meaning to get it out and play with it, but never felt inspired until now.  I inked the chipboard with very vanilla craft ink and then proceeded to add lots of different shades of brown from the neutrals collection.  It also got a good dose of early espresso and crumb cake from the color spritzer.  Nice and grungy!!


I used the more mustard and soft suede cardstock, the linen thread, and the mini clothespin which came in the chipboard project kit.  I did not however choose to decorate it like the project page.  I pulled out the daisy from Reason to smile, inked it up with crumb cake and then colored the center with pastels.


I'm planning on using this for a quotes, verses, thoughts, etc. journal... something to make me think and be a better person, which is why I chose the sentiment from Just Believe.

Well, I hope you enjoyed my first creation for ABACC and that you will make time to play along if you haven't already, and if you have, well...play again!!

Project Recipe:  chipboard journal (retired), Cardstock-more mustard, soft suede, naturals ivory, Ink-very vanilla, early espresso, crumb cake, soft suede, Stamp Sets-Reason to Smile (ret), Just Believe, Accessories-linen thread, pear pizzazz seam binding (ret.), color spritzer, pastels, mini clothespin basic pearl, 1 3/4 and 2 1/2" circle punch, 2 3/8" scallop circle punch, non SU flower punch

Saturday, August 18, 2012

Wrapped up in fall!

Hello! I hope your weekend is off to a wonderful start!  I have my upline Stampin' Up meeting today, so my morning will be full of crafty fun!

I really got into the fall theme for our latest stamp club meeting!  All three cards featured goodies from the Holiday Catalog and were perfect for fall!  

I don't normally do a whole lot of creating with Halloween but the Googly Ghouls stamp set (also part of the Ghoulish Googlies Bundle) was just too cute! The bundle is perfect for making little treat bags so I made sure I put it on my preorder.  When I saw the adorable mummy card at  Robyn's Stamping Hood , I knew I had to CASE it!


The 'wrapped' background is an easy technique but looks so awesome.  I started with a piece of whisper white cardstock in the size that I wanted the layer (sorry, didn't write down the measurements...).   I cut 3 strips about 1" wide  and the same length of the layer with the paper trimmer. Then I did some very unscientific or mathematical cutting.  Just make sure that the one side is wider than the other. Hope that makes sense.  This does not have to be even and actually looks better when it's a little wavy.  Before adhering the 'wraps', I inked all of the edges with basic black ink, then alternated the strips onto the layer.  The rest was pretty basic.  Don't you just love the little googly eyes (or is that just the preschool teacher coming out?)!

Thanks once again for stopping by and I hope you find some time to be crafty this weekend!

Card Recipe: Cardstock-whisper white, basic black, pumpkin pie, Ink-basic black, stazon black, Stamp Set-Googly Ghouls, Accessories-lots of punches: word window, modern label, scallop circle, and 1 3/4" circle, googlies, basic black scallop dots ribbon

Saturday, July 7, 2012

The intervention...

Hello, my name is Margaret and I have a problem.  I started making Christmas cards about a month ago to use up my old Christmas DSP.  I thought I could handle it, just make a few cards, use up some old paper, and then I would stop.  I was in control... or so I thought.  I have recently come to realize that I have an addiction to creating Christmas cards.  I've even started looking at other old packages of  Christmas DSP, just to see what was there...  I knew I hit rock bottom when I became frustrated that I had to make a birthday card. "That won't use up my Christmas paper... I have to use up my Christmas paper!!"  So that's my story.  I am a Christmas card addict.  The saddest part of this is I will have to find a way to control my behavior.  After all, Christmas is an annual holiday, and there will always be new DSP to buy, therefore making my current DSP old.  It's a vicious cycle...  But I can change... if I have to...I guess...

All silliness aside, I am really enjoying making my cards early (gasp!) and I was so excited when I realized I only had two full sheets and some little scraps left of my Merry Moments paper.  Bring on the new paper!!  

I once again used a Merry Monday sketch for my cards.  I'm just obsessive enough to feel that I need to do the sketches in order, but really would have liked to skip this one.  It was a wonderful sketch and I had this brilliant card pictured in my head, but when I attempted to put my vision to paper, I did not love it.  So I decided to try the sketch again with a different idea.  Not overly crazy with that one either...  But I finished the sketch and the next few are very basic and I think they will be a lot easier for me to use.  So here are both of my cards using sketch #7 from Merry Monday.  

   
My initial plan was for the cardinal to be resting on the branch, but it just didn't look right.  I also thought the background would be less bare and more 'forest-like' with the pine tree images.  I just feel like the whole vision fell short of what I wanted...


First of all... apologies for the washed out image... grr...
I decided to go a completely different route with this one.  I wanted to use the shaker frame, but didn't want to actually have a shaker card (confusing, I know).  So I stamped my image twice, added dazzling details to the bottom image and then layered the second image on top.  I think I would have been happier with this one if I had embossed the red background.

So do you ever have this problem?  Finishing a card and then really not liking it?  

Hope everyone has a fabulous rest of the weekend! Happy crafting!

Card Recipe #1-Cardstock-old olive, very vanilla, real red, Merry Memories DSP(ret), Ink-chocolate chip, old olive, Stamp Sets- Lovely as a Tree, Bells and Boughs, Language of Friendship, Punches-scallop oval, scallop circle, bird builder

Card Recipe #2-Cardstock-real red, very vanilla, garden green, Merry Memories DSP, Ink-real red, asst. markers, Stamp Sets- Sweet Snowglobe (ret), Warm Words (ret), Punches-1 3/4" circle, large oval, scallop oval, Accessories-dazzling details, shaker frame


Saturday, June 30, 2012

Umm... Another Christmas Card...

No, it's not Flashback Friday, but in my desperate attempt to use up my older Christmas DSP, I have another card to share this week!  I had to get a little creative with this one.  I used the sketch #5 from Merry Monday and knew I wanted to use the snowman circle from Tags Til Christmas, but there wasn't any blue in the DSP... So I grabbed the color coach and found that marina mist was suggested with real red and old olive, which were colors in the DSP! BINGO! Of  course, the snowy image just begged for some dazzling details as well!  Who am I to argue with a snowman stamp?!


I colored the image with markers and also did a little 'splitting' of the sentiment using the marina mist marker.  I love being able to color only what I want to stamp.  Makes fitting things into a punched shape much easier!!

I think there's just enough DSP left to make that mini album and possibly a few scrappy cards or a page or two.  As happy as that makes me, I am even more amazed that I have 10 Christmas cards made already!  I just won't know what to do when December arrives...  Maybe I'll get some more scrapbook pages finished!  Hope you are finding time to enjoy your weekend! Happy crafting!

Card Recipe: Cardstock-very vanilla, real red, Merry Moments DSP (ret), Ink-marina mist, real red, pumpkin pie, basic black (markers), Stamp Set-Tags Til Christmas, Star Studded Season, Punches-large oval, scallop oval, 1 3/4 circle, 2 3/8 scallop circle, Accessories- dazzling details


Wednesday, April 25, 2012

Blossom Builders Birthday

I was looking for something a little different to create for my stamp club and came across the blossom builders set in the Occasions mini.  I have to admit that I completely overlooked these until a fellow demonstrator did a tictac holder at one of our team meetings.  They are so awesome! All you have to do is punch them out and glue them down! And there is a solid color on one side and a print on the other.  Plus there are those fantastic pink rhinestones too! So I used the card in the mini (changed very little!) as one of my projects.  This was a really easy card to put together and the ladies loved the flowers!


While there are banner strips in the kit, I used very vanilla paper and snipped the ends. The sentiment is from Party This Way which is on the retiring list : (   I also used a circle as the base of my flower.

Card Recipe:  Cardstock-baja breeze, very vanilla, lucky limeade, Ink-baja breeze, Stamp Set-Party This Way, Accessories-Blossom Builders, word window punch, 1 3/4 circle punch, square lattice folder

Monday, January 23, 2012

Scrapbook Monday with the Triple T

Well, so far so good on the resolution to post a layout once a week! It helps that some of my blogging buddies have been checking in to see if I remembered : )

Today's layout used a sketch from Top Tip Tuesday designed by the ever talented, Lisa.  There are two sketches to choose from  and I used the CAS sketch earlier to make a Valentines card, but this one struck me as a scrapbook layout.  TIP TIME:  I have to admit that the angled piece threw me at first, then the logical half of my brain (the part that usually doesn't kick in until I've goofed up) said "Cut the piece to the width you want, then angle it on the page and use a ruler to draw your angles. DUH!!!" (my logic section is not very polite to the rest of my brain) So, if you are struggling with parallelograms or trapezoids, this is my suggestion!  Now to switch off the logic and let the creative and fun part take over lest everyone think they are back in math class. YIKES!!


The banner came from the Apothecary Art stamp set and only took a little fussy cutting to make it. I really like that! My flower was made using multiple layers of the boho blossom punch and the pretty pink rhinestones were colored with a pink sharpie. I LOVE this money saving technique and there's almost no limit to the colors I can create!

Even with the layers and circles, the page remains uncluttered and the photo is still the main element. Now all I need to do is add a little journaling to the page and it's finished.  I still have a stack of Christmas pictures taunting me and they keep getting put back in the photo box.  Maybe next week they will finally make it onto a page and into a book!

I also want to take a minute and thank everyone who visits, follows, and comments on my blog! Whether your comment is encouraging, witty, or advising, I really appreciate the feedback! Especially since my DH (bless his little heart!) says such wonderful things like "Looks OK to me." or "What do you mean, does it need anything else?".  He is incredibly supportive when it comes to a messy table, late dinners, and a ton of supplies that he doesn't understand exactly what they do, only that I need them! So I guess I can't complain too much!!  Thanks so much for stopping by and I hope you come back soon!

Page Recipe:  Cardstock-Sending Love DSP (ret), very vanilla, real red, pretty in pink, and the base is from my stash, Ink-soft suede, chocolate chip, Stamp Set- Apothecary Art, Accessories-1 3/4" and 1 3/8" circle punches, Boho blossom punch, houndstooth folder, chocolate chip corduroy button (ret), real red brad


Saturday, October 1, 2011

Boo!

Today was a great day to play with my stamps and paper! I blog hopped and found a few challenges that I wanted to try. Sketches By Carly had a fun sketch that I wanted to try. Then I saw the color challenge at My Create Ink, rich razzleberry, basic gray, and lucky limeade. Hmmm... I checked in on the ladies at Hand Stamped Sentiments and they were having a Halloween challenge. Three challenges in one card? Too cool! (It doesn't take much to excite me!) I had lots of thoughts and ideas going through my head and then I remembered that I had seen the owl punch turned into a ghost somewhere in blogland. I don't usually work a lot with gray and was afraid that the only gray would be my ink.  Then I remembered the gray corduroy buttons & brads I had bought from the clearance rack a long time ago! Here is my 3 challenge card...


As you read my card recipe, you may be a little confused. Just where is that Word Play stamp set on this card?! Well, I knew I wanted to put B-O-O on my banner but the alphabet stamps that I own are too big to fit on the banner. So, I used the B from 'wish big' and the O from 'thanks a million'. Necessity is truly the mother of invention! After I had the card put together, I started thinking that I should have done some dry embossing or stamping on the base. It just looks a little bare... Let me know what you think!

Card Recipe: Cardstock-lucky limeade, rich razzleberry, whisper white, & rich razzleberry DSP from the brights pack, Inks-basic gray and rich razzleberry, Stamp Sets- 4 frames, Word Play, Fabulous Phrases, Accessories-decorative label punch, owl punch, 1 3/4" circle, 1" circle, 3/4" circle, basic gray corduroy brads (ret), spider web embossing folder, rich razzleberry 1/4 grosgrain ribbon, white bakers twine

Wednesday, August 31, 2011

Eeek! A Halloween Card!

Halloween is not my favorite holiday.  When I was younger I loved it and watching all of the scary movies went right with the spooky day.  I think as I've matured (a sophisticated way of saying I'm getting old!) I have seen enough real scary things that the make believe scary just isn't 'fun' anymore. Add that to the meanness that seems to surface more at this time of year and it just doesn't have much appeal now.  I still enjoy helping my kids dress up and visit family and close friends for Trick or Treating and the girls and my husband always try to 'out do' last year's pumpkin carving.  Having said this, I did like the spider web embossing folder (I know...doesn't make sense, especially since I do not like spiders...) I really liked the idea of being able to ink the raised image or distress it with sanding.  Plus, it makes a great 'Wow! You're old' card too!  Hope you enjoy my 'spooky' card!


Card Recipe: Cardstock-whisper white, basic black, rich razzleberry DSP (brights collection), Ink-whisper white, rich razzleberry, Stamp Set-Sweet Centers, Accessories-spider web embossing folder, 1 3/4 circle punch,1 3/8 circle punch, rich razzleberry ribbon

Sunday, August 28, 2011

Yet another wedding card!

Wedding cards are not usually in my stash because we haven't had much call for them in recent years.  But next month we have two weddings to attend.  I have already created a few cards, but I seem to gravitate towards my stamp from Word Play to see what else I can create.  I'm pretty sure this will be the last wedding card for a little while (I think...).  This card was really basic and simple to make, but I think it still has the elegance that a wedding requires.  Of course, this stamp requires a little bit of bling! This could also easily be an anniversary card too.


Card Recipe: Cardstock-very vanilla, baja breeze, Ink-baja breeze, Stamp Set-Word Play, Accessories, very vanilla satin ribbon, basic rhinestones, elegant lines emb. folder, 1 3/4 circle punch

Thursday, July 14, 2011

Play Ball!

My nephew has always been a baseball junkie! He played as soon as he was able and often played on travel teams as well as the local leagues. His birthday is next month and I finally decided to break down and buy the stamp set Home Run. This will also come in handy as both of my girls play softball!

Card Recipe: cardstock-real red, basic black, whisper white, ink-crumb cake and real red, stamp set- Home Run, accessories-square lattice embossing folder, 1 3/8" circle punch, 1 3/4" circle punch

Sunday, June 12, 2011

Hello and Goodbye...

I just received my new stamp set previews this weekend and couldn't wait to play around! I haven't participated in Stamping 411's sketch challenge in the past 2 weeks and thought this would be a great place to start! I knew I wanted to use Precious Butterflies (a new hostess set), so my next decision was which DSP? Elegant Soiree is retiring from our current catalog and I thought this would make a nice blending of old and new...Which led to my creating wedding cards. You know-something old, something new, something blue (Sorry, nothing borrowed!).
As you can see, I changed the second card a little. This new stamp set is quickly becoming one of my favorites! TFL!
Card Recipe: Stamp Sets-Precious Butterflies, Fabulous Phrases, Card Stock-Crumb Cake, Baja Breeze, and Whisper White, DSP- Elegant Soiree, Inks-Baja Breeze & Soft Suede, Accessories-square lattice embossing folder, baja breeze seam binding ribbon (returning from spring mini), 1 3/4" and 3/4" circle punches