Showing posts with label scallop trim border punch. Show all posts

Sunday, August 11, 2013

Summer Fun-Challenge 25 at ABAC

Hello! I am finally back in blogland after a super crazy two weeks!! Thank goodness for scheduled posting!!  Today I'm sharing my project for Anything But a Card's current challenge: Summer Fun!!  There are so many different ways to interpret this challenge and just about as many different creations you could make!  While I originally thought about making a scrapbook layout, necessity took over and I'm sharing a fun little summer gift I made instead.

In my family there are SEVEN birthdays in August alone, so our summers are usually filled with cookouts and gatherings to celebrate.  We don't usually do a lot of gift exchanging, but I try to make a little something to give to the birthday person.  We just celebrated my mom's birthday and I made a cute little purse to hold a gift card for her. This is also a great size for a little gift like jewelry, cosmetics, or my personal favorite-chocolate!


I was under the gun to finish this one, so it's pretty CAS, but you could really dress up the base with stamping and inks if you wanted.


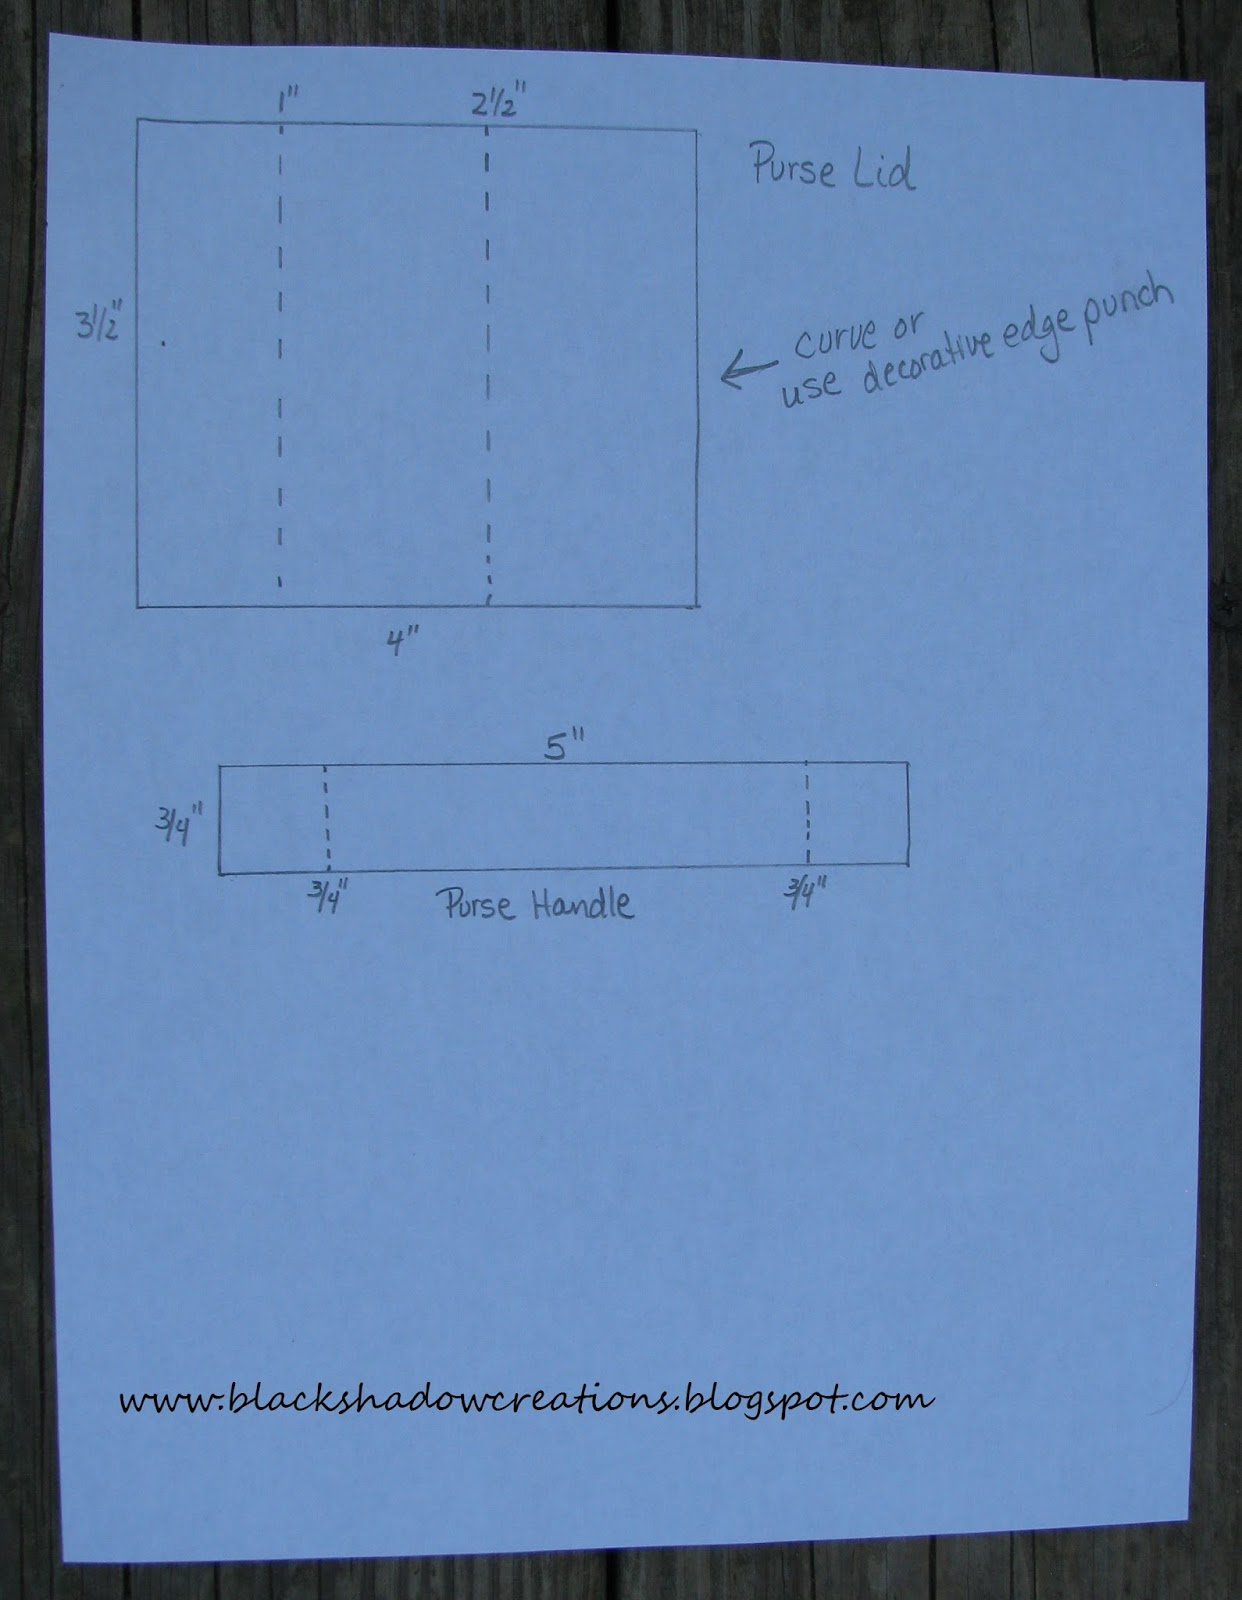
I found the template for this cute little purse at Paper Crafts magazine.  But it was actually easier for me to just make it using the dimensions.  Also, I found an error in the measurements on the top flap of the purse, so if you use their dimensions be sure to change the score line from 2" to 2 1/2" or your flap will not cover the top of the purse!

I started with a piece of yellow cardstock 5"x11" and scored it at 1 1/2" running the length of the 11" side.  Then I turned the paper to the 5" side and scored at 1 1/2, 5, 6 1/2, and 10".  I cut the scored lines to the 1 1/2" score line (look at  photo below if you need a visual).
The solid lines are cutting lines.

The top was created using a piece of pattern paper measuring 3 1/2"x4".  Here is where I found the mistake on the original.  Score at 1" and 2 1/2" (not 2" if you use the template from PCm).  I also added a scallop punched edge to mine instead of the curved edge, but you can really do whatever you want on that part.

The handles were two pieces of 3/4"x5" pattern paper.  If you use solid paper, you would only need one, but I used two since I wanted my patterns to match.  Score at 3/4" from each end.

Then it's a pretty simple task of folding and assembling the base and attaching the flap to the top.  Make sure the 1" end of the flap is in back so the longer piece covers the front.  I added an antique brad to dress it up a little.  The handles were glued to the top and then I added the silver brads for a little embellishing.  Then I decorated the front with a stamped birthday sentiment, ribbon, and a cute little flower button.  Easy peasy!

I hope you will play along and link up so I can see what summer fun means to you! You still have a week left!!

Project Recipe: Paper-yellow cardstock from stash (unknown maker), Play Date dsp (ret), Ink- tempting turquoise, Stamp Set-Label Love, Accessories-artisan label punch, scallop trim border punch, antique brads, silver brads, real red 1/4" stitched grosgrain ribbon, turquoise button (ret), white bakers twine

On a personal note, many of you know I recently 'retired' from my career as a preschool teacher and was debating what my next venture would be.  About two weeks before my girls were due to go back to school, I received a call from a friend telling me a local school corporation was looking for aides and that I should apply.  I still wasn't sure exactly what I wanted to do, but also knew that money would be super tight if I didn't do something, so I filled out an application and submitted my resume.  After interviewing and receiving a couple of different offers.  I decided to take a position as a special needs instructional assistant at the middle school level.  It was quite serendipitous that I was undecided between this position and a kindergarten position, when I found a quote by Caroline Myss- "Always go with the choice that scares you the most, because that's the one that is going to require the most from you."   So I went completely out of my comfort zone and I have to say that after my first week, I really enjoy it.  It is a challenge and I'm still learning my way, but everyone has been so supportive and I feel like I've contributed at the end of the day.  It's also a blessing to not be the one responsible for creating the lesson plans and charting the progress!

Have a wonderful week and happy crafting!

Wednesday, October 10, 2012

Scrapbook Wednesday with a hint of Flashback Friday

Hi! So glad you stopped by to visit my blog today!  I decided to rearrange my scrapbook posting day to Wednesday instead of Monday.  I'm hoping this will give me a little more time between design teams to get my regular posts on here. I'm also calling this a hint of Flashback Friday because I have used a lot of retired goodies from my stash on this layout.


The pictures are from a few years ago when DD#2 was chosen as the student of the month for her class.  As if that recognition wasn't enough to make her head swell, she was then chosen as the corporation's student of the month for the entire elementary school.  She received a very nice award at the school board meeting and even had her name on the school's message board.  We were a little proud as well!  I wanted both pictures on one page and since she wore pink in one picture and red in the other, I thought Sending Love DSP would work nicely.  There are hints of glitter in the DSP which DD loved.  I used an old Page Maps sketch for the layout and as I was working on the layout and digging through my stash, I found a pretty in pink scallop circle from who knows where.  This sparked the idea for the little 'flower' embellishment on the bottom half.

Well, I think I hear a mountain of dirty laundry calling my name... better go tell it to be quiet :P
Hope you have a fantastic rest of the week and find some time to be crafty!

Page Recipe: Cardstock-red base from stash, very vanilla, Sending Love DSP (ret), real red, pretty in pink, chocolate chip, Ink-chocolate chip, Stamp Set-Notes and Details (ret), Accessories-scallop trim border punch, 2 1/2" circle punch, 1" circle punch, 2 3/8" scallop circle punch, large scallop circle punch, corduroy buttons (ret), chocolate chip twill ribbon (ret), bakers twine (dyed chocolate chip), snow burst embossing folder, big shot

Saturday, September 22, 2012

Anything But a Card Challenges #2- Texture

So glad you stopped in to visit my little ol' blog today!  We have a challenge going on at Anything But a Card Challenges to make anything but a card with TEXTURE!!  Think fabric, canvas, wire, fibers, embossing, layering, crimping, studs, jewels...you get the picture!  Now any of my regular followers will be shocked that my first thought was FABRIC. Yes... I know...don't faint on me!  It is true that I do not sew if I can help it, but for whatever irrational reason, I have quite a bit of Stampin' UP's fabric.  Some were give aways from my upline, others I bought thinking I would do something with them.  Not that the reason matters, what is important is I have this stuff just sitting in a container taking up space and taunting me.  So when I saw the new sticky rounds in the Holiday catalog, I knew that this could be the solution to my neglected fabric stash!

Here is what a non-sewing scrapbooker does with fabric (and ribbon)...


Now I have to give a small warning... These can be a bit frustrating until you get the hang of twisting and sticking as you go, but once you get the hang of it, they are a little addictive.  I had intended to make one or two out of fabric, but ended up making several, some made with seam binding ribbon as well!  Between the fabric flowers and the Vintage Flowers embellishments, there is quite a bit of texture on this page.  This might have posed a problem if I was going to put it in an album, but I decided this one will be going in a 12x12 shadowbox frame, so 'lumpiness' will not be an issue! Oh, it's not showing up in the picture, but my cardstock base is textured too!


You still have time to play along with us and link up your creation with texture!  Hope to see you there!!  

Page Recipe: Cardstock-Baja breeze, very vanilla, pear pizzazz, Springtime Vintage DSP (ret), Stamp Sets-Curly Cute, Reason To Smile, Accessories-Baja breeze & rose red seam binding, vintage flowers, bird builder punch, springtime vintage fabric, scallop trim border, jumbo sticky rounds


Friday, July 13, 2012

Flash Back Friday


Happy Friday!  I realize it is Friday the 13th, but since 13 tends to be a good number for me (married on 13th, child born on 13th, first home had 13 in the address), I don't buy into the whole 'bad things' superstition.  Besides, isn't any Friday a good day, regardless of the date!  I am a little sad that I have less than a month of summer vacation left...

Today, I have yet another Christmas card for you!  The good news is I made 3 other cards besides this one and now my Merry Moments is all but gone!  So while I will continue to make at least one Christmas card a week (trying to stay ahead!), there will be a lot more new products and a wider variety of cards, after the last three are posted!  

Once again, I've used a Merry Monday sketch-#9 to be exact.  This seemed to be a good sketch as well (still grumbling about the complete loss of mojo on #7!) and the ornament just seemed to be the perfect thing to put on the center panel!


The pattern I punched out is probably my favorite design out of the entire package.  I'm a little sad it's all  but gone, but I am sure I will find a new favorite to replace it! My Flash Back items are the DSP (obviously!) and the now retired snow burst embossing folder (still sad about this one...), and the stamp set.

I hope you have a wonderful weekend and are able to find a little time to be crafty!

Card Recipe: Cardstock-crumb cake, very vanilla, real red, Merry Moments DSP (ret), Ink-chocolate chip, Stamp Set-warm words, Accessories-snow burst folder (ret), perfect polka dots folder, ornament punch, bitty banners framelits, lucky limeade bakers twine, scallop trim border punch

Tuesday, June 26, 2012

Birthday Smooches

My stampin' club met this past weekend and we had a great time!  I was so excited to show off some of the new DSP and stamps from the 2012/13 catalog!

This is one of the three projects we created.  I absolutely love the Memorable Moments stamp set! Such an easy way to make a birthday or anniversary card more personal!


The red buttons on my card are retired.  This way the ladies in the club could have their choice of the flower shaped buttons from the brights button collection. Plus it was good excuse to use some of my older SU buttons!!

Card Recipe: Cardstock- tempting turquoise, daffodil delight, whisper white, Summer Smooches DSP, Ink- stazon black, tangerine tango, Stamp Set-Memorable Moments, Accessories-labels framelits, big shot, scallop trim border punch, brights buttons, white bakers twine

I also wanted to share a personal photo today.  Every year, my girls and I attend several of our local library's summer programs.  Even though my oldest is now in middle school, she still loves seeing the performances.  Last week, the program was 'Zeus, Poseidon, and Percy'.  It was an introduction to mythology and the Percy Jackson series.  DD #1 was so excited when the presenter picked her to dress up as a Greek warrior.  After she put on the gear, he teased her that she must be an Amazonian warrior.  That's my girl!


Got a busy day today...both girls to the dentist in the morning, and a double header at the ball field this evening!  Hoping for some cooler temperatures!!!  Have a great day and happy crafting!


Sunday, June 17, 2012

Hold on to your seats...another Christmas card!

Hope everyone has some special plans for Father's day! We are having a simple family cook out which promised to be laid back and fun!

I have managed to make yet another Christmas card (two actually since I often make two of the same card and share the other with the Moms.) to use up my stash of Christmas DSP.  I have decided that if I can eliminate one whole package of old DSP by July, I will reward myself with a new package during the preorder period for the Holiday Catalog (demo perks-gotta love them!!).  So now my resolve is strong and I am already turning the wheels for the mini albums I always donate to our daycare's annual auction.  A few 6x6 albums ought to help a lot with that paper pile...  Maybe I'll even eliminate 2 pkgs of paper and buy 2 NEW packages! A girl can dream!!  But enough of my musing; you came her to see paper crafting!

So I proudly present my second Christmas card design, once again using a sketch from Merry Monday.  I followed in sequence and used sketch #2, but a good blogging friend suggested that while I continue to work chronologically, I could also do the current sketch.  Therefore, I would get two different cards completed and use up even more paper.  You are so smart, Sherry!!!  So I am going to try to squeeze in the time to complete a card for their next challenge. Apologies in advance for the wonky angle! Not sure what happened there... The black you see is not actually on the card.  It's shadows.  I really need a photography class for properly capturing cards and layout...


My card was based on this sketch...

I absolutely love this stamp set and was so excited that it is now offered in the 'clear' mount version in the new catalog!  Gotta love more options!  This is pretty basic and doesn't really require a lot of explaining.  I used markers to color the tree so the trunk would be brown and the needles, green.  Super easy, but really looks cool...  I didn't put a sentiment on the front because I couldn't find a place to make it work without throwing off the balance of the card, so the sentiment is going on the inside.  I figure if someone receives a card in December, they will know what the occasion is...

Well, that's it for today!  Hope everyone is enjoying their weekend and found some time to play around with their crafty supplies! Thanks for stopping by!!

Card Recipe: Cardstock-very vanilla, chocolate chip, Merry Moments DSP (ret), Ink-garden green, chocolate chip, Stamp Set-Lovely as a Tree, Accessories-scallop trim border punch, chocolate chip scallop dots ribbon

Friday, May 25, 2012

Flash Back Friday- Using Flowers

I'm feeling quite proud of myself today! Since summer vacation began last week, I have managed to go through the girls' closet (got rid of 6 bags of clothes), went through a few storage containers and eliminated 2 of them, AND even found time to be crafty!!! While I was doing my mini cleaning spree, I came across a plastic shoe box container with silk/fabric flowers in it.  I have not used most of these in ages and thought they would be the perfect supplies for my new resolution to use up some of my 'stash'.

So here it is... My first Flash Back Friday Creation...


I decided that in keeping with the 'out with the old' trend, I would pull out some retired DSP to work with as well.  This is Tea Party, a very retired pack from Stampin' UP.  I used an old Page Maps card sketch to create the layout of the card (I actually use those a lot, so it's not really anything new...)

So here is the recipe for my card:
Cardstock-so saffron, pretty in pink, Ink- basic gray, Stamp Set- Curly Cute, Other-scallop trim border punch, Flash Back Items-Tea Party DSP, fabric flowers

Hope you have a wonderful weekend and find some time to be crafty!!

Wednesday, April 18, 2012

Another Scrapbook Day -Fun Flowers

Happy Wednesday, everyone!  Half way to the weekend! Woo! Hoo!

Today's page is another from my sister's album.  Her favorite color is purple so I had to add some purple accents on the pages.  If you notice the birthday cake in the picture, you will see my daughter's birthday cake.  Their birthdays are 3 days apart and it was so easy to surprise my sister by telling her it was my daughter's party.  She was quite surprised!


I made the flowers using the Fun Flowers die.  It is such a great die for layered flowers. I really wish I would have brought more of my embossing folders to the crop to add texture to these, but you can't bring everything to a crop! Oh, well!  I decided to vary the centers of the flowers-antique brad, glitter brad, and a ribbon knot.

Well, I'm a few pages closer to finishing this album! Only about 10 more to go...sigh... I have a club meeting and a wedding this weekend, so I won't find a lot of crafting time.  Good thing I accomplished  so much at the crop!

Page Recipe: whisper white and basic black cardstock, purple and dp scroll from stash, Just Journaling stamp set, black stazon and elegant eggplant ink (sponging), scallop trim border punch, fun flowers die, antique brads, basics glimmer brads, purple handmade ribbon from Sherry

Sunday, April 1, 2012

Another CASE!

I had grand plans of spending full days of my spring break crafting the hours away.  But the reality was days full of cleaning out closets, laundry, grocery shopping, gardening, running DD to practice, and hanging out with my girls.  We even had a cookout and campfire one evening!  Not a bad way to spend a week, but it did make it a bit difficult to be completely immersed in creating.  So I did the next best thing.  I looked at other's fantastic creations and made my version.  Super creative...not really.  Relaxing and quick...definitely!

Today's card is a CASE of a card made a long time ago by my upline Kelly.  I loved the overall design of the card and after spending most of the day outside, I thought the butterfly stamp was just calling to be inked up!


A pretty self explanatory card.  Hope you have a wonderful day and a great rest of the week!

Card Recipe: Cardstock-Cheerful Treat DSP, bashful blue, lucky limeade, whisper white, Ink-bashful blue, black Stazon, Stamp Sets- Butterfly Prints, Precious Butterflies (sent) Punches-corner rounder, butterfly punch, scallop trim border punch, Extras-melon mambo scallop dots ribbon


Saturday, January 28, 2012

Clean and Simple Sketch

This has been one of those crazy weeks when I really wanted to sit down to create, but other commitments had first billing... TGIF! Grocery shopping finished, dinner made, kids in bed and time to get crafty!!  Clean & Simple Stamping had a great sketch that I really wanted to use to get a few more Valentines done.  I had hoped to be finished by now... Just where did January go anyway?!

I've been determined to use up some of my older DSP, so out came Cottage Wall.  I also used the stamp set Outlined Occasions, which is a Sale-A-Bration item.   As much as I wanted to color in the word Love and the cute little hearts, I resisted in an effort to keep the spirit of CAS!  Of course, I did end up using some Vanilla Shimmer Smooch on the embossed heart...


I even added a little DSP to the inside!


Well, I hope you enjoyed my CAS Valentine.  I actually made a few different cards, but you'll just have to come back to see them later!  Hope you weekend is filled with plenty of opportunities to be crafty!

Card Recipe: Cardstock-pale plum (ret), rich razzleberry, whisper white, Cottage Wall DSP (ret), Ink-pale plum (ret), Stamp Sets-Butterfly Prints, Outlined Occasions, Word Play, Accessories-scallop trim and full heart punches, snow burst embossing folder, Vanilla Shimmer smooch spritz


Tuesday, January 3, 2012

A Sneak Peek!

I've been playing with some NEW goodies from Stampin' UP!  Most of them will be available on January 4th with the release of the Occasions Mini.  The fabulous paper I used will be available during Sale-a-bration which begins January 24th.
As soon as I saw the labels framelits and coordinating stamp set, I knew these would be two of my first purchases!!  Then I realized there was a sentiment stamp set that would also work with these... Needless to say, it was just like Christmas morning when that box arrived on my doorstep.  I really love vintage and if it also happens to be a little shabby, all the better!  Both of the cards I made are going to be mailed, so I took it easy on the embellishments, but I am thinking of making another card adding the crochet trim and some pearls.


 Isn't the DSP gorgeous? It's called Everyday Enchantment and could be yours for FREE with a $50 order placed on or after the 24th!

Well, today I head back to work. I love my job, but it has been so nice being able to stay up late and sleep in every day since Christmas!  It will be nice to get the kids back into a routine again.  They have forgotten how to do their chores since Christmas break...

Card Recipe: Cardstock- pool party, soft suede, very vanilla, everyday enchantment DSP, Ink-soft suede, pool party marker, Stamp Sets-Apothecary Art, Loving Thoughts, Accessories-pastels, scallop trim border punch, square lattice embossing folder, labels collection framelits

Sunday, October 9, 2011

Tea Party and Butterflies

Today I had a little free time between laundry and housework to play along with Simply Stampin' Challenge.  Here is this week's sketch challenge...
I don't ever make square cards, but decided that this time I would stay true to the sketch and make one. When I saw the sketch, I started thinking about all of those layers and what image to use. I was thinking butterflies would be great for the two circles and wanted to go with a softer color palette.  I dug out my retired Tea Party DSP and got busy.   The top two butterflies were stamped, cut out, then attached to the main card.  I did end up changing one little thing about the sketch.  The layer on the left is taller in the sketch than on my card. When I put my layers together, the left piece pretty much covered up the ribbon and I didn't want that! So my left layer is just a bit shorter than the other two.


Card Recipe: Cardstock-whisper white, pretty in pink, Tea Party dsp (ret.), Ink-certainly celery, pretty in pink, so saffron, almost amethyst (ret.), Stamp Set- Precious Butterflies, Accessories- certainly celery ribbon (ret), basic pearls, white gel pen

Friday, September 30, 2011

Finally...an ornament!

This is the third card from my punch class showing how to use the ornament punch in a variety of ways. Although I showed two other ways to make things from this punch, I love using it for the obvious purpose-making an ornament.  I found this sketch over a year ago from Page Maps (LOVE this site!!) and made a few cards last Christmas using it. It is a pretty easy sketch, but looks so pretty and festive!

You can't really tell from the picture, but the candy cane striped paper is all glittery and pretty! All of the DSP is from the new Holly Berry Bouquet in the Holiday mini.  There are lots of pretty prints and glittery papers in this set! Many can be used for all occasions, not just winter and Christmas.

Card Recipe:Cardstock-chocolate chip, very vanilla, Holly Berry Bouquet, Ink- chocolate chip, Stamp Set-Snow Swirled (sentiment), Accessories-ornament punch, linen thread, scallop trim border punch

Monday, September 5, 2011

One Blinged Out Card

I have a special family member with a birthday in the next month and needed to make a special card for her.  I was glad to see that The Paper Players had a birthday card challenge this week.  Then I saw the great sketch challenge at Sketches By Carly and I was ready to go!
Do you ever feel like you're channeling someone else when your finished card is not what you normally create?  My style is generally pretty CAS, not that I don't love embellishments, but I usually end up with a mess when I try to put too much on a card.  Today's card, I couldn't stop myself from adding just a little more bling and I immediately thought of fellow blogger Anne Marie and her glittery, glitzy creations! So, here is my AM channeled, glamorous card...


Card Recipe: Cardstock-whisper white, so saffron, Delicate Dots DSP (ret.), Ink-Black Stazon, so saffron, certainly celery, blender pen, Accessories-scallop trim border punch, so saffron taffeta ribbon, basic rhinestones(16!!) Stamp is non-SU from my stash.

Wednesday, July 20, 2011

Memory Lane

My introduction to paper crafting was after the birth of my oldest daughter. I received a free scrapbooking sample in the mail. I was hooked! Over the years, my interests have grown to include card making and other paper crafting, but I still love to scrapbook. I just don't always have enough time to keep up!  As I was going through some of my older photo CDs, I found these pictures of my youngest daughter when she was in preschool and realized that I had not scrapped them... So here is my walk down memory lane, and my submission to two challenges-Clean and Simple Stamping provided the sketch and the color combo came from Create, Ink!


Layout recipe: cardstock-island indigo, baja breeze, baja breeze & rich razzleberry DSP, ink-rich razzleberry, stamp set- Cute by the Inch, accessories-vintage flowers (ret.) and crumb cake seam binding, scallop circle punch, scallop trim border punch

Wednesday, July 6, 2011

Sketches & Punches & Buttons

I was trying to come up with a title for today's card and kept thinking 'buttons'. Suddenly 'sketches & punches & buttons' popped in my head (you know...'lions and tigers and bears, Oh My!). Warped right? Anyway...I had a sketch from Stamping 411 that I have been looking at this week and had finally decided on a card when I saw the challenge at Hand Stamped Sentiments was using buttons.  I decided to trade out my stamped flowers for buttons to tie the two together.

I tend to over-analyze most of my cards and this one is no exception.  Before I put it together I kept thinking that the large white space was too 'blank', so I dry embossed it.  After finishing the card I thought maybe it looked better with the 'blank' space. Hmm... I may go back tomorrow and try it out, but for now I'm going to be happy with what I have. I do love my little vase made w/ the ornament punch!

Card Recipe: cardstock- daffodil delight, whisper white, wild wasabi, and pacific point DSP from the brights pack, ink-wild wasabi, stamp set-Fabulous Phrases, accessories- ice cream parlor buttons (ret), elegant lines embossing folder, brights brads, ornament & scallop trim border punches

Monday, June 13, 2011

Another Peek!

I have been playing with some of the items that will be available July 1st (demos get to preorder some items :-)  I love this job!).  I also completed a sketch challenge for Clean and Simple Stamping. I have seen so many creative people decorating the inside of their cards as well.  I have never done this. Don't know why...just haven't. But I love the look, so I am going to try to do this more often.
Card recipe: Stamp set-Precious Butterflies, Card Stock-Very Vanilla & Pretty in Pink, Ink-Concord Crush, Pretty in Pink, Basic Gray, & Certainly Celery. Accessories-Scallop Trim Border punch. TFL!

Saturday, June 4, 2011

Tough Guys...


I actually got a little scrapbooking done today.  My pages tend to be pretty basic and I normally don't post them, but this one just called to be shown off...  The pictures are from Easter this year.  It was very wet and rainy, but the kids wanted to go exploring in the woods.  My nephew didn't have appropriate footwear, so he borrowed Grandma's boots which just happen to match my DD.  They are the best of friends and thought this was so funny!  I am still using up some of my stash that is non SU, so if I can't remember who or what it is, I'm sorry! SU products used were chocolate chip and whisper white card stock, Butterfly Prints stamp set, pretty in pink ink, butterfly and scallop trim border punches and basic pearl jewels.  I used the cricut to cut out the letters.

Wednesday, June 1, 2011

Stamping 411 Challenge

I haven't been very crafty since the girls got out of school, so I decided to check out Stamping 411's sketch challenge for this week.  My card changed up the sizes a little, but still stayed pretty true to the original. Here's the recipe...  Stamp set is Because I Care (hostess set).  Papers used were whisper white, so saffron, and chocolate chip, & some retired DSP.  Inks used were certainly celery, so saffron, and blushing bride.  Tools used were scallop trim border punch, and the square lattice embossing folder & Big Shot. TFL!

Saturday, May 7, 2011

A Triple Challenge!


I love making cards, but sometimes things get so busy that I don't make the time.  That's why I love challenge blogs (motivates me every time)!  This card was created based on three different challenges.  The first challenge was the color splash challenge from Hand Stamped Sentiments.  The colors were pretty in pink, bashful blue, and certainly celery.  Then I saw the challenge at SUO Challenges requiring the use of butterflies.  I needed to make my niece a birthday card and the two challenges sounded like just the right combo. But how to put it together?  That's where the ladies at Stamping 411 came in!  Here's the 'recipe' for my triple challenge card...
cardstock- certainly celery, pretty in pink, bashful blue, and whisper white
stamps-Butterfly Prints and Just Believe (sentiment) both from IB&C
ink- certainly celery, pretty in pink, bashful blue, and basic gray
extras- butterfly punch, scallop trim border punch, cert. celery grosgrain ribbon, pretty in pink corduroy brad (retired), basic pearls, big shot & backgrounds 1 texturz plates