Friday, August 30, 2013

Flashback Friday- Surprise!!


Do not adjust your monitor! I am really here with a Flashback Friday again!!!  I am really trying to keep up with my Christmas card making so I'm not freaking out mid December!  So I pulled out some retired Snow Festival dsp.  One of my favorite sheets from this set is the various images placed perfectly in squares.  It is soooo easy to make cards with this and I didn't use a single stamp on these!!  So easy that I managed to make 4 cards in one short sitting!

Another flashback item- Baja Breeze seam binding


Like I said, these were incredibly simple, but I think they turned out pretty cute!  I hope I've inspired you to dig into some of your older supplies and make something new too! Have a wonderful weekend and happy crafting!

Card Recipe:  Paper-Snow Festival, gumball green, primrose petals, soft suede, Accessories- Petals a Plenty embossing folder, Baja breeze seam binding, gumball green stitched satin ribbon, vintage faceted button


Tuesday, August 27, 2013

A little distressed, but it's a good thing!

Hi!!  I think I might finally be establishing a sort of normal routine again!  I finally found time to photograph some of the cards I had made recently, so now I can post them and share!

Today's card is the last of cards we made at my latest stamp club.  I always try to mix things up and we hadn't done a 'guy' card for a while so I decided to pull out Lovely as a Tree.  It tends to be my go-to set for masculine.  And what goes better with a tree than woodgrain?? Maybe some early espresso colored coredinations paper?  I absolutely love this paper!  It has just a hint of texture to it and it's even more wonderful when you emboss and sand it!


I apologize for the washed out pic!  It was very sunny and I just could not get a good pic, indoors or out...  I stamped the tree image in early espresso and the bold detail is gorgeous! Love this stamp!!  I did use a retired brad on the banner, but since I didn't have the new candy dots to match, we made do.

I hope you are having a marvelous week! I celebrated my 29th birthday (again!) yesterday, and my family was so good to me!  Now all I need to do is squeeze in some crafty time and it will be an even better week!  Hope you manage to do the same!!  Thanks so much for stopping by to visit! It makes my day even brighter!!

Card Recipe: Paper-early espresso, early espresso coredinations, sahara sand, very vanilla, Ink-early espresso, Stamp Sets-Lovely as a Tree, Teeny Tiny Wishes, Accessories-woodgrain embossing folder, metallic brad

Sunday, August 25, 2013

ABAC Challenge 26- One Sassy Fairy!

Hello and happy Sunday to you!  I am so glad you are here because I have quite the interesting post today, at least, I hope you find it interesting!

Our current challenge at Anything But A Card Challenges is Fairies or fairy tales.  While I absolutely love this challenge, it was truly a challenge for me.  Now let me clarify that I am not anti-fairy.  I have nothing against the tiny little winged flitters, but my girls never got into the whole fairy themed merchandise and I never bought any fairy images.  I was going online for a digital image, when I stopped by the ABAC site to see the inspiration posted by my incredibly creative teamies.  That is where I found this!  The fairy name generator!!  How fun is this???  So I took a little bunny trail to the website and found my fairy name and background.

My fairy name is
Columbine Cornweb
She creates bounty and harvest. 

She lives in mushroom fields and quiet meadows. 
She can only be seen in the mist of an early morning. 

She wears lilac and purple like columbine flowers and has butterfly wings the colour of yellow corn.

This led me to creating my very own fairy based on the generated information.  The purple was not a problem; I had plenty of that since it's DD #1's favorite color.  I realized I didn't have any columbine images, but I did buy a gorgeous retired SU coneflower and grass stamp recently.  Besides, if I'm truly a fairy that lives among the meadows, wouldn't I love coneflowers just as much?!

I managed to create the background without a glitch when I realized I still needed a fairy... Hmmm... I did have a Sassy Susie stamp that might work.  Yep! She's even sitting in a chair! Hmm...chairs in a meadow? What I needed was a mushroom.  So I punched an oval and rounded the bottom with a circle punch and used the word window punch to make the stem. A little fussy cutting and Sassy Susie, um I mean Columbine was almost ready.  A butterfly punch, vellum, and some elegant eggplant ink created the snazzy wings and now Columbine was ready to perch on her toadstool.  I also found a sentiment from Blooming With Happiness that fit her pesonality.  It wasn't until I posted my picture with the information that I noticed that her wings were supposed to be yellow... Oops! It was a little too late to change them now.  Honestly I'm not completely sold that I would have corn yellow wings anyway.  Growing up on a farm, I am aware that corn is tasty, but it's also very 'hairy' and itchy. I would much rather have lovely eggplant purple wings!

So here is Columbine Coneflowerweb, taking a break from germinating and planting to say 'hello'!  She would love it if you would join us this week with your own fairy or fairy tale creation!  Be sure to check out the fabulous creations shared by the design team as well!


Have a fairy-tastic week and happy crafting!!

Project Recipe: Paper-whisper white, vellum, Ink-wisteria wonder, elegant eggplant, certainly celery, baked brown sugar, blush blossom, basic black, crumb cake, Stamp Set-Sassy Susie, Blooming With Happiness, Inspired by Nature, Accessories-pastels, butterfly punch, 1 3/4" circle punch, large oval punch, word window punch

Monday, August 19, 2013

Anything But a Card Challenge 26- Fairy Tales or Fairy Theme

Hello! Running a bit behind with my post, but there is still plenty of time to play along at Anything But a Card's current challenge.  Our theme this time around is Fairy Tales or just good ol' Fairies!! There is even a fun link to find your very own fairy name!!  Team one is sharing some absolutely marvelous inspiration pieces and we hope you will link up and share with us too!  I will be sharing my creation next week.


Just for fun, I tried out the fairy name website and here is the result...

My fairy name is
Columbine Cornweb
She creates bounty and harvest. 
She lives in mushroom fields and quiet meadows. 
She can only be seen in the mist of an early morning. 
She wears lilac and purple like columbine flowers and has butterfly wings the colour of yellow corn.

Not sure about the whole early morning thing, but I love everything else!!
I hope you have a wonderful week and that you find some time to make your own fairy creations and share them with us!! Happy Crafting!

Sunday, August 11, 2013

Summer Fun-Challenge 25 at ABAC

Hello! I am finally back in blogland after a super crazy two weeks!! Thank goodness for scheduled posting!!  Today I'm sharing my project for Anything But a Card's current challenge: Summer Fun!!  There are so many different ways to interpret this challenge and just about as many different creations you could make!  While I originally thought about making a scrapbook layout, necessity took over and I'm sharing a fun little summer gift I made instead.

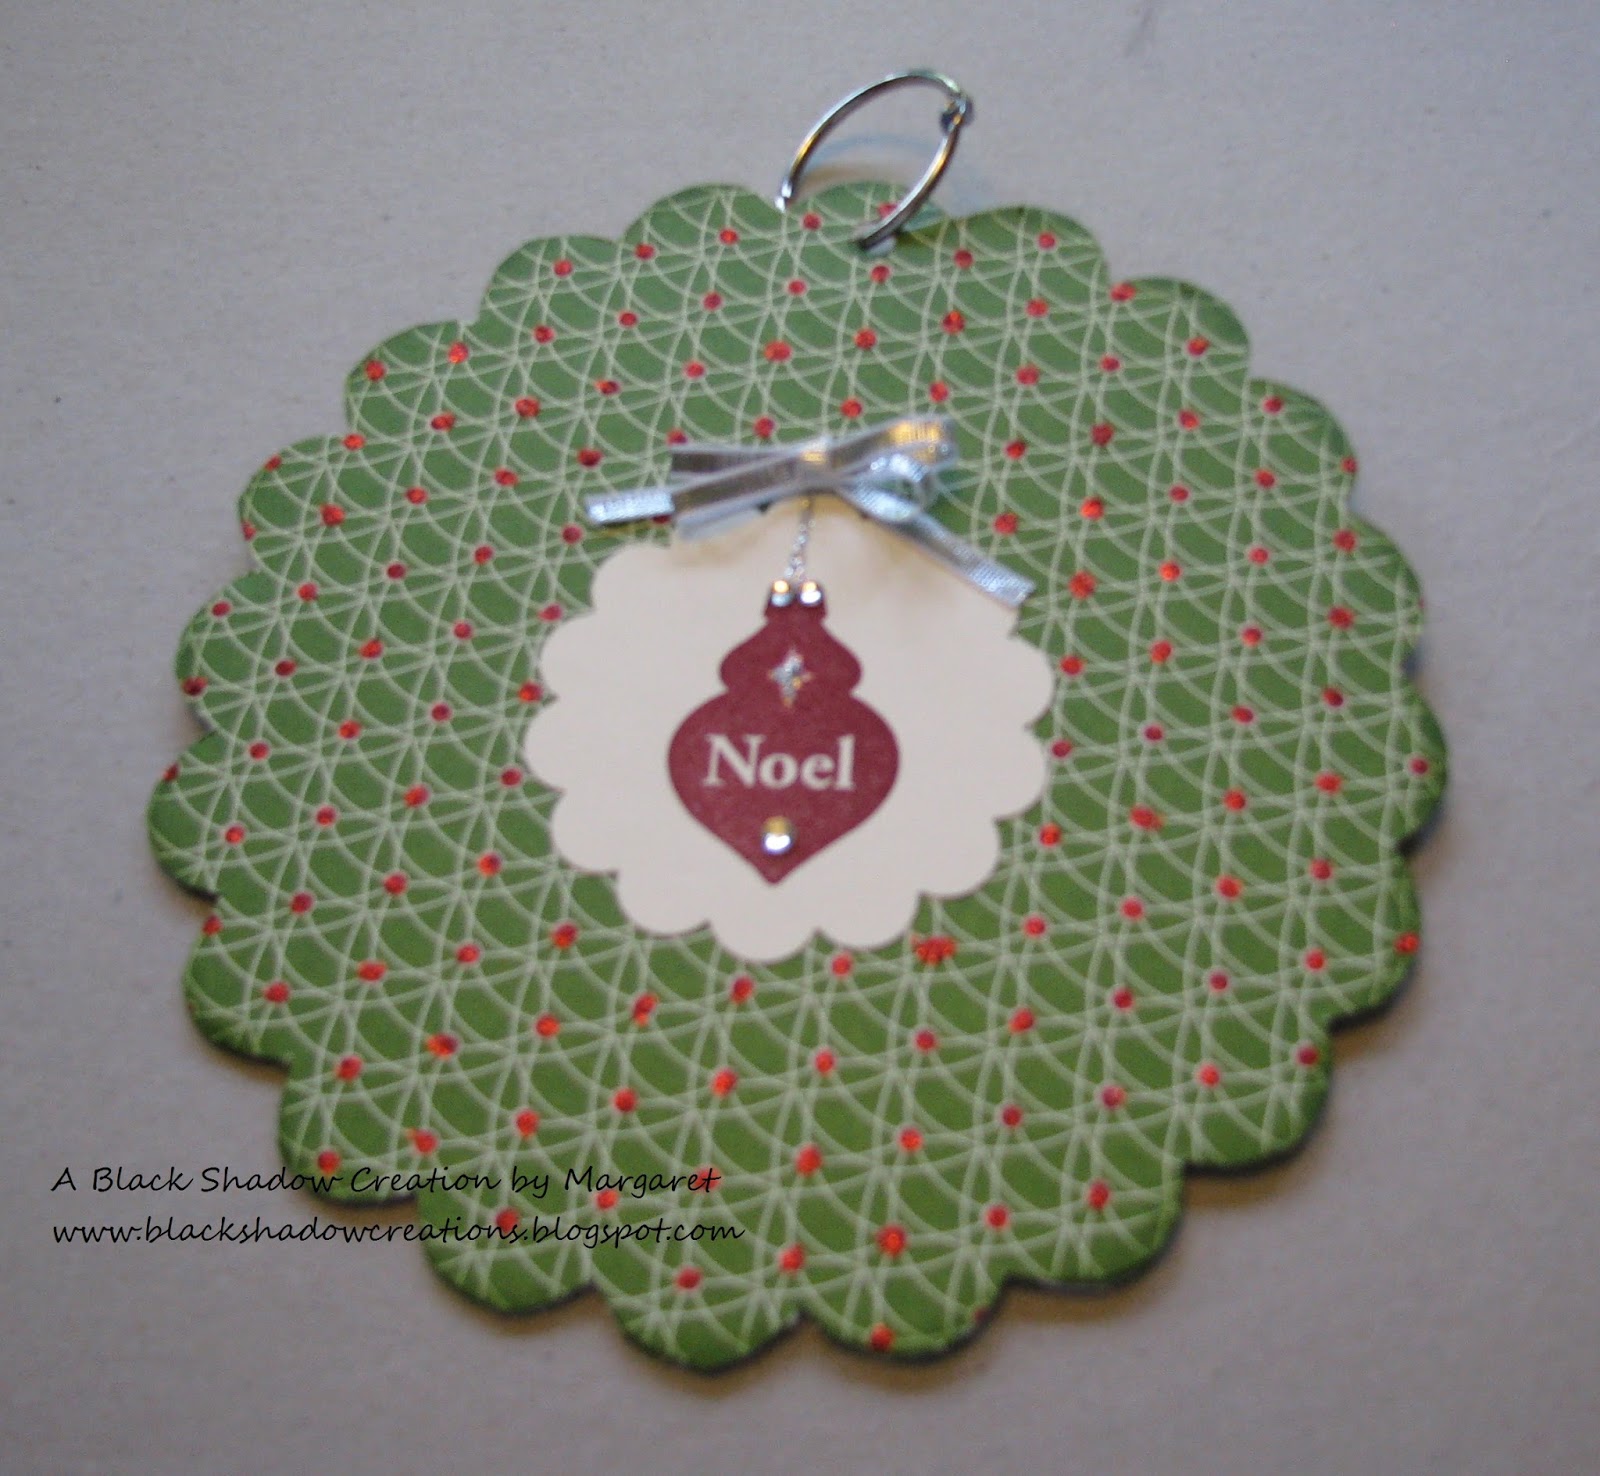
In my family there are SEVEN birthdays in August alone, so our summers are usually filled with cookouts and gatherings to celebrate.  We don't usually do a lot of gift exchanging, but I try to make a little something to give to the birthday person.  We just celebrated my mom's birthday and I made a cute little purse to hold a gift card for her. This is also a great size for a little gift like jewelry, cosmetics, or my personal favorite-chocolate!


I was under the gun to finish this one, so it's pretty CAS, but you could really dress up the base with stamping and inks if you wanted.


I found the template for this cute little purse at 
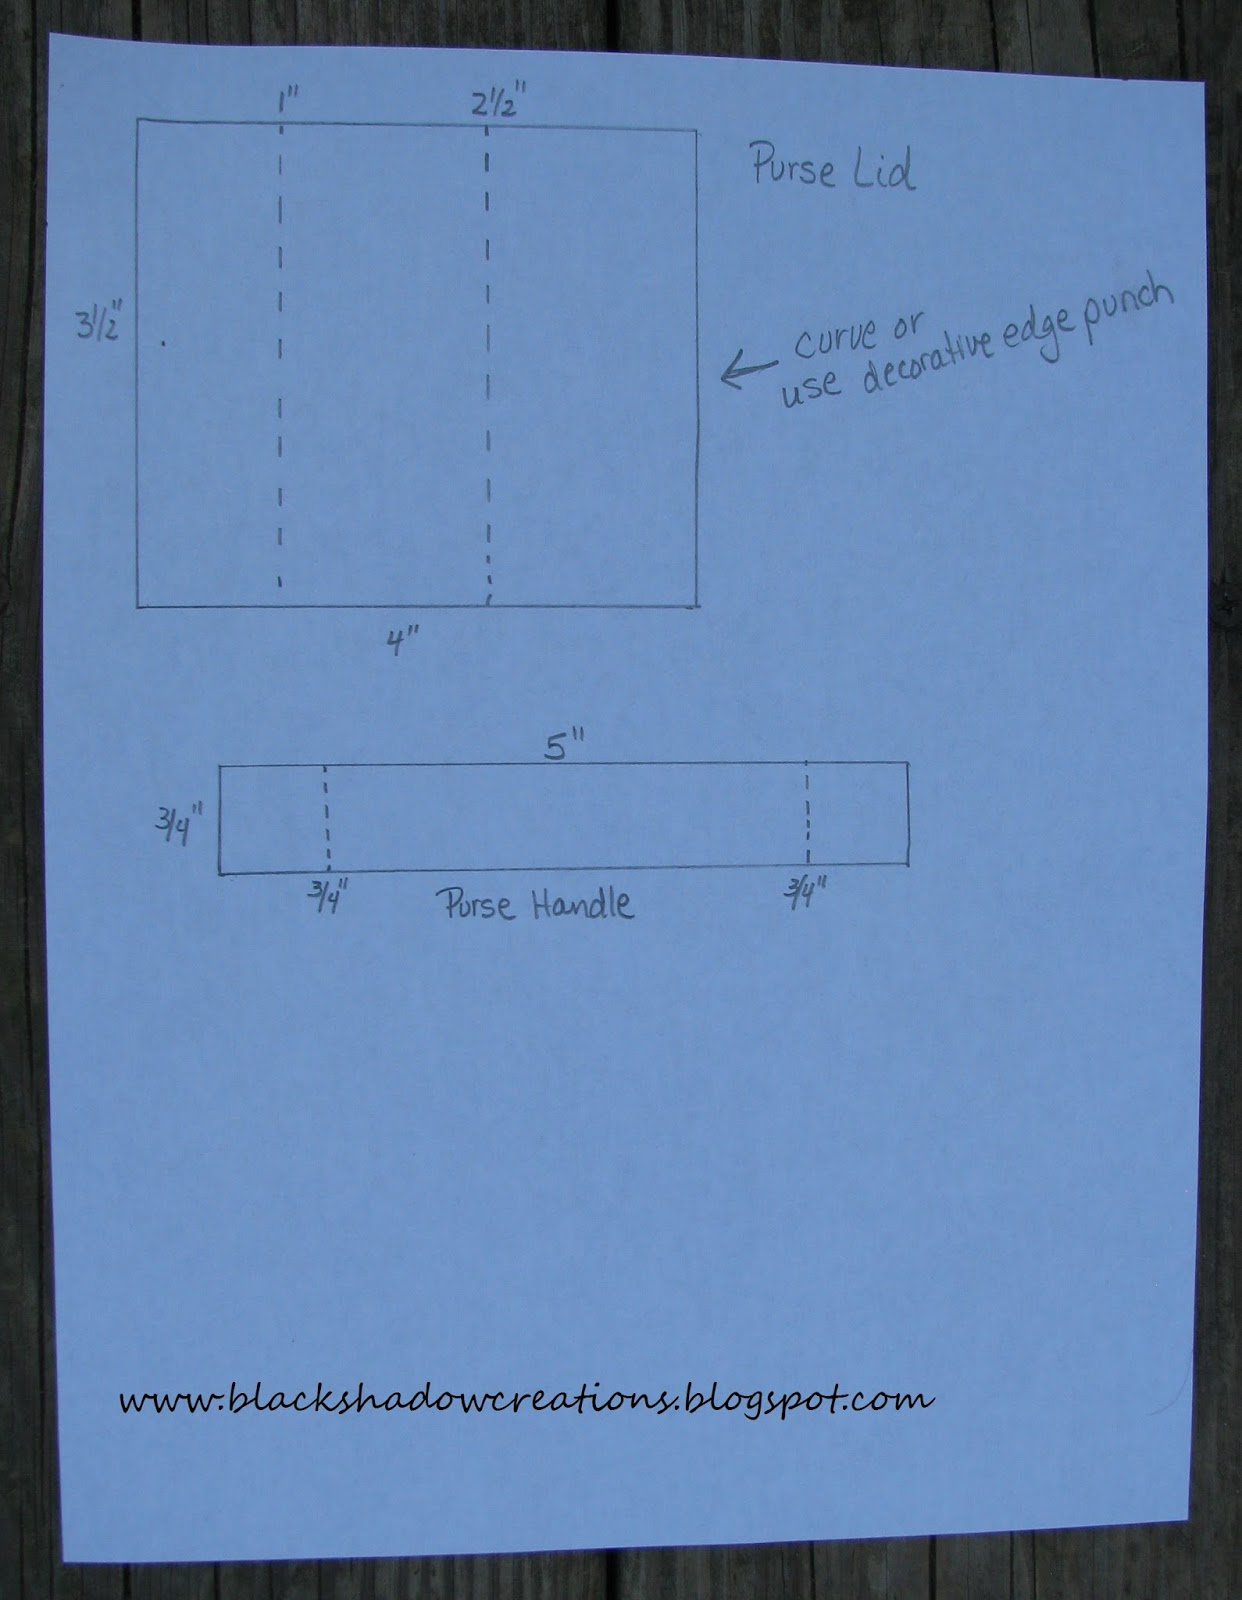
Paper Crafts magazine.  But it was actually easier for me to just make it using the dimensions.  Also, I found an error in the measurements on the top flap of the purse, so if you use their dimensions be sure to change the score line from 2" to 2 1/2" or your flap will not cover the top of the purse!

I started with a piece of yellow cardstock 5"x11" and scored it at 1 1/2" running the length of the 11" side.  Then I turned the paper to the 5" side and scored at 1 1/2, 5, 6 1/2, and 10".  I cut the scored lines to the 1 1/2" score line (look at  photo below if you need a visual).
The solid lines are cutting lines.

The top was created using a piece of pattern paper measuring 3 1/2"x4".  Here is where I found the mistake on the original.  Score at 1" and 2 1/2" (not 2" if you use the template from PCm).  I also added a scallop punched edge to mine instead of the curved edge, but you can really do whatever you want on that part.

The handles were two pieces of 3/4"x5" pattern paper.  If you use solid paper, you would only need one, but I used two since I wanted my patterns to match.  Score at 3/4" from each end.


Then it's a pretty simple task of folding and assembling the base and attaching the flap to the top.  Make sure the 1" end of the flap is in back so the longer piece covers the front.  I added an antique brad to dress it up a little.  The handles were glued to the top and then I added the silver brads for a little embellishing.  Then I decorated the front with a stamped birthday sentiment, ribbon, and a cute little flower button.  Easy peasy!

I hope you will play along and link up so I can see what summer fun means to you! You still have a week left!!

Project Recipe: Paper-yellow cardstock from stash (unknown maker), Play Date dsp (ret), Ink- tempting turquoise, Stamp Set-Label Love, Accessories-artisan label punch, scallop trim border punch, antique brads, silver brads, real red 1/4" stitched grosgrain ribbon, turquoise button (ret), white bakers twine

On a personal note, many of you know I recently 'retired' from my career as a preschool teacher and was debating what my next venture would be.  About two weeks before my girls were due to go back to school, I received a call from a friend telling me a local school corporation was looking for aides and that I should apply.  I still wasn't sure exactly what I wanted to do, but also knew that money would be super tight if I didn't do something, so I filled out an application and submitted my resume.  After interviewing and receiving a couple of different offers.  I decided to take a position as a special needs instructional assistant at the middle school level.  It was quite serendipitous that I was undecided between this position and a kindergarten position, when I found a quote by Caroline Myss- "Always go with the choice that scares you the most, because that's the one that is going to require the most from you."   So I went completely out of my comfort zone and I have to say that after my first week, I really enjoy it.  It is a challenge and I'm still learning my way, but everyone has been so supportive and I feel like I've contributed at the end of the day.  It's also a blessing to not be the one responsible for creating the lesson plans and charting the progress!

Have a wonderful week and happy crafting!

Tuesday, August 6, 2013

Holiday Catalog

Hello! Just popping in quickly to let you know that the NEW Holiday catalog is now available!  Click on the photo below to check out all of the wonderful goodies that are new just in time for the upcoming holidays!!


I will be missing from blogland for a few days.  I'm starting a new job and will be quite busy with that and back to school time.  So if I haven't visited your blog, don't worry, I'll be there eventually!!  Hope you have a fabulous day and happy crafting!!

Monday, August 5, 2013

Anything But a Card-Challenge 25

Hello! I hope you had a marvelous weekend!! Once again, I'm running behind schedule on my post for ABAC...  But no worries because you still have almost 2 weeks to play along on our newest challenge!

The new Challenge... Anything But a Card Challenge 25 brings us back to the current season "SUMMER FUN". Summer Fun! Splish-splash for hot fun in the summertime! For this challenge it could be all things summer, vacation, tropical beaches, sun, summertime colors {orange, bright blue, teal, yellow, tan} - anything goes! Just remember create anything except a card... and to have FUN!!!


Doesn't get much better than this!  I will be sharing my creation next week.  I hope you find time to make something fun and summery to share with us!!  Be sure to check out the inspiration provided this week by our fabulous design team!!

Wednesday, July 31, 2013

The last of the mini album

Hello again! As promised, I'm sharing the last of my mini Christmas Traditions album.  I did manage to keep the washi obsession to only one page today!

an old glimmer brad & using up some retired paper too...

finally using some stickles I've had for ages
-a green and red mixture

pulled out the silver glass glitter too!


I managed to pull out some neglected supplies for this project.  I hadn't used the glass glitter in ages and almost forgot how awesome it looks.  I HAD to have this bottle of red and green stickles a few years ago and this is the first time I've used it...  I also used a little more of Be of Good Cheer DSP left over from last year.  I was amazed at how many things I pulled out for this album.  Usually I try to keep everything really simple and don't pull out the fancy stuff, but it was a lot of fun playing with the pretties and not really all that time consuming either.  Once you've brought something out, you might as well keep using it! Maybe that's what happened with the washi... yeah... let's go with that!

We only have a week of carefree days left before school resumes and my girls are determined to fill them with lots of fun activities.  We went to one of the free movies at a local theater this morning and they really want to go to the pool tomorrow.  I'm hoping I can convince them to be crafty on Friday so I can have some playtime too! Wish me luck and happy crafting!!

Project Recipe: Paper-Be of Good Cheer (ret), Ink-black stamp and write marker, cherry cobbler, Stamp Sets-Tags til Christmas, Joyous Celebrations, Accessories- Season of Style washi, silver glass glitter, silver glimmer brad, postage stamp punch, extra large tag punch, circle framelits, very old stickles

Tuesday, July 30, 2013

More Mini Album Pages and a slight addiction...

Well hello! I am so glad you are visiting because I finished my mini album this weekend, and I have pages to share!  We had some rainy weather followed by a drop in temperature this weekend.  I actually had the a/c off and the windows open and it's the end of July!! Crazy!!! Not that I'm complaining...made it a lot easier to mow the grass and pull weeds!

The cooler weather also gave me a little motivation to finish my mini album I started for the current ABAC challenge-Christmas in July.  I also discovered that I have a slight addiction to washi tape.  Once I started using it, I wanted to put it on every page... Sheesh! Well, at least I'm using the stuff!!  I kept my pages pretty simple since the pictures took up most of the space anyway.

I used washi tape to make the stripes.

more washi to add some color...

and a frame made from washi... Are you seeing
the trend here?

I have a few more pages to share, but will save them for another day.  I'm pretty sure there's washi on at least one more...

I also thought I would share a pic of Shadow enjoying the cooler weather. I think he got wind of the kitty post and was slightly offended that I would allow them to have the spotlight...


Well, I have promised my youngest a fun filled day so I better get off of here!! Have a wonderful day and happy crafting!!

Project Recipe: Ink-black stamp and write marker, cherry cobbler, Stamp Set-Tags Til Christmas, Accessories-Season of Style washi tape, scallop square punch, chipboard album, vintage white acrylic paint


Sunday, July 28, 2013

Anything But a Card Challenge 24-Christmas Album

Hello! We are in week 2 of challenge 24 at Anything But a Card Challenges.  Our challenge is to celebrate Christmas in July (or Hanukkah, Kwanzaa, or winter) and you are welcome to share just about anything!

I had originally planned to scrapbook some photos from past Christmases, but it has been so terribly hot and humid here this week that I just couldn't get myself motivated.  I did however begin to alter a chipboard mini album which will feature some of my favorite holiday tradition photos.

The chipboard album came from the clearance bin at Michaels.  I think they were a quarter and I just couldn't pass them up.  Since I'm making an effort to actually use some of these things instead of letting them gather dust, I chose the wreath shape for this week's project.


I also used the retired Be of Good Cheer DSP.  This pattern reminded me of a berry covered holly wreath, so much so that I added some cherry cobbler dazzling details to really make the dots dimensional and festive! The silver ribbon is from the new Holiday catalog which goes live on August 1st.  I absolutely love this!! It's the perfect size for cards and smaller creations and it's so pretty!!

a close up showing the 'bling' factor...

On the back side, I painted the chipboard with Folk Art vintage white acrylic paint.  After the paint dried, I added a few strips of Season of Style washi tape (from the new Holiday catalog too) and mounted my photo on another piece of DSP.  I was debating what to add next when a piece of cherry cobbler tulle caught my eye.  I played with this a few months ago and opted not to use it.  I wanted a slightly tattered look, so I cut fringes  and scrunched them up before using glue dots to attach my shabby bow.  The snowflake was an extra punched from wax paper for a project completed long ago, but I kept it in my 'someday' container.  Apparently today is 'someday'!


You probably can't tell from the pic, but my DD is making Christmas cards.  The girls and I get together every year with my sister to work on Christmas projects.  Usually it's cards, but we've also made a Christmas Bingo game, and photo ornaments over the years too.

I'm hoping to get a few more pages finished this week since it's the last week of summer vacation.  I'm sure things will get quite a bit busier once the girls are back to their activities and schedules...  Maybe I'll manage to keep myself busy with some crafting projects while they're gone during the day!

I hope I have inspired you to pull out your holiday goodies and make something crafty to link up with our challenge!  Just remember, anything BUT a card!

Project Recipe:  Paper-Be of Good Cheer DSP (ret), very vanilla, Stamp Set-Joyous Celebrations, Ink-cherry cobbler, gumball green(sponging), Accessories-silver dazzling details, cherry cobbler dazzling details, silver 1/8" ribbon, basic rhinestones, large scallop circle punch, non-su snowflake punch, Season of Style washi tape, chipboard mini album, cherry cobbler tulle